

Owner's Manual
Page 2
Call 1-800-468-1502 for the most common system We are here to the store. 69-2210EF-03 ii It is Easy Label wires and remove your old thermostat Install and wire your new thermostat Set your new thermostat to match your heating/cooling system - Installation is preset for wiring assistance before returning the thermostat to help.
Call 1-800-468-1502 for the most common system We are here to the store. 69-2210EF-03 ii It is Easy Label wires and remove your old thermostat Install and wire your new thermostat Set your new thermostat to match your heating/cooling system - Installation is preset for wiring assistance before returning the thermostat to help.
Owner's Manual
Page 4
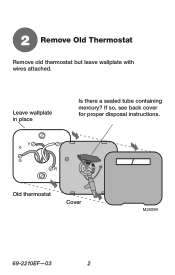
Old thermostat Cover 69-2210EF-03 2 M28099 If so, see back cover for proper disposal instructions. 2 Remove Old Thermostat Remove old thermostat but leave wallplate with wires attached. Leave wallplate in place Is there a sealed tube containing mercury?
Old thermostat Cover 69-2210EF-03 2 M28099 If so, see back cover for proper disposal instructions. 2 Remove Old Thermostat Remove old thermostat but leave wallplate with wires attached. Leave wallplate in place Is there a sealed tube containing mercury?
Owner's Manual
Page 5
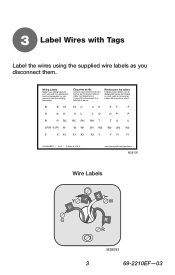
Wire Labels M28100 M28093 3 69-2210EF-03 3 Label Wires with Tags Label the wires using the supplied wire labels as you disconnect them.
Wire Labels M28100 M28093 3 69-2210EF-03 3 Label Wires with Tags Label the wires using the supplied wire labels as you disconnect them.

Owner's Manual
Page 9
Have a Heat Pump system? Call 1-800-468-1502 for wiring assistance. 7 69-2210EF-03 7 Connect Wires Simply match wire labels. M27513 Labels don't match? We are here to help. See page 21. Remove metal jumper if you have both R and Rc wires. See page 14.
Have a Heat Pump system? Call 1-800-468-1502 for wiring assistance. 7 69-2210EF-03 7 Connect Wires Simply match wire labels. M27513 Labels don't match? We are here to help. See page 21. Remove metal jumper if you have both R and Rc wires. See page 14.

Owner's Manual
Page 14
Advanced Installation System setup 13 Wiring 21 Troubleshooting 22 Customer assistance 25 Limited warranty 26
Advanced Installation System setup 13 Wiring 21 Troubleshooting 22 Customer assistance 25 Limited warranty 26

Owner's Manual
Page 15
RTH6400 ASybsotuetmyosuertunpew thermostat Press and hold the s and FAN buttons until the screen changes (approximately 5 seconds). SETUP WIRING ASSISTANCE M28348 Press s or t to exit and save settings. Function 1 Setting 0 Done Next Press DONE to change settings. M28349 Press NEXT to advance to next function. 13 69-2210EF-03 TROUBLESHOOTING
RTH6400 ASybsotuetmyosuertunpew thermostat Press and hold the s and FAN buttons until the screen changes (approximately 5 seconds). SETUP WIRING ASSISTANCE M28348 Press s or t to exit and save settings. Function 1 Setting 0 Done Next Press DONE to change settings. M28349 Press NEXT to advance to next function. 13 69-2210EF-03 TROUBLESHOOTING
Owner's Manual
Page 16
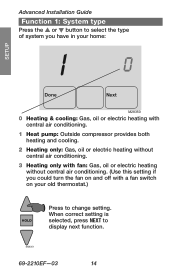
... change setting. SETUP Advanced Installation Guide Function 1: System type Press the s or t button to select the type of system you have in your home: 10 WIRING ASSISTANCE Done Next M28350 0 Heating & cooling: Gas, oil or electric heating with central air conditioning. 1 Heat pump: Outside compressor provides both heating and cooling. 2 Heating...
... change setting. SETUP Advanced Installation Guide Function 1: System type Press the s or t button to select the type of system you have in your home: 10 WIRING ASSISTANCE Done Next M28350 0 Heating & cooling: Gas, oil or electric heating with central air conditioning. 1 Heat pump: Outside compressor provides both heating and cooling. 2 Heating...
Owner's Manual
Page 17
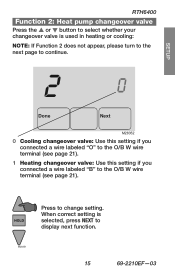
... (see page 21). 1 Heating changeover valve: Use this setting if you connected a wire labeled "B" to the O/B W wire terminal (see page 21). M28351 15 69-2210EF-03 ASSISTANCE TROUBLESHOOTING Press to change setting. SETUP WIRING RTH6400 Function 2: Heat pump changeover valve Press the s or t button to select whether your changeover valve is selected, press NEXT...
... (see page 21). 1 Heating changeover valve: Use this setting if you connected a wire labeled "B" to the O/B W wire terminal (see page 21). M28351 15 69-2210EF-03 ASSISTANCE TROUBLESHOOTING Press to change setting. SETUP WIRING RTH6400 Function 2: Heat pump changeover valve Press the s or t button to select whether your changeover valve is selected, press NEXT...
Owner's Manual
Page 18
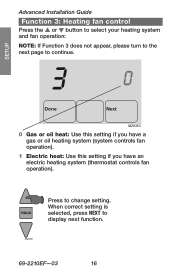
ASSISTANCE TROUBLESHOOTING Press to display next function. When correct setting is selected, press NEXT to change setting. M28351 69-2210EF-03 16 SETUP WIRING Advanced Installation Guide Function 3: Heating fan control Press the s or t button to select your heating system and fan operation: NOTE: If Function 3 does not appear, ...
ASSISTANCE TROUBLESHOOTING Press to display next function. When correct setting is selected, press NEXT to change setting. M28351 69-2210EF-03 16 SETUP WIRING Advanced Installation Guide Function 3: Heating fan control Press the s or t button to select your heating system and fan operation: NOTE: If Function 3 does not appear, ...
Owner's Manual
Page 19
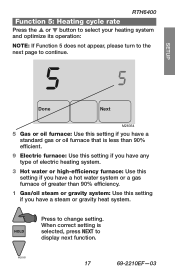
...oil steam or gravity system: Use this setting if you have a standard gas or oil furnace that is selected, press NEXT to change setting. SETUP RTH6400 Function 5: Heating cycle rate Press the s or t button to select your heating system and optimize its operation: NOTE: If Function 5 does not ...appear, please turn to the next page to continue. 55 WIRING ASSISTANCE Done Next M28354 5 Gas or oil furnace: Use this setting if you have a steam or gravity heat system. Press to display next function.
...oil steam or gravity system: Use this setting if you have a standard gas or oil furnace that is selected, press NEXT to change setting. SETUP RTH6400 Function 5: Heating cycle rate Press the s or t button to select your heating system and optimize its operation: NOTE: If Function 5 does not ...appear, please turn to the next page to continue. 55 WIRING ASSISTANCE Done Next M28354 5 Gas or oil furnace: Use this setting if you have a steam or gravity heat system. Press to display next function.
Owner's Manual
Page 20
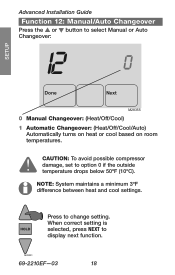
... NOTE: System maintains a minimum 3ºF difference between heat and cool settings. CAUTION: To avoid possible compressor damage, set to select Manual or Auto Changeover: 12 0 WIRING ASSISTANCE Done Next M28355 0 Manual Changeover: (Heat/Off/Cool) 1 Automatic Changeover: (Heat/Off/Cool/Auto) Automatically turns on heat or cool based on room temperatures...
... NOTE: System maintains a minimum 3ºF difference between heat and cool settings. CAUTION: To avoid possible compressor damage, set to select Manual or Auto Changeover: 12 0 WIRING ASSISTANCE Done Next M28355 0 Manual Changeover: (Heat/Off/Cool) 1 Automatic Changeover: (Heat/Off/Cool/Auto) Automatically turns on heat or cool based on room temperatures...
Owner's Manual
Page 21
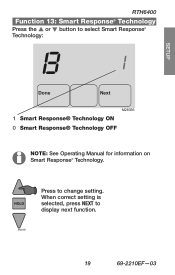
M28351 ASSISTANCE TROUBLESHOOTING 19 69-2210EF-03 When correct setting is selected, press NEXT to select Smart Response® Technology: 13 1 Done Next M28356 1 Smart Response® Technology ON 0 Smart Response® Technology OFF NOTE: See Operating Manual for information on Smart Response® Technology. SETUP WIRING RTH6400 Function 13: Smart Response® Technology Press the s or t button to display next function. Press to change setting.
M28351 ASSISTANCE TROUBLESHOOTING 19 69-2210EF-03 When correct setting is selected, press NEXT to select Smart Response® Technology: 13 1 Done Next M28356 1 Smart Response® Technology ON 0 Smart Response® Technology OFF NOTE: See Operating Manual for information on Smart Response® Technology. SETUP WIRING RTH6400 Function 13: Smart Response® Technology Press the s or t button to display next function. Press to change setting.
Owner's Manual
Page 22
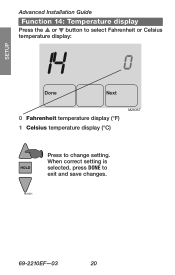
When correct setting is selected, press DONE to change setting. M28351 ASSISTANCE TROUBLESHOOTING 69-2210EF-03 20 SETUP WIRING Advanced Installation Guide AFubnocuttioynou1r4n: eTwemthpermatousrteadt isplay Press the s or t button to select Fahrenheit or Celsius temperature display: 14 0 Done Next 0 Fahrenheit temperature display (°F) 1 Celsius temperature display (°C) M28357 Press to exit and save changes.
When correct setting is selected, press DONE to change setting. M28351 ASSISTANCE TROUBLESHOOTING 69-2210EF-03 20 SETUP WIRING Advanced Installation Guide AFubnocuttioynou1r4n: eTwemthpermatousrteadt isplay Press the s or t button to select Fahrenheit or Celsius temperature display: 14 0 Done Next 0 Fahrenheit temperature display (°F) 1 Celsius temperature display (°C) M28357 Press to exit and save changes.
Owner's Manual
Page 23
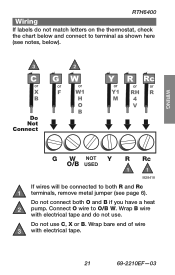
Connect O wire to both O and B if you have a heat pump. RTH6400 Wiring If labels do not use C, X or B. Wrap B wire with electrical tape. 21 69-2210EF-03 SETUP WIRING ASSISTANCE TROUBLESHOOTING M28418 If wires will be connected to O/B W. Do not use . Wrap bare end of wire with electrical tape and do not match letters on the thermostat, check the chart below and connect to terminal as shown here (see page 6). Do not connect both R and Rc terminals, remove metal jumper (see notes, below).
Connect O wire to both O and B if you have a heat pump. RTH6400 Wiring If labels do not use C, X or B. Wrap B wire with electrical tape. 21 69-2210EF-03 SETUP WIRING ASSISTANCE TROUBLESHOOTING M28418 If wires will be connected to O/B W. Do not use . Wrap bare end of wire with electrical tape and do not match letters on the thermostat, check the chart below and connect to terminal as shown here (see page 6). Do not connect both R and Rc terminals, remove metal jumper (see notes, below).
Owner's Manual
Page 24
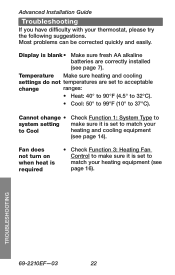
SETUP WIRING Advanced Installation Guide Troubleshooting If you have difficulty with your to Cool heating and cooling equipment (see page 14). Cannot change • Check Function 1: System ...
SETUP WIRING Advanced Installation Guide Troubleshooting If you have difficulty with your to Cool heating and cooling equipment (see page 14). Cannot change • Check Function 1: System ...
Owner's Manual
Page 25
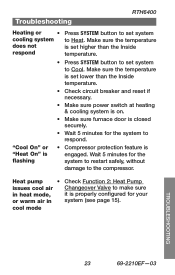
... sure furnace door is properly configured for the system to restart safely, without damage to respond. cool mode ASSISTANCE TROUBLESHOOTING 23 69-2210EF-03 SETUP WIRING Troubleshooting RTH6400 Heating or • Press SYSTEM button to set system cooling system to Cool. Wait 5 minutes for your or warm air in system (see page...
... sure furnace door is properly configured for the system to restart safely, without damage to respond. cool mode ASSISTANCE TROUBLESHOOTING 23 69-2210EF-03 SETUP WIRING Troubleshooting RTH6400 Heating or • Press SYSTEM button to set system cooling system to Cool. Wait 5 minutes for your or warm air in system (see page...

Owner's Manual
Page 26
...• Check Function 1: System Type to is set to make sure it is running at the make sure turn off) bare wires are not touching each other (see page 14). WIRING ASSISTANCE TROUBLESHOOTING 69-2210EF-03 24 same time (or • Grasp and pull thermostat away heat does not from wallplate. Check...
...• Check Function 1: System Type to is set to make sure it is running at the make sure turn off) bare wires are not touching each other (see page 14). WIRING ASSISTANCE TROUBLESHOOTING 69-2210EF-03 24 same time (or • Grasp and pull thermostat away heat does not from wallplate. Check...
Owner's Manual
Page 27
... to cover marks left by old thermostats. WIRING ASSISTANCE TROUBLESHOOTING 25 69-2210EF-03 Accessories/replacement parts To order, please call Honeywell Customer Care toll-free at 1-800-468-1502. SETUP ACbuosutotmyoeur ransseiwsttahnecremostat RTH6400 For assistance with this product, please visit http://DIYthermostats.honeywell.com or call Honeywell Customer Care toll-free at 1-800-468...
... to cover marks left by old thermostats. WIRING ASSISTANCE TROUBLESHOOTING 25 69-2210EF-03 Accessories/replacement parts To order, please call Honeywell Customer Care toll-free at 1-800-468-1502. SETUP ACbuosutotmyoeur ransseiwsttahnecremostat RTH6400 For assistance with this product, please visit http://DIYthermostats.honeywell.com or call Honeywell Customer Care toll-free at 1-800-468...


