
Owner's Manual
Page 1
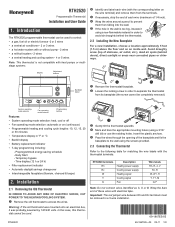
... If necessary, strip the end of each wire (maximum of these wires with the thermostat terminals. Temporary bypass - Installation 2.1 Removing the Old Thermostat IN ORDER TO AVOID ANY RISK OF ELECTRIC SHOCK, CUT POWER TO THE HEATING/COOLING SYSTEM. ...anchors. Pass the wires through the opening of staircase, air outlet, etc.), dead air spots (behind the thermostat. 2.2 Installing the New Baseplate For a new installation, choose a location approximately 5 feet (1.5 m) above the floor and on (continuous) • Programmable heating and cooling cycle lengths...
... If necessary, strip the end of each wire (maximum of these wires with the thermostat terminals. Temporary bypass - Installation 2.1 Removing the Old Thermostat IN ORDER TO AVOID ANY RISK OF ELECTRIC SHOCK, CUT POWER TO THE HEATING/COOLING SYSTEM. ...anchors. Pass the wires through the opening of staircase, air outlet, etc.), dead air spots (behind the thermostat. 2.2 Installing the New Baseplate For a new installation, choose a location approximately 5 feet (1.5 m) above the floor and on (continuous) • Programmable heating and cooling cycle lengths...
Owner's Manual
Page 2
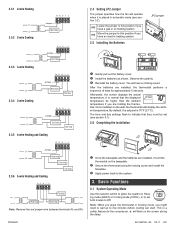
... shown. will flash on the wall, the thermostat will display the ambient temperature. RTH2520 Once the baseplate and the batteries are installed, the thermostat performs a sequence of tests for the compressor. Note: When you place the thermostat in Heating mode (HEAT) or Cooling mode... The jumper specifies how the fan will hear a clicking sound. HG Leave the jumper in automatic mode (see section 5.1). 2.6 Completing the Installation Jumper Heat relay Cool relay Fan relay 2.3.6 5-wire Heating and Cooling Fan relay Heat relay Cool relay Note: Remove the red jumper wire ...
... shown. will flash on the wall, the thermostat will display the ambient temperature. RTH2520 Once the baseplate and the batteries are installed, the thermostat performs a sequence of tests for the compressor. Note: When you place the thermostat in Heating mode (HEAT) or Cooling mode... The jumper specifies how the fan will hear a clicking sound. HG Leave the jumper in automatic mode (see section 5.1). 2.6 Completing the Installation Jumper Heat relay Cool relay Fan relay 2.3.6 5-wire Heating and Cooling Fan relay Heat relay Cool relay Note: Remove the red jumper wire ...
Owner's Manual
Page 3
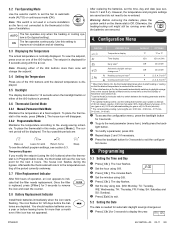
...of the buttons. After replacing the batteries, set the fan to remove the icon and reset the counter. 3.8 Battery Replacement Indicator Install fresh batteries immediately when the icon starts flashing. However, the temperature and program settings are removed. 4. tion menu. 5. Sleep... menu, press the backlight button for 3 seconds to display the year. The house icon will 3.4 Setting the Temperature Press one of installation. Programming 5.1 Setting the Time and Day Press [ Clk ]. buttons more than once will disappear. 3.6.2 Programmable Mode Maintains the...
...of the buttons. After replacing the batteries, set the fan to remove the icon and reset the counter. 3.8 Battery Replacement Indicator Install fresh batteries immediately when the icon starts flashing. However, the temperature and program settings are removed. 4. tion menu. 5. Sleep... menu, press the backlight button for 3 seconds to display the year. The house icon will 3.4 Setting the Temperature Press one of installation. Programming 5.1 Setting the Time and Day Press [ Clk ]. buttons more than once will disappear. 3.6.2 Programmable Mode Maintains the...


