
Owners Manual
Page 1
...may become intense enough to replace loose or worn outlet. 12. Do not use . SAVE THESE INSTRUCTIONS The Honeywell trademark is used by the cord. 13. Oil-filled_OM_rev3.qx 5/1/06 10:17 AM Page 1 OIL-FILLED HEATERS Models: HZ-605C/HZ-680 Series, HZ-680C Series HZ-690 Series, HZ-690C Series HZ-707/HZ...-708/HZ-709/HZ-710 Series HZ-707C/HZ-708C/HZ-709C/HZ-710C Series IMPORTANT SAFETY INSTRUCTIONS When using this heater. 2. Never locate heater where it in use ...
...may become intense enough to replace loose or worn outlet. 12. Do not use . SAVE THESE INSTRUCTIONS The Honeywell trademark is used by the cord. 13. Oil-filled_OM_rev3.qx 5/1/06 10:17 AM Page 1 OIL-FILLED HEATERS Models: HZ-605C/HZ-680 Series, HZ-680C Series HZ-690 Series, HZ-690C Series HZ-707/HZ...-708/HZ-709/HZ-710 Series HZ-707C/HZ-708C/HZ-709C/HZ-710C Series IMPORTANT SAFETY INSTRUCTIONS When using this heater. 2. Never locate heater where it in use ...

Owners Manual
Page 2
...Incorrect If the controls are located at the bottom and the Honeywell logo is now ready for use. • Place the heater on the heater and tighten using the wing nuts provided (Fig. 2). • Turn heater right-side up. Fig. 3 Your heater is upside down to the U-bolts on a firm, ...the wheels incorrectly (Fig. 3). DO NOT OPERATE THE HEATER IF THE WHEELS ARE NOT ASSEMBLED CORRECTLY. • Make sure the heater is still upside-down, position the wheel base assemblies between the end fins. NOTE: THESE MODELS OF OIL-FILLED HEATERS MAY TAKE UP TO SEVERAL MINUTES TO REACH NORMAL ...
...Incorrect If the controls are located at the bottom and the Honeywell logo is now ready for use. • Place the heater on the heater and tighten using the wing nuts provided (Fig. 2). • Turn heater right-side up. Fig. 3 Your heater is upside down to the U-bolts on a firm, ...the wheels incorrectly (Fig. 3). DO NOT OPERATE THE HEATER IF THE WHEELS ARE NOT ASSEMBLED CORRECTLY. • Make sure the heater is still upside-down, position the wheel base assemblies between the end fins. NOTE: THESE MODELS OF OIL-FILLED HEATERS MAY TAKE UP TO SEVERAL MINUTES TO REACH NORMAL ...

Owners Manual
Page 3
...output. • You can select the proper setting to its highest setting. • This heater has 3 levels of heating. This is equipped with three different heat settings (Fig. 5). NOTE: THIS HEATER IS OIL FILLED AND WILL COOL DOWN SLOWLY AFTER THE POWER IS SHUT OFF. Turning the Power unit on ...High and leaving the unit on a circuit when the heater is in the High setting. The Low setting ( ) uses 600 ...
...output. • You can select the proper setting to its highest setting. • This heater has 3 levels of heating. This is equipped with three different heat settings (Fig. 5). NOTE: THIS HEATER IS OIL FILLED AND WILL COOL DOWN SLOWLY AFTER THE POWER IS SHUT OFF. Turning the Power unit on ...High and leaving the unit on a circuit when the heater is in the High setting. The Low setting ( ) uses 600 ...

Owners Manual
Page 4
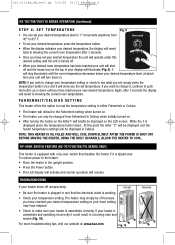
... to change your heat setting, press the heat setting control button up or down until the heater goes off when the set the heater operation time (Fig. 8). If you have reached your desired time. NOTE: THIS HEATER IS OIL FILLED AND WILL COOL DOWN SLOWLY AFTER THE POWER IS SHUT OFF. HZ-707/708/71009...
... to change your heat setting, press the heat setting control button up or down until the heater goes off when the set the heater operation time (Fig. 8). If you have reached your desired time. NOTE: THIS HEATER IS OIL FILLED AND WILL COOL DOWN SLOWLY AFTER THE POWER IS SHUT OFF. HZ-707/708/71009...
Owners Manual
Page 5
... 3 seconds the display will revert to the heater: • Place the heater in the upright position. • Press the Power button. • The LED display will activate and normal operation will resume. NOTE: THIS HEATER IS OIL FILLED AND WILL COOL DOWN SLOWLY AFTER THE POWER IS... SHUT OFF. While the F is assembled and operating incorrectly it is assembled correctly. FAHRENHEIT/CELSIUS SETTING This heater offers the option to read the temperature setting...
... 3 seconds the display will revert to the heater: • Place the heater in the upright position. • Press the Power button. • The LED display will activate and normal operation will resume. NOTE: THIS HEATER IS OIL FILLED AND WILL COOL DOWN SLOWLY AFTER THE POWER IS... SHUT OFF. While the F is assembled and operating incorrectly it is assembled correctly. FAHRENHEIT/CELSIUS SETTING This heater offers the option to read the temperature setting...
Owners Manual
Page 6
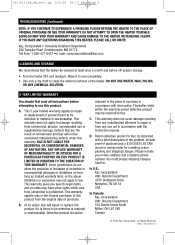
... damage resulting from jurisdiction to be defective in accordance with a brief description of the problem. Oil-filled_OM_rev3.qx 5/1/06 10:17 AM Page 6 TROUBLESHOOTING (Continued) NOTE: IF YOU CONTINUE TO EXPERIENCE A PROBLEM, PLEASE RETURN THE HEATER TO THE PLACE OF ORIGINAL PURCHASE OR SEE YOUR WARRANTY. DO NOT USE WATER, WAX, POLISH...
... damage resulting from jurisdiction to be defective in accordance with a brief description of the problem. Oil-filled_OM_rev3.qx 5/1/06 10:17 AM Page 6 TROUBLESHOOTING (Continued) NOTE: IF YOU CONTINUE TO EXPERIENCE A PROBLEM, PLEASE RETURN THE HEATER TO THE PLACE OF ORIGINAL PURCHASE OR SEE YOUR WARRANTY. DO NOT USE WATER, WAX, POLISH...


