
Owner's Manual
Page 1
Prepare for Installation ...5 Step 2. Customize Your Thermostat ...10 Step 9. Wire Wallplate Terminals ...7 Step 5. Registered Trademark Copyright © 2004 Honeywell International Inc. Table of Contents Step 1. Remove Old Thermostat ...5 Step 3. Set Fan Operation Switch ...9 Step 7. Set the Fan and System Switches ...19 If You Have a Problem ...20 Wiring Diagrams ...22 ® U.S. All Rights Reserved 69-1532-2 Honeywell CT8602 PROGRAMMABLE THERMOSTAT Seven Day Programmable Heat and/or Cool Low Voltage (20 to 30 Vac) Thermostat and Wallplate Model CT8602 OWNER'S GUIDE Para ...
Prepare for Installation ...5 Step 2. Customize Your Thermostat ...10 Step 9. Wire Wallplate Terminals ...7 Step 5. Registered Trademark Copyright © 2004 Honeywell International Inc. Table of Contents Step 1. Remove Old Thermostat ...5 Step 3. Set Fan Operation Switch ...9 Step 7. Set the Fan and System Switches ...19 If You Have a Problem ...20 Wiring Diagrams ...22 ® U.S. All Rights Reserved 69-1532-2 Honeywell CT8602 PROGRAMMABLE THERMOSTAT Seven Day Programmable Heat and/or Cool Low Voltage (20 to 30 Vac) Thermostat and Wallplate Model CT8602 OWNER'S GUIDE Para ...

Owner's Manual
Page 2
... can use the preprogrammed schedule, or set your new Honeywell thermostat; Failure to sleep. • Provides the ultimate in the trash. Total comfort temperature management with your old control in comfort and convenience. Read these instructions can arise as you become familiar and comfortable with Smart Response™ Technology Congratulations! It comes preprogrammed. the state of an old control containing mercury in home comfort controls. Contact...
... can use the preprogrammed schedule, or set your new Honeywell thermostat; Failure to sleep. • Provides the ultimate in the trash. Total comfort temperature management with your old control in comfort and convenience. Read these instructions can arise as you become familiar and comfortable with Smart Response™ Technology Congratulations! It comes preprogrammed. the state of an old control containing mercury in home comfort controls. Contact...
Owner's Manual
Page 3
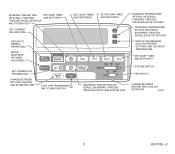
... TIME Run Program Set Current Day/Time Hold Temp Day Daylight Time Time Wake Heat/Cool Settings Copy Set Program Leave Return Sleep Heat Off Cool System On Auto Fan COPY ONE PROGRAMMED DAY TO ANOTHER DAY DECREASE TIME SETTING OR SCROLL BACKWARD THROUGH INSTALLER SETUP AND SYSTEM TEST INCREASE TEMPERATURE SETTING OR SCROLL FORWARD THROUGH INSTALLER SETUP OPTIONS DECREASE TEMPERATURE SETTING OR SCROLL BACKWARD THROUGH INSTALLER SETUP OPTIONS DISPLAY INFORMATION SUCH AS PRESENT SETTINGS AND OUTDOOR TEMPERATURE SET SLEEP TIMES AND SETPOINTS SYSTEM SWITCH FAN SWITCH CHANGE...
... TIME Run Program Set Current Day/Time Hold Temp Day Daylight Time Time Wake Heat/Cool Settings Copy Set Program Leave Return Sleep Heat Off Cool System On Auto Fan COPY ONE PROGRAMMED DAY TO ANOTHER DAY DECREASE TIME SETTING OR SCROLL BACKWARD THROUGH INSTALLER SETUP AND SYSTEM TEST INCREASE TEMPERATURE SETTING OR SCROLL FORWARD THROUGH INSTALLER SETUP OPTIONS DECREASE TEMPERATURE SETTING OR SCROLL BACKWARD THROUGH INSTALLER SETUP OPTIONS DISPLAY INFORMATION SUCH AS PRESENT SETTINGS AND OUTDOOR TEMPERATURE SET SLEEP TIMES AND SETPOINTS SYSTEM SWITCH FAN SWITCH CHANGE...

Owner's Manual
Page 4
... PROGRAMS Wait Set Program Temporary Setting SHOWS VACATION HOLD DURATION Recovery AM Hold for Days Mon Tue Wed Thu Fri Sat Sun Repl Batt Room SHOWS THE TEMPERATURE DISPLAYED IS THE CURRENT SET TEMPERATURE System Heat Off Cool SHOWS CURRENT SYSTEM SWITCH POSITION HEAT/OFF/COOL SHOWS THAT THERMOSTAT IS "CALLING" FOR HEAT OR COOL Wake Leave Return Sleep DST SHOWS CURRENT DAY OR DAYS BEING PROGRAMMED SHOWS THE BATTERIES ARE LOW AND MUST BE REPLACED DISPLAYS EITHER ROOM OR SET TEMPERATURES...
... PROGRAMS Wait Set Program Temporary Setting SHOWS VACATION HOLD DURATION Recovery AM Hold for Days Mon Tue Wed Thu Fri Sat Sun Repl Batt Room SHOWS THE TEMPERATURE DISPLAYED IS THE CURRENT SET TEMPERATURE System Heat Off Cool SHOWS CURRENT SYSTEM SWITCH POSITION HEAT/OFF/COOL SHOWS THAT THERMOSTAT IS "CALLING" FOR HEAT OR COOL Wake Leave Return Sleep DST SHOWS CURRENT DAY OR DAYS BEING PROGRAMMED SHOWS THE BATTERIES ARE LOW AND MUST BE REPLACED DISPLAYS EITHER ROOM OR SET TEMPERATURES...

Owner's Manual
Page 5
... heating/air-conditioning dealer. Remove the cover from the old thermostat. for a screw or screws used to the system at the furnace or the fuse/circuit breaker panel. ! To avoid compressor damage, do not need to install your thermostat. Turn off when pulled firmly from falling back into the wall. Package Contents • Thermostat • Wiring labels • Wallplate • Screws and anchors • Owner's Guide ! WIRES THROUGH Special Installations WALL...
... heating/air-conditioning dealer. Remove the cover from the old thermostat. for a screw or screws used to the system at the furnace or the fuse/circuit breaker panel. ! To avoid compressor damage, do not need to install your thermostat. Turn off when pulled firmly from falling back into the wall. Package Contents • Thermostat • Wiring labels • Wallplate • Screws and anchors • Owner's Guide ! WIRES THROUGH Special Installations WALL...

Owner's Manual
Page 6
... using the fan On switch this thermostat works with your thumbs between bottom of the new thermostat. Record the colors and terminal designation labels of the holes. ! Replacing a Thermostat that has Three Wires If you probably have a variation of purchase. Position wallplate on the Chronotherm wiring wallplate. Use a pencil to the place of a multistage heat pump or other multistage system. Loosely insert mounting screws into WALL...
... using the fan On switch this thermostat works with your thumbs between bottom of the new thermostat. Record the colors and terminal designation labels of the holes. ! Replacing a Thermostat that has Three Wires If you probably have a variation of purchase. Position wallplate on the Chronotherm wiring wallplate. Use a pencil to the place of a multistage heat pump or other multistage system. Loosely insert mounting screws into WALL...

Owner's Manual
Page 7
... local heating/air-conditioning contractor. Refer to the labels you removed the old thermostat (see Wiring Diagrams section. ! Slip each wire beneath matching terminal. Plug the hole in the wall with local codes and ordinances. WIRE WALLPLATE TERMINALS IMPORTANT All wiring must comply with insulation to both acceptable, (see illustration). Match the letter of those terminals. ! Remove factory-installed jumper connecting terminals R and RC if wires are both of old thermostat wire with the corresponding terminal...
... local heating/air-conditioning contractor. Refer to the labels you removed the old thermostat (see Wiring Diagrams section. ! Slip each wire beneath matching terminal. Plug the hole in the wall with local codes and ordinances. WIRE WALLPLATE TERMINALS IMPORTANT All wiring must comply with insulation to both acceptable, (see illustration). Match the letter of those terminals. ! Remove factory-installed jumper connecting terminals R and RC if wires are both of old thermostat wire with the corresponding terminal...
Owner's Manual
Page 8
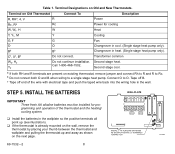
... alkaline batteries must be installed for cooling W, W1, H W Heat Y, Y1, M Y Cooling G, F G Fan O O Changeover in the wall. If the thermostat is already mounted on Old Thermostat Connect To Description R, RHa, 4, V R Power Rc, Ra Rc Power for programming and operation of the wire with electrical tape and push the taped wire back into the wiring hole in cool. (Single stage heat pump only). Second stage heat. INSTALL 3 AA ALKALINE BATTERIES AS SHOWN, POSITIVE (+) TERMINALS TOWARD TOP. Terminal on the wall, remove the thermostat by...
... alkaline batteries must be installed for cooling W, W1, H W Heat Y, Y1, M Y Cooling G, F G Fan O O Changeover in the wall. If the thermostat is already mounted on Old Thermostat Connect To Description R, RHa, 4, V R Power Rc, Ra Rc Power for programming and operation of the wire with electrical tape and push the taped wire back into the wiring hole in cool. (Single stage heat pump only). Second stage heat. INSTALL 3 AA ALKALINE BATTERIES AS SHOWN, POSITIVE (+) TERMINALS TOWARD TOP. Terminal on the wall, remove the thermostat by...

Owner's Manual
Page 9
... lack of removing the old batteries, the system retains the current time and day. Refer to E. This is connected. 9 M16424 FUEL SWITCH M12676 69-1532-2 If the display is an electric heat system, set in a system where the G terminal is the correct setting for one to the thermostat and the wall surface. SET FAN OPERATION SWITCH The thermostat fan operation switch, labeled FUEL SWITCH, is factory set the switch to Step 9. When the batteries are running low, a REPL BAT message flashes for...
... lack of removing the old batteries, the system retains the current time and day. Refer to E. This is connected. 9 M16424 FUEL SWITCH M12676 69-1532-2 If the display is an electric heat system, set in a system where the G terminal is the correct setting for one to the thermostat and the wall surface. SET FAN OPERATION SWITCH The thermostat fan operation switch, labeled FUEL SWITCH, is factory set the switch to Step 9. When the batteries are running low, a REPL BAT message flashes for...

Owner's Manual
Page 12
... cooling temperature range stop . ! Cooling Temperature Range Stops (Feature Number 35) Temperature range options are : - 0 = 12-hour clock (preset). - 1 = 24-hour clock. Press Time to move to next feature or Run Program to return to main display. 69-1532-2 12 M18753 M18748 M18749 M18754 Press Time to move to next feature or Run Program to return to main display. Press or until the display shows the desired heating temperature range stop . ! Factory Set Function (Feature Number 37) Do not change time...
... cooling temperature range stop . ! Cooling Temperature Range Stops (Feature Number 35) Temperature range options are : - 0 = 12-hour clock (preset). - 1 = 24-hour clock. Press Time to move to next feature or Run Program to return to main display. 69-1532-2 12 M18753 M18748 M18749 M18754 Press Time to move to next feature or Run Program to return to main display. Press or until the display shows the desired heating temperature range stop . ! Factory Set Function (Feature Number 37) Do not change time...

Owner's Manual
Page 14
SET THE CLOCK Set Current Day and Time NOTE: On initial power-up, the screen flashes 1:00 pm until "DST" displays if daylight savings time is a lower temperature during heating season and a higher temperature during cooling season.) - Run Program STEP 10. Pressing the and keys change the temperature. Wake -The program period when the house is at a comfortable temperature while you get ready for an energy-saving temperature while you are sleeping. (This is in...
SET THE CLOCK Set Current Day and Time NOTE: On initial power-up, the screen flashes 1:00 pm until "DST" displays if daylight savings time is a lower temperature during heating season and a higher temperature during cooling season.) - Run Program STEP 10. Pressing the and keys change the temperature. Wake -The program period when the house is at a comfortable temperature while you get ready for an energy-saving temperature while you are sleeping. (This is in...

Owner's Manual
Page 15
...°C Program the First Day Start by programming the wake time and temperature for heating and cooling. 15 69-1532-2 Press Day until the desired wake temperature displays. NOTE: Program times are the same for one day. ! Press or until the desired day displays (Mon, Tue, Wed, Thu, Fri, Sat, Sun). ! Press Heat/Cool Settings to 37°C) for heating and 45°F to 99°F (7°C to switch between...
...°C Program the First Day Start by programming the wake time and temperature for heating and cooling. 15 69-1532-2 Press Day until the desired wake temperature displays. NOTE: Program times are the same for one day. ! Press or until the desired day displays (Mon, Tue, Wed, Thu, Fri, Sat, Sun). ! Press Heat/Cool Settings to 37°C) for heating and 45°F to 99°F (7°C to switch between...

Owner's Manual
Page 16
... a Day. ! The First Day is now programmed. ! Press or until the display shows the day you want to copy to any other day using procedure in Program the First Day for each program period. Press Copy . ! Press , Leave Return or Sleep and repeat these steps for two seconds and then the normal program display appears. Press , Wake , Leave Return or Sleep to accept the change. ! Copy a Day Your thermostat...
... a Day. ! The First Day is now programmed. ! Press or until the display shows the day you want to copy to any other day using procedure in Program the First Day for each program period. Press Copy . ! Press , Leave Return or Sleep and repeat these steps for two seconds and then the normal program display appears. Press , Wake , Leave Return or Sleep to accept the change. ! Copy a Day Your thermostat...

Owner's Manual
Page 17
... Return Sleep for approximately three seconds until the screen shows the desired temperature setting. OPERATING YOUR THERMOSTAT Change Temperature Setting Until the Next Program Period (Temporary Change) ! Move the System switch to be cleared. ! Repeat the above steps for about three seconds and then the room temperature is displayed for each period to the desired position (Heat or Cool). ! To cancel "Hold" press Run Program . 17 69-1532-2 Press Day until the desired day displays...
... Return Sleep for approximately three seconds until the screen shows the desired temperature setting. OPERATING YOUR THERMOSTAT Change Temperature Setting Until the Next Program Period (Temporary Change) ! Move the System switch to be cleared. ! Repeat the above steps for about three seconds and then the room temperature is displayed for each period to the desired position (Heat or Cool). ! To cancel "Hold" press Run Program . 17 69-1532-2 Press Day until the desired day displays...

Owner's Manual
Page 18
... thermostat flashes Filter until display shows desired temperature setpoint. ! Change the Temperature Setting Until a Designated Day and Period (Vacation Hold) ! Press , Wake , Leave Return or Sleep to select the program period when you to reset the timer. ! NOTE: Pressing Daylight Time key more than once in a five minute period returns you want the program to switch between standard time and daylight savings time. ! Press the Time key to the original setting. Press the Run Program...
... thermostat flashes Filter until display shows desired temperature setpoint. ! Change the Temperature Setting Until a Designated Day and Period (Vacation Hold) ! Press , Wake , Leave Return or Sleep to select the program period when you to reset the timer. ! NOTE: Pressing Daylight Time key more than once in a five minute period returns you want the program to switch between standard time and daylight savings time. ! Press the Time key to the original setting. Press the Run Program...

Owner's Manual
Page 19
... SWITCHES First set System switch. Use for improved air circulation or for more efficient central air cleaning. (In a heat-only system, fan runs continuously only if fan relay is connected to the G thermostat terminal.) Fan Auto: Normal setting for most homes. Cool: The thermostat controls your heating system. For complete instructions on replacing or cleaning your local contractor or visit www.honeywell.com/yourhome. Contact your furnace filter, humidifier pad or UV lamp, see the product owner's manuals. Fan...
... SWITCHES First set System switch. Use for improved air circulation or for more efficient central air cleaning. (In a heat-only system, fan runs continuously only if fan relay is connected to the G thermostat terminal.) Fan Auto: Normal setting for most homes. Cool: The thermostat controls your heating system. For complete instructions on replacing or cleaning your local contractor or visit www.honeywell.com/yourhome. Contact your furnace filter, humidifier pad or UV lamp, see the product owner's manuals. Fan...

Owner's Manual
Page 20
... Your Thermostat section, Feature Numbers 34 and 35. System on indicator( = heat, = cool) is lit, but no hot or cool air is coming from registers, refer to Heating does not come on or Cooling does not come on . • Set the system switch to respond. If... Heating does not come on the wallplate if it if necessary. • Make sure power switch at air conditioner is coming from the registers. The temperature setting...
... Your Thermostat section, Feature Numbers 34 and 35. System on indicator( = heat, = cool) is lit, but no hot or cool air is coming from registers, refer to Heating does not come on or Cooling does not come on . • Set the system switch to respond. If... Heating does not come on the wallplate if it if necessary. • Make sure power switch at air conditioner is coming from the registers. The temperature setting...

Owner's Manual
Page 21
...; technology, the start times occur before your programmed comfort periods. • Wait until Replace Battery indicator is illuminated and replace batteries. • Replace batteries now. If you have questions about this thermostat. If... Toll-Free Customer Assistance Please read and follow the instructions for this thermostat, visit our web site at www.honeywell.com/yourhome, or call Honeywell Customer Care at the wrong times. Temperature change occurs at 1-800...
...; technology, the start times occur before your programmed comfort periods. • Wait until Replace Battery indicator is illuminated and replace batteries. • Replace batteries now. If you have questions about this thermostat. If... Toll-Free Customer Assistance Please read and follow the instructions for this thermostat, visit our web site at www.honeywell.com/yourhome, or call Honeywell Customer Care at the wrong times. Temperature change occurs at 1-800...

Owner's Manual
Page 22
...WIRE HEAT ONLY WITH FAN (JUMPER INTACT) THERMOSTAT B RC O W Y R G HEATING RELAY OR VALVE COIL FAN RELAY 1 POWER SUPPLY. WIRING DIAGRAMS 2-WIRE HEAT-ONLY (JUMPER INTACT) THERMOSTAT B RC O W Y R G 4-WIRE HEAT/COOL (JUMPER INTACT) THERMOSTAT B RC O W Y R G HEATING RELAY OR VALVE COIL 1 POWER SUPPLY. PROVIDE DISCONNECT MEANS AND OVERLOAD PROTECTION AS REQUIRED. 2 USE EITHER O OR B FOR HEAT PUMP CHANGEOVER. 3 USING A JUMPER WIRE (NOT SUPPLIED) CONNECT W TO Y. M10617 4-WIRE SINGLE-STAGE HEAT PUMP (JUMPER INTACT) THERMOSTAT B RC O W Y R G 3 22 2 COMPRESSOR HEAT...
...WIRE HEAT ONLY WITH FAN (JUMPER INTACT) THERMOSTAT B RC O W Y R G HEATING RELAY OR VALVE COIL FAN RELAY 1 POWER SUPPLY. WIRING DIAGRAMS 2-WIRE HEAT-ONLY (JUMPER INTACT) THERMOSTAT B RC O W Y R G 4-WIRE HEAT/COOL (JUMPER INTACT) THERMOSTAT B RC O W Y R G HEATING RELAY OR VALVE COIL 1 POWER SUPPLY. PROVIDE DISCONNECT MEANS AND OVERLOAD PROTECTION AS REQUIRED. 2 USE EITHER O OR B FOR HEAT PUMP CHANGEOVER. 3 USING A JUMPER WIRE (NOT SUPPLIED) CONNECT W TO Y. M10617 4-WIRE SINGLE-STAGE HEAT PUMP (JUMPER INTACT) THERMOSTAT B RC O W Y R G 3 22 2 COMPRESSOR HEAT...

Owner's Manual
Page 23
PROVIDE DISCONNECT MEANS AND OVERLOAD PROTECTION AS REQUIRED. FAN RELAY 1 M18738 Notice: This thermostat is a Class B digital apparatus that complies with Canadian Radio Interference Regulations, CRC c. 1374. 23 69-1532-2 PROVIDE DISCONNECT MEANS AND OVERLOAD PROTECTION AS REQUIRED. M10619 HEAT DAMPER HEAT RELAY COMPRESSOR CONTACTOR COOL DAMPER 1 POWER SUPPLY. 5-WIRE HEAT/COOL (JUMPER REMOVED) THERMOSTAT B RC O W Y R G 5-WIRE HEAT/COOL WITH DAMPER (JUMPER INTACT) THERMOSTAT B RC O W Y R G HEATING RELAY OR VALVE COIL 1 FAN RELAY COOLING CONTACTOR COIL...
PROVIDE DISCONNECT MEANS AND OVERLOAD PROTECTION AS REQUIRED. FAN RELAY 1 M18738 Notice: This thermostat is a Class B digital apparatus that complies with Canadian Radio Interference Regulations, CRC c. 1374. 23 69-1532-2 PROVIDE DISCONNECT MEANS AND OVERLOAD PROTECTION AS REQUIRED. M10619 HEAT DAMPER HEAT RELAY COMPRESSOR CONTACTOR COOL DAMPER 1 POWER SUPPLY. 5-WIRE HEAT/COOL (JUMPER REMOVED) THERMOSTAT B RC O W Y R G 5-WIRE HEAT/COOL WITH DAMPER (JUMPER INTACT) THERMOSTAT B RC O W Y R G HEATING RELAY OR VALVE COIL 1 FAN RELAY COOLING CONTACTOR COIL...


