
Owner's Manual
Page 1
... Questions ...22 Customer Assistance ...23 Limited Warranty ...24 ® U.S. Registered Trademark Copyright © 2003 Honeywell International Inc. All Rights Reserved 69-1638-1 CT2800 Programmable Thermostat INSTALLATION AND PROGRAMMING INSTRUCTIONS Welcome to 30 Vac) Thermostat and Mounting Plate Model CT2800 Table of comfort and energy savings with your home, keeping you comfortable while saving energy.
... Questions ...22 Customer Assistance ...23 Limited Warranty ...24 ® U.S. Registered Trademark Copyright © 2003 Honeywell International Inc. All Rights Reserved 69-1638-1 CT2800 Programmable Thermostat INSTALLATION AND PROGRAMMING INSTRUCTIONS Welcome to 30 Vac) Thermostat and Mounting Plate Model CT2800 Table of comfort and energy savings with your home, keeping you comfortable while saving energy.
Owner's Manual
Page 2
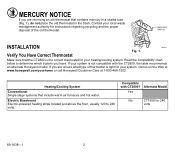
... If you are unsure what type of the old thermostat. Contact your local waste management authority for instructions regarding recycling and the proper disposal of thermostat is not compatible with CT2800? Installation MERCURY SWITCH INSTALLATION Verify You Have Correct Thermostat Fig. 1. If your system is right for... your heating/cooling system. Read the compatibility chart below to 240 volts. Compatible with the CT2800, the table recommends an alternate Honeywell model. Alternate Model Yes No CT1950 for your system, visit us on the Web at www...
... If you are unsure what type of the old thermostat. Contact your local waste management authority for instructions regarding recycling and the proper disposal of thermostat is not compatible with CT2800? Installation MERCURY SWITCH INSTALLATION Verify You Have Correct Thermostat Fig. 1. If your system is right for... your heating/cooling system. Read the compatibility chart below to 240 volts. Compatible with the CT2800, the table recommends an alternate Honeywell model. Alternate Model Yes No CT1950 for your system, visit us on the Web at www...
Owner's Manual
Page 3
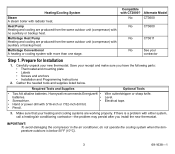
... Gather the needed tools and supplies listed below 50°F (10°C). 3 69-1638-1 Honeywell recommends Energizer® • Wire cutter/stripper or sharp knife. Alternate Model No CT3600 No ...Pump Heating and cooling are produced from the same outdoor unit (compressor) with CT2800? Compatible with auxiliary or backup heat. IMPORTANT: To avoid damaging the compressor in...and mounting plate • Labels • Screws and anchors • Installation and Programming Instructions 2. If there is below . Make sure that your receipt and make sure you install...
... Gather the needed tools and supplies listed below 50°F (10°C). 3 69-1638-1 Honeywell recommends Energizer® • Wire cutter/stripper or sharp knife. Alternate Model No CT3600 No ...Pump Heating and cooling are produced from the same outdoor unit (compressor) with CT2800? Compatible with auxiliary or backup heat. IMPORTANT: To avoid damaging the compressor in...and mounting plate • Labels • Screws and anchors • Installation and Programming Instructions 2. If there is below . Make sure that your receipt and make sure you install...
Owner's Manual
Page 4
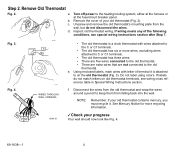
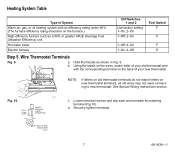
... ✓Check your old thermostat (Fig. 2). Using enclosed labels, mark wires with letter of the following conditions, see wiring cross reference table in Special Wiring Instructions section. If labels do not disconnect the wires. f. NOTE: Remember, if your old thermostat contains mercury, you must recycle it is a clock thermostat with wires... are five wires connected to the old thermostat. • There are extra wires that are not connected to on old thermostat terminals, see special wiring instructions section after Step 7. Step 2.
... ✓Check your old thermostat (Fig. 2). Using enclosed labels, mark wires with letter of the following conditions, see wiring cross reference table in Special Wiring Instructions section. If labels do not disconnect the wires. f. NOTE: Remember, if your old thermostat contains mercury, you must recycle it is a clock thermostat with wires... are five wires connected to the old thermostat. • There are extra wires that are not connected to on old thermostat terminals, see special wiring instructions section after Step 7. Step 2.
Owner's Manual
Page 7
... 2 Use factory setting 1-On; 2-On 1-Off; 2-On Fuel Switch F F 1-Off; 2-On F 1-On; 2-Off E Step 5. d. b. END OF WIRE VISIBLE HERE M20126 7 69-1638-1 a. See Special Wiring Instructions section. Securely tighten terminals. Loosen terminal screws and slip each wire beneath its matching terminal (Fig 10). Using the labels on the wires, match letter...
... 2 Use factory setting 1-On; 2-On 1-Off; 2-On Fuel Switch F F 1-Off; 2-On F 1-On; 2-Off E Step 5. d. b. END OF WIRE VISIBLE HERE M20126 7 69-1638-1 a. See Special Wiring Instructions section. Securely tighten terminals. Loosen terminal screws and slip each wire beneath its matching terminal (Fig 10). Using the labels on the wires, match letter...
Owner's Manual
Page 9
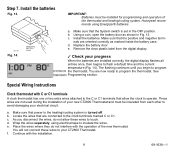
... the System switch is turned off. REMOVING BATTERY DOOR IMPORTANT: Batteries must be insulated from the digital display. ✓ Check your CT2800 Thermostat. Honeywell recommends using electrical tape to operate. c. e. The flashing continues until you disconnect the wires, do not interfere with the installation..... a. As you begin to flash a default time and the current temperature (Fig. 14). b. See Programming section. Special Wiring Instructions Clock thermostat with C or C1 terminals A clock thermostat has one or two extra wires attached to the C or C1 terminals that...
... the System switch is turned off. REMOVING BATTERY DOOR IMPORTANT: Batteries must be insulated from the digital display. ✓ Check your CT2800 Thermostat. Honeywell recommends using electrical tape to operate. c. e. The flashing continues until you disconnect the wires, do not interfere with the installation..... a. As you begin to flash a default time and the current temperature (Fig. 14). b. See Programming section. Special Wiring Instructions Clock thermostat with C or C1 terminals A clock thermostat has one or two extra wires attached to the C or C1 terminals that...


