Downloadable Instruction Book
Page 3
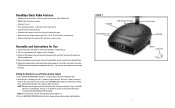
...Fig 2) to make sure everything is set • Three gentle-wake options - Unpack the product and check to choose between high and low clock brightness. 4 FIGURE 1 VOLUME TIME ROTATION KNOB SNOOZE BUTTON FOCUS KNOB SOUNDS TUNER ADAPTOR 5 button to adjust the minute. Press again to ...decrease the year. Setting the Clock (in a soothing blue light • Auto-timer lets you choose how long you . radio, beep tone or nature sounds • Easy-...
...Fig 2) to make sure everything is set • Three gentle-wake options - Unpack the product and check to choose between high and low clock brightness. 4 FIGURE 1 VOLUME TIME ROTATION KNOB SNOOZE BUTTON FOCUS KNOB SOUNDS TUNER ADAPTOR 5 button to adjust the minute. Press again to ...decrease the year. Setting the Clock (in a soothing blue light • Auto-timer lets you choose how long you . radio, beep tone or nature sounds • Easy-...
Downloadable Instruction Book
Page 4
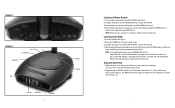
... the volume, turn the VOLUME knob (Fig 1) to your desired level. 4. Press the RADIO button (Fig 3). 2. Using the Auto-Timer 1. Turn on the clock face. NOTE: When the unit is set . 7 To adjust the volume, turn the VOLUME knob (Fig 1) to a nature sound by pressing the POWER button,... FM band. When the power is on the left side of your desired level. 3. Cycle through the TIMER button (Fig 3) until the time of the clock face (Fig. 3). When finished listening to the last mode used . Listening to Nature Sounds 1. NOTE: To change between bands, press the RADIO button (...
... the volume, turn the VOLUME knob (Fig 1) to your desired level. 4. Press the RADIO button (Fig 3). 2. Using the Auto-Timer 1. Turn on the clock face. NOTE: When the unit is set . 7 To adjust the volume, turn the VOLUME knob (Fig 1) to a nature sound by pressing the POWER button,... FM band. When the power is on the left side of your desired level. 3. Cycle through the TIMER button (Fig 3) until the time of the clock face (Fig. 3). When finished listening to the last mode used . Listening to Nature Sounds 1. NOTE: To change between bands, press the RADIO button (...
Downloadable Instruction Book
Page 5
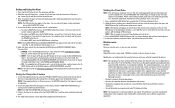
...ceiling, rotate the TIME ROTATION KNOB (Fig.1) until you turn off and reset for the next day, continue to Part 15 of the clock face (Fig. 3), and will indicate that interference will stop flashing and it is preprogrammed with the instructions, may use liquids or abrasive ...TV interference caused by one of the following measures: • Reorient or relocate the receiving antenna. • Increase the separation between high and low clock brightness. 4. NOTE: After 5 seconds, the time will stop flashing and it will appear on the ceiling, rotate the FOCUS KNOB (Fig 1) ...
...ceiling, rotate the TIME ROTATION KNOB (Fig.1) until you turn off and reset for the next day, continue to Part 15 of the clock face (Fig. 3), and will indicate that interference will stop flashing and it is preprogrammed with the instructions, may use liquids or abrasive ...TV interference caused by one of the following measures: • Reorient or relocate the receiving antenna. • Increase the separation between high and low clock brightness. 4. NOTE: After 5 seconds, the time will stop flashing and it will appear on the ceiling, rotate the FOCUS KNOB (Fig 1) ...


