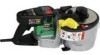
Instruction Manual
Page 3
...outlined in the "SAFETY" section of the operating instructions, safety precautions and warnings in the Instruction Manual before it occurs, and by observing appropriate safety procedures. Never use this power tool in a manner...this power tool. Basic safety precautions are identified by WARNINGS on the power tool and in this Instruction Manual and in the sections which , if ignored, could result in moderate personal injury, or could result ... INFORMATION Read and understand all of this Instruction Manual. Most accidents that result from power tool operation and maintenance are caused by...
...outlined in the "SAFETY" section of the operating instructions, safety precautions and warnings in the Instruction Manual before it occurs, and by observing appropriate safety procedures. Never use this power tool in a manner...this power tool. Basic safety precautions are identified by WARNINGS on the power tool and in this Instruction Manual and in the sections which , if ignored, could result in moderate personal injury, or could result ... INFORMATION Read and understand all of this Instruction Manual. Most accidents that result from power tool operation and maintenance are caused by...
Instruction Manual
Page 4
English SAFETY INPORTANT SAFETY INSTRUCTIONS FOR USING ALL POWER TOOLS READ ALL OF THE WARNINGS AND OPERATING INSTRUCTIONS IN THIS MANUAL BEFORE OPERATING OR MAINTAINING THIS TOOL: WARNING: When using your hand and it frees both hands to hold the workpiece in place. Avoid injuries by ...
English SAFETY INPORTANT SAFETY INSTRUCTIONS FOR USING ALL POWER TOOLS READ ALL OF THE WARNINGS AND OPERATING INSTRUCTIONS IN THIS MANUAL BEFORE OPERATING OR MAINTAINING THIS TOOL: WARNING: When using your hand and it frees both hands to hold the workpiece in place. Avoid injuries by ...
Instruction Manual
Page 5
... properly. ALWAYS DISCONNECT THE TOOL before servicing and before inserting the power plug into the tool against the moving parts for descriptions of the cutter in the OFF position before changing blades or other damaged components before using the tool. 18. Always repair or replace any way. 5 ... TOOL. Always feed work into the 15. Prevent serious injury by not tipping the tool and by not risking unintentional contact with this instruction manual for proper alignment, freedom from binding and other ). Apply 120 volts AC only to a complete stop. Do not leave tool until it...
... properly. ALWAYS DISCONNECT THE TOOL before servicing and before inserting the power plug into the tool against the moving parts for descriptions of the cutter in the OFF position before changing blades or other damaged components before using the tool. 18. Always repair or replace any way. 5 ... TOOL. Always feed work into the 15. Prevent serious injury by not tipping the tool and by not risking unintentional contact with this instruction manual for proper alignment, freedom from binding and other ). Apply 120 volts AC only to a complete stop. Do not leave tool until it...
Instruction Manual
Page 6
...home workshop or other than those specified. Keep all screws, bolts and covers tightly in the Instruction Manual. 5. Keep all times. Check their condition periodically. 7. If the tool appears to a complete stop... potential injuries to the tool should not be used until it immediately and arrange for extended periods. Cutters, cutting implements and accessories which is cracked. If using the tool for repairs by children, individuals ...tools should be operated by a Hitachi authorized service center. 12. Never leave tool running unattended. Handle tool correctly.
...home workshop or other than those specified. Keep all screws, bolts and covers tightly in the Instruction Manual. 5. Keep all times. Check their condition periodically. 7. If the tool appears to a complete stop... potential injuries to the tool should not be used until it immediately and arrange for extended periods. Cutters, cutting implements and accessories which is cracked. If using the tool for repairs by children, individuals ...tools should be operated by a Hitachi authorized service center. 12. Never leave tool running unattended. Handle tool correctly.
Instruction Manual
Page 9
... must still follow these precautions: ⅜ Only HITACHI AUTHORIZED SERVICE CENTER should disassemble or assemble this Instruction Manual, including not using the power tool in this power tool, and only genuine HITACHI replacement parts should be installed. ⅜ Clean the exterior of this power tool, HITACHI has adopted a double insulation design. To keep the...
... must still follow these precautions: ⅜ Only HITACHI AUTHORIZED SERVICE CENTER should disassemble or assemble this Instruction Manual, including not using the power tool in this power tool, and only genuine HITACHI replacement parts should be installed. ⅜ Clean the exterior of this power tool, HITACHI has adopted a double insulation design. To keep the...
Instruction Manual
Page 10
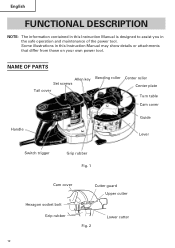
NAME OF PARTS Allen key Set screws Tail cover Bending roller Center roller Center plate Turn table Cam cover Handle Guide Lever Switch trigger Grip rubber Fig. 1 Cam cover Cutter guard Upper cutter Hexagon socket bolt Grip rubber Fig. 2 Lower cutter 10 Some illustrations in this Instruction Manual is designed to assist you in this Instruction Manual may show details or attachments that differ from those on your own power tool. English FUNCTIONAL DESCRIPTION NOTE: The information contained in the safe operation and maintenance of the power tool.
NAME OF PARTS Allen key Set screws Tail cover Bending roller Center roller Center plate Turn table Cam cover Handle Guide Lever Switch trigger Grip rubber Fig. 1 Cam cover Cutter guard Upper cutter Hexagon socket bolt Grip rubber Fig. 2 Lower cutter 10 Some illustrations in this Instruction Manual is designed to assist you in this Instruction Manual may show details or attachments that differ from those on your own power tool. English FUNCTIONAL DESCRIPTION NOTE: The information contained in the safe operation and maintenance of the power tool.
Instruction Manual
Page 17
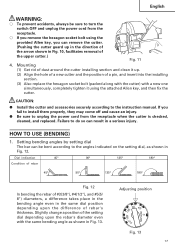
...receptacle. ⅜ If you remove the hexagon socket bolt using the attached Allen key, and then fix the cutter. CAUTION: G Install the cutter and accessories securely according to the instruction manual. Slightly change a position of the setting dial depending upon the difference of dust around the... cutter installing section and clean it using the provided Allen key, you fail to install them properly, they may come off and cause an injury. Mounting (1) Get rid of rebar's...
...receptacle. ⅜ If you remove the hexagon socket bolt using the attached Allen key, and then fix the cutter. CAUTION: G Install the cutter and accessories securely according to the instruction manual. Slightly change a position of the setting dial depending upon the difference of dust around the... cutter installing section and clean it using the provided Allen key, you fail to install them properly, they may come off and cause an injury. Mounting (1) Get rid of rebar's...
Instruction Manual
Page 23
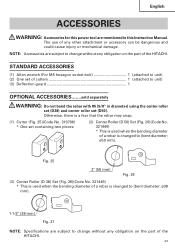
...ACCESSORIES WARNING: Accessories for this Instruction Manual. The use of the HITACHI. NOTE: Accessories are subject to change without any obligation on the part of any obligation on the part of a rebar is used when the bending diameter of a rebar is changed to (bent diameter: ... the bending diameter of the HITACHI. 23 STANDARD ACCESSORIES (1) Allen wrench (For M5 hexagon socket bolt 1 (attached to unit) (2) One set of cutters 1 (attached to unit) (3) Deflection guard 1 OPTIONAL ACCESSORIES.......sold separately WARNING: Do not bend the rebar with #5 (5/8" in this power...
...ACCESSORIES WARNING: Accessories for this Instruction Manual. The use of the HITACHI. NOTE: Accessories are subject to change without any obligation on the part of any obligation on the part of a rebar is used when the bending diameter of a rebar is changed to (bent diameter: ... the bending diameter of the HITACHI. 23 STANDARD ACCESSORIES (1) Allen wrench (For M5 hexagon socket bolt 1 (attached to unit) (2) One set of cutters 1 (attached to unit) (3) Deflection guard 1 OPTIONAL ACCESSORIES.......sold separately WARNING: Do not bend the rebar with #5 (5/8" in this power...


