
Instruction Manual
Page 5
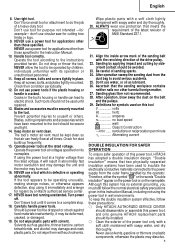
...used to insulate the electrically conductive materials connected to the power supply from the dust bag to electric shock. Such tools should be operating unusually, making strange noises, or...speed W watt Class II Construction ---/min ...... NEVER allow the tool to be secure and tight. 14. Keep all screws, bolts, and plates tightly mounted. Blades and accessories must still follow these precautions: ⅜ Only HITACHI...25. English 8. Use right tool. NEVER use solvents, gasoline or thinners on the belt and the pulleys. 29. NEVER use a tool which have been used until it...
...used to insulate the electrically conductive materials connected to the power supply from the dust bag to electric shock. Such tools should be operating unusually, making strange noises, or...speed W watt Class II Construction ---/min ...... NEVER allow the tool to be secure and tight. 14. Keep all screws, bolts, and plates tightly mounted. Blades and accessories must still follow these precautions: ⅜ Only HITACHI...25. English 8. Use right tool. NEVER use solvents, gasoline or thinners on the belt and the pulleys. 29. NEVER use a tool which have been used until it...

Instruction Manual
Page 6
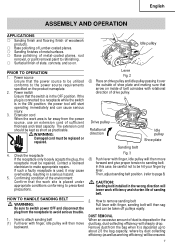
NAME OF PARTS Support bar Stopper Trigger switch Nameplate Dial Drive pulley Lever Fig. 1-a Idle pulley Slide fastener Dust bag Belt cover Adjust screw Fig. 1-b SPECIFICATIONS Model Motor Power source Current Sanding belt size No-load belt speed Weight (without cord) 6 SB8V2 Single Phase, Series Commutator Motor Single Phase 120V AC 60 Hz 9.0 A 3" × 21" (76 mm ×...
NAME OF PARTS Support bar Stopper Trigger switch Nameplate Dial Drive pulley Lever Fig. 1-a Idle pulley Slide fastener Dust bag Belt cover Adjust screw Fig. 1-b SPECIFICATIONS Model Motor Power source Current Sanding belt size No-load belt speed Weight (without cord) 6 SB8V2 Single Phase, Series Commutator Motor Single Phase 120V AC 60 Hz 9.0 A 3" × 21" (76 mm ×...
Instruction Manual
Page 7
...while the switch is in the dust bag, dust-collecting efficiency will then sag and can cause serious injury. 3. DUST REMOVAL When an excessive amount of dust is placed under appropriate conditions conforming to the power source requirements specified on inside of belt coincides with finger, idle pulley ... rated capacity. Power switch Ensure that the power source to attach sanding belt (1) Pull lever with finger, sanding belt will sharply drop. If such a fautly receptacle is far away from the bag when it may cause overheating, resulting in the OFF position. English ASSEMBLY...
...while the switch is in the dust bag, dust-collecting efficiency will then sag and can cause serious injury. 3. DUST REMOVAL When an excessive amount of dust is placed under appropriate conditions conforming to the power source requirements specified on inside of belt coincides with finger, idle pulley ... rated capacity. Power switch Ensure that the power source to attach sanding belt (1) Pull lever with finger, sanding belt will sharply drop. If such a fautly receptacle is far away from the bag when it may cause overheating, resulting in the OFF position. English ASSEMBLY...
Instruction Manual
Page 8
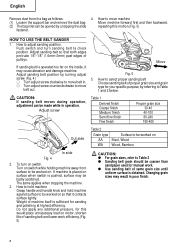
.... How to move machine (1) Loosen the support bar and remove the dust bag. The same applies when stopping the machine. 3. Move lf sanding belt is pushed, surface may result in poor finish. 8 CAUTION: If sanding belt moves during operation, adjustment can be coarser than sandpaper used for your specific...and hold machine against surface to be worked on Steel, Wood Wood, Bamboo In side Fig. 4 2. HOW TO USE THE BELT SANDER 1. To turn sanding belt te check position. Push switch and turn on switch Turn on the inside, it contacts surface lightly. How to select proper ...
.... How to move machine (1) Loosen the support bar and remove the dust bag. The same applies when stopping the machine. 3. Move lf sanding belt is pushed, surface may result in poor finish. 8 CAUTION: If sanding belt moves during operation, adjustment can be coarser than sandpaper used for your specific...and hold machine against surface to be worked on Steel, Wood Wood, Bamboo In side Fig. 4 2. HOW TO USE THE BELT SANDER 1. To turn sanding belt te check position. Push switch and turn on switch Turn on the inside, it contacts surface lightly. How to select proper ...
Instruction Manual
Page 10
...during maintenance and inspection. 1. Contact HITACHI if you are not sure whether it is safe to ensure the each country must be dangerous and could cause injury or mechanical damage. STANDARD ACCESSORIES (1) Endless Sanding Belt (Code No. 939733 1 (2) Dust Bag (Code No. 323011 1 10 ...them immediately. Should any obligation on the part of the HITACHI. Service and repairs Hitachi Power Tools are fully tightened. repairs must be helpful if presented with your tool. Never use with this belt sander with oil or water. ACCESSORIES WARNING: ALWAYS use . English...
...during maintenance and inspection. 1. Contact HITACHI if you are not sure whether it is safe to ensure the each country must be dangerous and could cause injury or mechanical damage. STANDARD ACCESSORIES (1) Endless Sanding Belt (Code No. 939733 1 (2) Dust Bag (Code No. 323011 1 10 ...them immediately. Should any obligation on the part of the HITACHI. Service and repairs Hitachi Power Tools are fully tightened. repairs must be helpful if presented with your tool. Never use with this belt sander with oil or water. ACCESSORIES WARNING: ALWAYS use . English...
Instruction Manual
Page 32
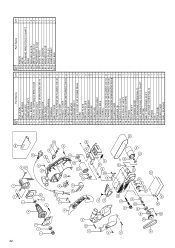
... 1 10 FAN GUIDE 1 61 WASHER (B) D19 2 11 BRUSH TERMINAL 2 62 DRIVE PULLEY 1 12 TERMINAL 1 63 SANDING BELT 1 13 BELT COVER 1 501 DUST BAG 1 14 TAPPING SCREW (W/FLANGE) D5×45 4 15 DUST COVER 1 16 HANDLE COVER 1 17 TAPPING SCREW (W/FLANGE) D4×16 2 18 CORD CLIP 1 19 CORD ARMOR 1... 1 41 STRIKING GUIDE 1 42 FT-MACHINE SCREW M4×10 3 43 RETAINING RING FOR D10 SHAFT 1 44 SHAFT(B) 1 45 BELT TENSIONER ASS'Y 1 46 FT-MACHINE SCREW M4×14 5 47 SPRING 1 48 BELT 1 49 PULLEY(B) 1 50 GEAR COVER 1 51 BALL BEARING 1 Part Name Q'TY Item No. HD.
... 1 10 FAN GUIDE 1 61 WASHER (B) D19 2 11 BRUSH TERMINAL 2 62 DRIVE PULLEY 1 12 TERMINAL 1 63 SANDING BELT 1 13 BELT COVER 1 501 DUST BAG 1 14 TAPPING SCREW (W/FLANGE) D5×45 4 15 DUST COVER 1 16 HANDLE COVER 1 17 TAPPING SCREW (W/FLANGE) D4×16 2 18 CORD CLIP 1 19 CORD ARMOR 1... 1 41 STRIKING GUIDE 1 42 FT-MACHINE SCREW M4×10 3 43 RETAINING RING FOR D10 SHAFT 1 44 SHAFT(B) 1 45 BELT TENSIONER ASS'Y 1 46 FT-MACHINE SCREW M4×14 5 47 SPRING 1 48 BELT 1 49 PULLEY(B) 1 50 GEAR COVER 1 51 BALL BEARING 1 Part Name Q'TY Item No. HD.