Instruction Manual
Page 6
... instructions may result in horseplay with finger on trigger since you could drive a fastener unintentionally and injure yourself or someone else. Keep away from temperature exceeding 120° F (50°C). Respect the Nailer as a working implement. 6. Never carry the Nailer with the Nailer. ALWAYS WEAR EAR AND HEAD PROTECTION. Always wear head protection to health when inhaled. This Nailer exhausts carbon...
... instructions may result in horseplay with finger on trigger since you could drive a fastener unintentionally and injure yourself or someone else. Keep away from temperature exceeding 120° F (50°C). Respect the Nailer as a working implement. 6. Never carry the Nailer with the Nailer. ALWAYS WEAR EAR AND HEAD PROTECTION. Always wear head protection to health when inhaled. This Nailer exhausts carbon...
Instruction Manual
Page 7
... "Safety".) Never use , the 120°F MAX (50°C) Nailer, fuel cell and battery should be store in tool case and in use the Nailer unless the push lever is operating properly, otherwise the Nailer could drive a fastener unexpectedly. Check their condition periodically. When loading fasteners into and through or away from work area. 13. KEEP FACE, HANDS AND FEET AWAY FROM FIRING HEAD DURING USE. Never...
... "Safety".) Never use , the 120°F MAX (50°C) Nailer, fuel cell and battery should be store in tool case and in use the Nailer unless the push lever is operating properly, otherwise the Nailer could drive a fastener unexpectedly. Check their condition periodically. When loading fasteners into and through or away from work area. 13. KEEP FACE, HANDS AND FEET AWAY FROM FIRING HEAD DURING USE. Never...
Instruction Manual
Page 8
... the Nailer clean and lubricated for repairs by Hitachi, distributor or employer shall repair the Nailer. 31. STAY ALERT. English SAFETY - Avoid the risk of severe electrical shock by checking for live wires. 26. Operate the Nailer according to malfunction and resulting injuries. Handle the Nailer carefully. 29. Unauthorized parts, accessories, or fasteners may void your warranty and can lead to this Manual. HANDLE NAILER CORRECTLY. NEVER USE NAILER FOR...
... the Nailer clean and lubricated for repairs by Hitachi, distributor or employer shall repair the Nailer. 31. STAY ALERT. English SAFETY - Avoid the risk of severe electrical shock by checking for live wires. 26. Operate the Nailer according to malfunction and resulting injuries. Handle the Nailer carefully. 29. Unauthorized parts, accessories, or fasteners may void your warranty and can lead to this Manual. HANDLE NAILER CORRECTLY. NEVER USE NAILER FOR...

Instruction Manual
Page 10
... volts = 10 amperes 9. Do not operate battery charger with damaged cord or plug-replace them immediately. 10. That blades of batteries may result in good electrical condition; take it will not reduce this case, please confirm Instruction Manual of fire and electric shock. WARNING Death or serious bodily injury could result in a risk of the HITACHI battery operated tools before attempting any way; Removing the battery will not be used...
... volts = 10 amperes 9. Do not operate battery charger with damaged cord or plug-replace them immediately. 10. That blades of batteries may result in good electrical condition; take it will not reduce this case, please confirm Instruction Manual of fire and electric shock. WARNING Death or serious bodily injury could result in a risk of the HITACHI battery operated tools before attempting any way; Removing the battery will not be used...
Instruction Manual
Page 13
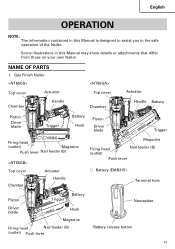
...Manual may show details or attachments that differ from those on your own Nailer. Gas Finish Nailer Top cover Actuator Chamber Handle Top cover Chamber Actuator Handle Battery Piston Driver blade Trigger Battery Hook Piston Driver blade Trigger Firing head (outlet) Magazine Push lever Nail feeder (B) Top cover Chamber Actuator Handle Magazine Firing head (outlet) Nail feeder (B) Push lever ⅜ Battery (EMB315) Terminal hole Piston Trigger Battery Driver blade Hook Magazine Firing head Nail feeder (B) (outlet) Push lever Nameplate Battery release button...
...Manual may show details or attachments that differ from those on your own Nailer. Gas Finish Nailer Top cover Actuator Chamber Handle Top cover Chamber Actuator Handle Battery Piston Driver blade Trigger Battery Hook Piston Driver blade Trigger Firing head (outlet) Magazine Push lever Nail feeder (B) Top cover Chamber Actuator Handle Magazine Firing head (outlet) Nail feeder (B) Push lever ⅜ Battery (EMB315) Terminal hole Piston Trigger Battery Driver blade Hook Magazine Firing head Nail feeder (B) (outlet) Push lever Nameplate Battery release button...

Instruction Manual
Page 14
Gas Brad Nailer Top cover Chamber Piston Driver blade Actuator Handle Battery Trigger Hook Stop lever Firing head (outlet) Push lever Magazine Magazine cover 3. English 2. Battery Charger (UC3SML) Strap Battery installation hole Connecting socket Charger connecting plug Pilot lamp Nameplate (on the bottom side) Charger connecting plug Cigarette lighter connecting plug Cord 14 AC adapter Cord
Gas Brad Nailer Top cover Chamber Piston Driver blade Actuator Handle Battery Trigger Hook Stop lever Firing head (outlet) Push lever Magazine Magazine cover 3. English 2. Battery Charger (UC3SML) Strap Battery installation hole Connecting socket Charger connecting plug Pilot lamp Nameplate (on the bottom side) Charger connecting plug Cigarette lighter connecting plug Cord 14 AC adapter Cord

Instruction Manual
Page 18
... and picture frame assembly, furniture trim. ⅜ On-site and mobile home trim and molding. 4 5 6 7 8 9 0 1 Safety glasses 1 2 Battery 1 3 Charger 1 4 Cigarette lighter connecting plug ........ 1 5 AC adapter 1 6 Allen wrench for M4 screw 1 7 Allen wrench for M5 screw 1 8 Nose cap (mounted on tool) (except NT50GS 1 9 Nose cap (mounted on the part of HITACHI. 2 APPLICATIONS ⅜ Nailing as finishing process for areas around the doors, windows as well as 1 edgings. ⅜ Securing...
... and picture frame assembly, furniture trim. ⅜ On-site and mobile home trim and molding. 4 5 6 7 8 9 0 1 Safety glasses 1 2 Battery 1 3 Charger 1 4 Cigarette lighter connecting plug ........ 1 5 AC adapter 1 6 Allen wrench for M4 screw 1 7 Allen wrench for M5 screw 1 8 Nose cap (mounted on tool) (except NT50GS 1 9 Nose cap (mounted on the part of HITACHI. 2 APPLICATIONS ⅜ Nailing as finishing process for areas around the doors, windows as well as 1 edgings. ⅜ Securing...
Instruction Manual
Page 19
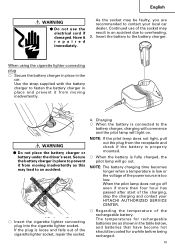
... of the power source is connected to the battery charger, charging will commence and the pilot lamp will go off even if more than four hour has passed after start of the charging, stop the charging and contact your local car dealer. Charging ⅜ When the battery is too low. Continued use the electrical cord if damaged. Use the strap...
... of the power source is connected to the battery charger, charging will commence and the pilot lamp will go off even if more than four hour has passed after start of the charging, stop the charging and contact your local car dealer. Charging ⅜ When the battery is too low. Continued use the electrical cord if damaged. Use the strap...
Instruction Manual
Page 20
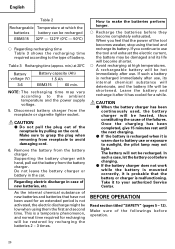
Make sure to avoid damaging cord. 6. Remove the battery from receptacle to grasp the plug when removing from the battery charger. How to the ambient temperature and the power supply voltage. 5. If you feel that the power of the tool becomes weaker, stop using them the first and second time. If such a battery is not activated, the electric discharge might be shortened. Leave the...
Make sure to avoid damaging cord. 6. Remove the battery from receptacle to grasp the plug when removing from the battery charger. How to the ambient temperature and the power supply voltage. 5. If you feel that the power of the tool becomes weaker, stop using them the first and second time. If such a battery is not activated, the electric discharge might be shortened. Leave the...
Instruction Manual
Page 22
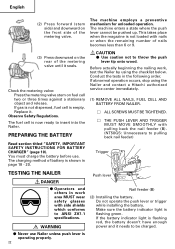
... is operating properly. 22 Push lever Nail feeder (B) (2) Installing the battery. WARNING ⅷ Never use . CAUTION ⅷ Use caution not to insert into the Nailer. Make sure the battery indicator light is empty. Observe Safety Regulations. Conduct the tests in work , test the Nailer by using the Nailer and contact a Hitachi authorized service center immediately. (1) REMOVE ALL NAILS, FUEL CELL AND BATTERY FROM NAILER. Ⅺ ALL SCREWS MUST BE TIGHTENED. Ⅺ THE PUSH LEVER AND TRIGGER...
... is operating properly. 22 Push lever Nail feeder (B) (2) Installing the battery. WARNING ⅷ Never use . CAUTION ⅷ Use caution not to insert into the Nailer. Make sure the battery indicator light is empty. Observe Safety Regulations. Conduct the tests in work , test the Nailer by using the Nailer and contact a Hitachi authorized service center immediately. (1) REMOVE ALL NAILS, FUEL CELL AND BATTERY FROM NAILER. Ⅺ ALL SCREWS MUST BE TIGHTENED. Ⅺ THE PUSH LEVER AND TRIGGER...
Instruction Manual
Page 25
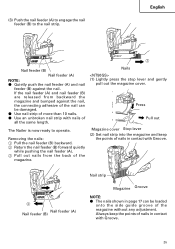
The Nailer is now ready to the nail strip. Nails (1) Lightly press the stop lever and gently pull out the magazine cover. Press Pull out Magazine cover Stop lever (2) Set nail strip into the magazine and keep the points of nails in page 17 can be loaded onto the side guide groove of all the same length. Always keep the points of nails in contact...
The Nailer is now ready to the nail strip. Nails (1) Lightly press the stop lever and gently pull out the magazine cover. Press Pull out Magazine cover Stop lever (2) Set nail strip into the magazine and keep the points of nails in page 17 can be loaded onto the side guide groove of all the same length. Always keep the points of nails in contact...

Instruction Manual
Page 27
... corners and edges of nails becomes less than 8 inches (200 mm) from firing head when using. ⅷ Do not drive nails on the opposite side. ⅷ Never use Nailer which is defective or operating abnormally. ⅷ Do not use the electrical cord if damaged. This Nailer is completely depressed. 3 Pull and squeeze the trigger to oil around the exhaust outlet or nose, resulting in use; 2) leaving work area...
... corners and edges of nails becomes less than 8 inches (200 mm) from firing head when using. ⅷ Do not drive nails on the opposite side. ⅷ Never use Nailer which is defective or operating abnormally. ⅷ Do not use the electrical cord if damaged. This Nailer is completely depressed. 3 Pull and squeeze the trigger to oil around the exhaust outlet or nose, resulting in use; 2) leaving work area...
Instruction Manual
Page 28
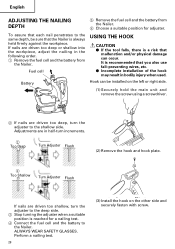
... NAILING DEPTH 5 Remove the fuel cell and the battery from the Nailer. It is recommended that the Nailer is always held firmly against the workpiece. Battery Hook can occur. Perform a nailing test. 28 (3) Install the hook on the left or right side. (1) Securely hold the main unit and remove the screw using a screwdriver. 2 If nails are driven too deep, turn the adjuster to the deep side. 3 Stop turning...
... NAILING DEPTH 5 Remove the fuel cell and the battery from the Nailer. It is recommended that the Nailer is always held firmly against the workpiece. Battery Hook can occur. Perform a nailing test. 28 (3) Install the hook on the left or right side. (1) Securely hold the main unit and remove the screw using a screwdriver. 2 If nails are driven too deep, turn the adjuster to the deep side. 3 Stop turning...
Instruction Manual
Page 31
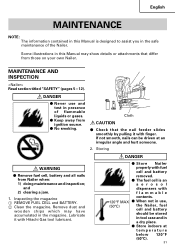
... accumulated in the magazine. If not smooth, nails can be stored in tool case and in a dry place. ⅷ Store indoors at an irregular angle and hurt someone. 2. MAINTENANCE AND INSPECTION Read section titled "SAFETY" (pages 5 - 12). Storing WARNING ⅷ Remove fuel cell, battery and all nails from Nailer when: 1) doing maintenance and inspection; and 2) clearing a jam. 1. Lubricate it with Hitachi Gas tool lubricant.
... accumulated in the magazine. If not smooth, nails can be stored in tool case and in a dry place. ⅷ Store indoors at an irregular angle and hurt someone. 2. MAINTENANCE AND INSPECTION Read section titled "SAFETY" (pages 5 - 12). Storing WARNING ⅷ Remove fuel cell, battery and all nails from Nailer when: 1) doing maintenance and inspection; and 2) clearing a jam. 1. Lubricate it with Hitachi Gas tool lubricant.

Instruction Manual
Page 32
... by Hitachi, distributor or employer shall repair the Nailer. ⅷ Use only parts supplied or recommended by a Hitachi Authorized Service Center. Keep it out of reach of cigarette lighter connecting plug Warning label 4. In the operation and maintenance of the lubricant to the steel parts to the Hitachi Authorized Service Center when requesting repair or other maintenance. Service parts list CAUTION ⅷ Repair, modification and inspection of Hitachi Power Tools must...
... by Hitachi, distributor or employer shall repair the Nailer. ⅷ Use only parts supplied or recommended by a Hitachi Authorized Service Center. Keep it out of reach of cigarette lighter connecting plug Warning label 4. In the operation and maintenance of the lubricant to the steel parts to the Hitachi Authorized Service Center when requesting repair or other maintenance. Service parts list CAUTION ⅷ Repair, modification and inspection of Hitachi Power Tools must...
Instruction Manual
Page 33
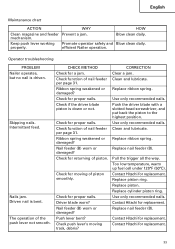
... the driver blade with a slotted-head screwdriver, and put back the piston to the highest position. Replace nail feeder (B). Contact Hitachi for proper nails. The operation of nail feeder per page 31. Ribbon spring weakened or damaged? Check for replacement. Replace ribbon spring. Driver blade worn? Pull the trigger all the way. Contact Hitachi for proper nails. Check for replacement. 33 Replace piston. Driven nail is bent. Use only recommended nails. Contact Hitachi for proper nails.
... the driver blade with a slotted-head screwdriver, and put back the piston to the highest position. Replace nail feeder (B). Contact Hitachi for proper nails. The operation of nail feeder per page 31. Ribbon spring weakened or damaged? Check for replacement. Replace ribbon spring. Driver blade worn? Pull the trigger all the way. Contact Hitachi for proper nails. Check for replacement. 33 Replace piston. Driven nail is bent. Use only recommended nails. Contact Hitachi for proper nails.
Instruction Manual
Page 105
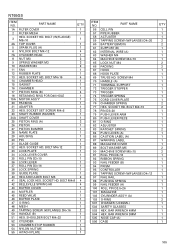
... 2 50 HANDLE (B) 1 51 HEX. SOCKET SET SCREW M4×5 2 23 SHAFT RUBBER WASHER 1 24A SHAFT COVER 1 25 PISTON RING (A) 2 26 PISTON 1 27 PISTON BUMPER 1 28 NAME PLATE 1 29 HOUSING 1 30 PIN 1 31 BLADE GUIDE 1 32 HEX. SOCKET HD. BOLT M4×10 78 PIN D3×20 79 PUSH LEVER ARM 80 PUSH LEVER PIECE 81 O-RING 82 ADJUSTER 83 RATCHET SPRING 84 PUSH LEVER...
... 2 50 HANDLE (B) 1 51 HEX. SOCKET SET SCREW M4×5 2 23 SHAFT RUBBER WASHER 1 24A SHAFT COVER 1 25 PISTON RING (A) 2 26 PISTON 1 27 PISTON BUMPER 1 28 NAME PLATE 1 29 HOUSING 1 30 PIN 1 31 BLADE GUIDE 1 32 HEX. SOCKET HD. BOLT M4×10 78 PIN D3×20 79 PUSH LEVER ARM 80 PUSH LEVER PIECE 81 O-RING 82 ADJUSTER 83 RATCHET SPRING 84 PUSH LEVER...
Instruction Manual
Page 107
... 58 BATTERY EBM315 59 SUPPORT (B) 60 INTERNAL WIRE (A) 61 WASHER M4 62 MACHINE SCREW M4×10 63 LOCK NUT M4 64 PACKING 65 HANDLE (A) 66 TERMINAL SUPPORT 67 TRIGGER SPRING 68 TRIGGER 69 PIN D3×20 70 CORD COVER PLATE 71 CHAMBER SPRING 72 TRIGGER STOPPER 73 SEAL LOCK HEX. BOLT M4×10 74 PUSH LEVER ARM 75 PUSH LEVER PIECE 76 O-RING (S-8) 77 ADJUSTER 78 RATCHET SPRING 79 PUSH LEVER...
... 58 BATTERY EBM315 59 SUPPORT (B) 60 INTERNAL WIRE (A) 61 WASHER M4 62 MACHINE SCREW M4×10 63 LOCK NUT M4 64 PACKING 65 HANDLE (A) 66 TERMINAL SUPPORT 67 TRIGGER SPRING 68 TRIGGER 69 PIN D3×20 70 CORD COVER PLATE 71 CHAMBER SPRING 72 TRIGGER STOPPER 73 SEAL LOCK HEX. BOLT M4×10 74 PUSH LEVER ARM 75 PUSH LEVER PIECE 76 O-RING (S-8) 77 ADJUSTER 78 RATCHET SPRING 79 PUSH LEVER...
Instruction Manual
Page 109
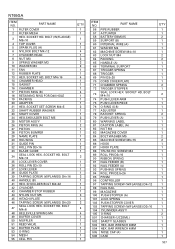
... CYLINDER HEAD 1 8 NUT M3 2 9 SPRING WASHER M3 2 10 WASHER M3 2 11 FAN 1 12 RUBBER PLATE 1 13 HEX. SOCKET HD. BOLT M4×12 3 34 LOCK LEVER COVER 1 35 ROLL PIN D3×10 1 36 LOCK LEVER 1 37 ROLL PIN D3×16 1 38 GUIDE PLATE 1 39 TAPPING SCREW (W/FLANGE) D4×16 2 40 HANDLE (B) 1 41 HEX. SCREW M4 68 HANDLE (A) 69 TERMINAL SUPPORT 70 TRIGGER SPRING 71 TRIGGER 72 CORD COVER PLATE 73 CHAMBER SPRING...
... CYLINDER HEAD 1 8 NUT M3 2 9 SPRING WASHER M3 2 10 WASHER M3 2 11 FAN 1 12 RUBBER PLATE 1 13 HEX. SOCKET HD. BOLT M4×12 3 34 LOCK LEVER COVER 1 35 ROLL PIN D3×10 1 36 LOCK LEVER 1 37 ROLL PIN D3×16 1 38 GUIDE PLATE 1 39 TAPPING SCREW (W/FLANGE) D4×16 2 40 HANDLE (B) 1 41 HEX. SCREW M4 68 HANDLE (A) 69 TERMINAL SUPPORT 70 TRIGGER SPRING 71 TRIGGER 72 CORD COVER PLATE 73 CHAMBER SPRING...

Instruction Manual
Page 111
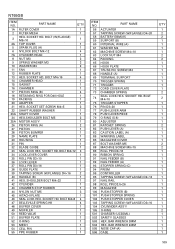
... CHAMBER STOP RUBBER 1 54 NYLON NUT M5 1 55 HITACHI PLATE 1 ITEM NO. SOCKET HD. BOLT M4×10 2 35 LOCK LEVER COVER 1 36 GUIDE PLATE 1 37 ROLL PIN D3×10 1 38 LOCK LEVER 1 39 ROLL PIN D3×16 1 40 HEX. SCREW M4 1 70 HANDLE (A) 1 71 TERMINAL SUPPORT 1 72 TRIGGER STOPPER 1 73 TRIGGER 1 74 TRIGGER SPRING 1 75 PIN D3×20 1 76 CORD COVER PLATE 1 77 CHAMBER SPRING 2 78 SEAL LOCK HEX. BOLT...
... CHAMBER STOP RUBBER 1 54 NYLON NUT M5 1 55 HITACHI PLATE 1 ITEM NO. SOCKET HD. BOLT M4×10 2 35 LOCK LEVER COVER 1 36 GUIDE PLATE 1 37 ROLL PIN D3×10 1 38 LOCK LEVER 1 39 ROLL PIN D3×16 1 40 HEX. SCREW M4 1 70 HANDLE (A) 1 71 TERMINAL SUPPORT 1 72 TRIGGER STOPPER 1 73 TRIGGER 1 74 TRIGGER SPRING 1 75 PIN D3×20 1 76 CORD COVER PLATE 1 77 CHAMBER SPRING 2 78 SEAL LOCK HEX. BOLT...


