
Instruction Manual
Page 6
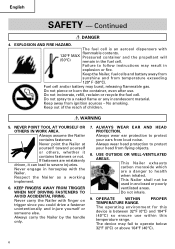
... ignition sources - Always assume the Nailer contains fasteners. KEEP FINGERS AWAY FROM TRIGGER WHEN NOT DRIVING FASTENERS TO AVOID ACCIDENTAL FIRING. The device may result in the fuel cell. Failure to follow instructions may fail to severe injuries. Fuel cell and/or battery may burst, releasing flammable gas. English SAFETY - Do not spray...
... ignition sources - Always assume the Nailer contains fasteners. KEEP FINGERS AWAY FROM TRIGGER WHEN NOT DRIVING FASTENERS TO AVOID ACCIDENTAL FIRING. The device may result in the fuel cell. Failure to follow instructions may fail to severe injuries. Fuel cell and/or battery may burst, releasing flammable gas. English SAFETY - Do not spray...
Instruction Manual
Page 7
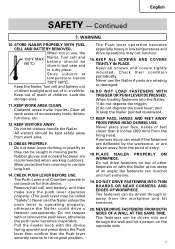
...work areas of an angle; Store indoors at too steep of unnecessary tools, debris, furniture, etc. 12. Look the storage area. 11. KEEP ALL SCREWS AND COVERS TIGHTLY IN PLACE. Do not drive fasteners on the opposite side. 7 STORE NAILER PROPERLY WITH FUEL CELL AND BATTERY REMOVED. KEEP VISITORS ...tool case and in low temperatures and drive operations may be called "Safety".) Never use , the 120°F MAX (50°C) Nailer, fuel cell and battery should be driven through the wall and hit a person on top of entry. 18. DRESS PROPERLY. KEEP FACE, HANDS AND FEET ...
...work areas of an angle; Store indoors at too steep of unnecessary tools, debris, furniture, etc. 12. Look the storage area. 11. KEEP ALL SCREWS AND COVERS TIGHTLY IN PLACE. Do not drive fasteners on the opposite side. 7 STORE NAILER PROPERLY WITH FUEL CELL AND BATTERY REMOVED. KEEP VISITORS ...tool case and in low temperatures and drive operations may be called "Safety".) Never use , the 120°F MAX (50°C) Nailer, fuel cell and battery should be driven through the wall and hit a person on top of entry. 18. DRESS PROPERLY. KEEP FACE, HANDS AND FEET ...
Instruction Manual
Page 8
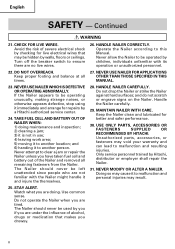
...common sense. Never allow the Nailer to this Manual. If the Nailer appears to another person. Keep the Nailer clean and lubricated for repairs by a Hitachi authorized service center. 24. NEVER MODIFY OR ALTER A NAILER. STAY ALERT. The Nailer should never be operated by ...checking for live wires. 26. Turn off the breaker switch to malfunction and resulting injuries. TAKE FUEL CELL AND BATTERY OUT OF NAILER...
...common sense. Never allow the Nailer to this Manual. If the Nailer appears to another person. Keep the Nailer clean and lubricated for repairs by a Hitachi authorized service center. 24. NEVER MODIFY OR ALTER A NAILER. STAY ALERT. The Nailer should never be operated by ...checking for live wires. 26. Turn off the breaker switch to malfunction and resulting injuries. TAKE FUEL CELL AND BATTERY OUT OF NAILER...

Instruction Manual
Page 10
...extension cord should not be used make sure: a. Make sure cord is required. Use of the HITACHI battery operated tools before attempting any way; Do not operate battery charger if it will not reduce this case, please confirm Instruction Manual of improper extension cord could ...amperes 9. Table 1 RECOMMENDED MINIMUM AWG SIZE FOR EXTENSION CORDS FOR BATTERY CHARGERS AC Input Rating Amperes* AWG Size of Cord Equal to damage or stress. 8. and c. Removing the battery will not be attached to HITACHI battery operated tools as those of fire, electric shock, or injury ...
...extension cord should not be used make sure: a. Make sure cord is required. Use of the HITACHI battery operated tools before attempting any way; Do not operate battery charger if it will not reduce this case, please confirm Instruction Manual of improper extension cord could ...amperes 9. Table 1 RECOMMENDED MINIMUM AWG SIZE FOR EXTENSION CORDS FOR BATTERY CHARGERS AC Input Rating Amperes* AWG Size of Cord Equal to damage or stress. 8. and c. Removing the battery will not be attached to HITACHI battery operated tools as those of fire, electric shock, or injury ...

Instruction Manual
Page 11
...the battery away from driving. PRECAUTIONS WHEN USING THE BATTERY CHARGER WITH A DC 12V IN-CAR POWER SOURCE 1. Do not place the battery charger or battery under the brake pedal or the cable may overheat and damage the charger. 13. NEVER 4. short-circuit the battery. use the Nailer. ... If you use a booster transformer when charging. 10. connect two battery chargers together. REMEMBER: USE ONLY HITACHI BATTERY TYPE EBM315. NEVER 5. Electric shock or damage to serious injury. ALWAYS disconnect the power cord from its receptacle when the charger is low humidity and good ...
...the battery away from driving. PRECAUTIONS WHEN USING THE BATTERY CHARGER WITH A DC 12V IN-CAR POWER SOURCE 1. Do not place the battery charger or battery under the brake pedal or the cable may overheat and damage the charger. 13. NEVER 4. short-circuit the battery. use the Nailer. ... If you use a booster transformer when charging. 10. connect two battery chargers together. REMEMBER: USE ONLY HITACHI BATTERY TYPE EBM315. NEVER 5. Electric shock or damage to serious injury. ALWAYS disconnect the power cord from its receptacle when the charger is low humidity and good ...
Instruction Manual
Page 12
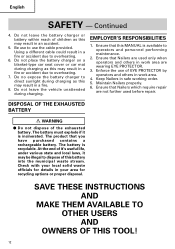
.... Do not leave the vehicle unattended during charging as this may result in a fire or accident due to overheating. 7. Maintain Nailers properly. 6. Ensure that you have purchased contains a rechargeable battery. English SAFETY - The battery must explode if it may result in a fire. 8. Check with your area for recycling options or proper disposal. Enforce...
.... Do not leave the vehicle unattended during charging as this may result in a fire or accident due to overheating. 7. Maintain Nailers properly. 6. Ensure that you have purchased contains a rechargeable battery. English SAFETY - The battery must explode if it may result in a fire. 8. Check with your area for recycling options or proper disposal. Enforce...
Instruction Manual
Page 13
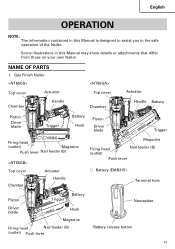
Gas Finish Nailer Top cover Actuator Chamber Handle Top cover Chamber Actuator Handle Battery Piston Driver blade Trigger Battery Hook Piston Driver blade Trigger Firing head (outlet) Magazine Push lever Nail feeder (B) Top cover Chamber Actuator Handle Magazine Firing head (outlet) Nail feeder (B) Push lever ⅜ Battery (EMB315) Terminal hole Piston Trigger Battery Driver blade Hook Magazine Firing...
Gas Finish Nailer Top cover Actuator Chamber Handle Top cover Chamber Actuator Handle Battery Piston Driver blade Trigger Battery Hook Piston Driver blade Trigger Firing head (outlet) Magazine Push lever Nail feeder (B) Top cover Chamber Actuator Handle Magazine Firing head (outlet) Nail feeder (B) Push lever ⅜ Battery (EMB315) Terminal hole Piston Trigger Battery Driver blade Hook Magazine Firing...

Instruction Manual
Page 14
Gas Brad Nailer Top cover Chamber Piston Driver blade Actuator Handle Battery Trigger Hook Stop lever Firing head (outlet) Push lever Magazine Magazine cover 3. Battery Charger (UC3SML) Strap Battery installation hole Connecting socket Charger connecting plug Pilot lamp Nameplate (on the bottom side) Charger connecting plug Cigarette lighter connecting plug Cord 14 AC adapter Cord English 2.
Gas Brad Nailer Top cover Chamber Piston Driver blade Actuator Handle Battery Trigger Hook Stop lever Firing head (outlet) Push lever Magazine Magazine cover 3. Battery Charger (UC3SML) Strap Battery installation hole Connecting socket Charger connecting plug Pilot lamp Nameplate (on the bottom side) Charger connecting plug Cigarette lighter connecting plug Cord 14 AC adapter Cord English 2.
Instruction Manual
Page 15
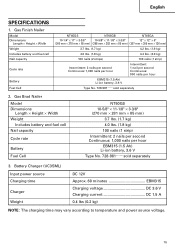
... current DC 1.5 A 0.4 lbs (0.2 kg) NOTE: The charging time may vary according to temperature and power source voltage. 15 Gas Finish Nailer Model Dimensions Length × Height × Width Weight Includes battery and fuel cell Nail capacity Cycle rate Battery Fuel Cell NT65GS NT65GB NT65GA 10-1/4" × 11" × 3-3/8" 10-5/8" × 11-1/8" × 3-3/8" 12" × 12" × 5" (260...
... current DC 1.5 A 0.4 lbs (0.2 kg) NOTE: The charging time may vary according to temperature and power source voltage. 15 Gas Finish Nailer Model Dimensions Length × Height × Width Weight Includes battery and fuel cell Nail capacity Cycle rate Battery Fuel Cell NT65GS NT65GB NT65GA 10-1/4" × 11" × 3-3/8" 10-5/8" × 11-1/8" × 3-3/8" 12" × 12" × 5" (260...

Instruction Manual
Page 18
...site and mobile home trim and molding. 4 5 6 7 8 9 0 1 Safety glasses 1 2 Battery 1 3 Charger 1 4 Cigarette lighter connecting plug ........ 1 5 AC adapter 1 6 Allen wrench for ...adapter Insert the AC adapter into the connecting socket of HITACHI. 2 APPLICATIONS ⅜ Nailing as finishing process for M5 screw 1 8 Nose cap (mounted ...on tool) (except NT50GS 1 9 Nose cap (mounted on tool) (only NT50GS 1 0 Case 1 CHARGING METHOD NOTE: Before plugging into the receptacle, make sure the following points. ⅜ The power...
...site and mobile home trim and molding. 4 5 6 7 8 9 0 1 Safety glasses 1 2 Battery 1 3 Charger 1 4 Cigarette lighter connecting plug ........ 1 5 AC adapter 1 6 Allen wrench for ...adapter Insert the AC adapter into the connecting socket of HITACHI. 2 APPLICATIONS ⅜ Nailing as finishing process for M5 screw 1 8 Nose cap (mounted ...on tool) (except NT50GS 1 9 Nose cap (mounted on tool) (only NT50GS 1 0 Case 1 CHARGING METHOD NOTE: Before plugging into the receptacle, make sure the following points. ⅜ The power...
Instruction Manual
Page 19
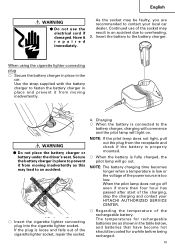
...use of the power source is too low. If the plug is fully charged, the pilot lamp will light on. NOTE: If the pilot lamp does not light, pull out the plug from the receptacle and check if the battery is properly mounted. ⅜ When the battery is loose ... due to overheating. 3. Use the strap supplied with the battery charger to contact your HITACHI AUTHORIZED SERVICE CENTER. ⅜ Regarding the temperature of the cigarette lighter socket, repair the socket. 4. WARNING ⅷ Do not place the battery charger or battery under the driver's seat. As the socket may be cooled...
...use of the power source is too low. If the plug is fully charged, the pilot lamp will light on. NOTE: If the pilot lamp does not light, pull out the plug from the receptacle and check if the battery is properly mounted. ⅜ When the battery is loose ... due to overheating. 3. Use the strap supplied with the battery charger to contact your HITACHI AUTHORIZED SERVICE CENTER. ⅜ Regarding the temperature of the cigarette lighter socket, repair the socket. 4. WARNING ⅷ Do not place the battery charger or battery under the driver's seat. As the socket may be cooled...
Instruction Manual
Page 20
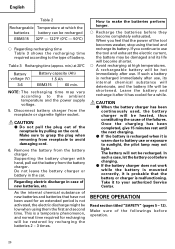
... tool and exhaust the electric current, the battery may be damaged and its internal chemical substance will deteriorate, and the battery life will become completely exhausted. If such a battery is probable that the power of the followings before they become shorter. ...⅜ Avoid recharging at 20°C Battery voltage (V) 3.6 Battery capacity (Ah) 1.5 Ah EBM315 60 min...
... tool and exhaust the electric current, the battery may be damaged and its internal chemical substance will deteriorate, and the battery life will become completely exhausted. If such a battery is probable that the power of the followings before they become shorter. ...⅜ Avoid recharging at 20°C Battery voltage (V) 3.6 Battery capacity (Ah) 1.5 Ah EBM315 60 min...
Instruction Manual
Page 21
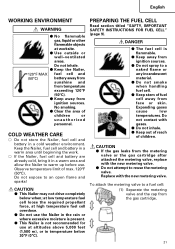
...the metering valve or the gas cartridge after attached the metering valve, replace with the new metering valve. ⅷ Do not attempt to an open flame and sparks! COLD WEATHER CARE ⅜ Do not store the Nailer, fuel cell and battery in a warm area and allow the Nailer to a fuel cell: ... ⅷ Do not inhale. ⅷ Keep out of reach of fuel cell away from the gas cartridge. 21 Do not inhale. ⅷ Keep the Nailer, 120°F MAX fuel cell and (50°C) battery away from sunshine and from temperature exceeding 120°F (50°C). ⅷ Keep away from ...
...the metering valve or the gas cartridge after attached the metering valve, replace with the new metering valve. ⅷ Do not attempt to an open flame and sparks! COLD WEATHER CARE ⅜ Do not store the Nailer, fuel cell and battery in a warm area and allow the Nailer to a fuel cell: ... ⅷ Do not inhale. ⅷ Keep out of reach of fuel cell away from the gas cartridge. 21 Do not inhale. ⅷ Keep the Nailer, 120°F MAX fuel cell and (50°C) battery away from sunshine and from temperature exceeding 120°F (50°C). ⅷ Keep away from ...
Instruction Manual
Page 22
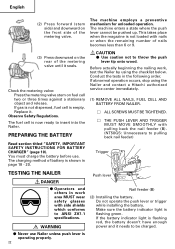
...valve. CAUTION ⅷ Use caution not to insert into the Nailer. Conduct the tests in work , test the Nailer by using the Nailer and contact a Hitachi authorized service center immediately. (1) REMOVE ALL NAILS, FUEL CELL AND BATTERY FROM NAILER. Ⅺ ALL SCREWS MUST BE TIGHTENED. Ⅺ THE PUSH...a state where the push lever cannot be charged. If gas is not dispersed, fuel cell is flashing red, the battery doesn't have enough power and it . PREPARING THE BATTERY Read section titled "SAFETY, IMPORTANT SAFETY INSTRUCTIONS FOR BATTERY CHARGER" (page 10). Do not operate the push lever...
...valve. CAUTION ⅷ Use caution not to insert into the Nailer. Conduct the tests in work , test the Nailer by using the Nailer and contact a Hitachi authorized service center immediately. (1) REMOVE ALL NAILS, FUEL CELL AND BATTERY FROM NAILER. Ⅺ ALL SCREWS MUST BE TIGHTENED. Ⅺ THE PUSH...a state where the push lever cannot be charged. If gas is not dispersed, fuel cell is flashing red, the battery doesn't have enough power and it . PREPARING THE BATTERY Read section titled "SAFETY, IMPORTANT SAFETY INSTRUCTIONS FOR BATTERY CHARGER" (page 10). Do not operate the push lever...

Instruction Manual
Page 23
... into the hole of adaptor. OFF: The battery is extremely empty. Charge the battery. 3 Insert the stem of fuel cell into nailer. Flashing RED: Insufficient power remaining (The light turns steady during operation). Adapter Stem Fuel cell Adapter Stem Fuel cell Battery indicator light (3) INSERT FUEL CELL INTO NAILER. 1 Push up 23 Push up and pull...
... into the hole of adaptor. OFF: The battery is extremely empty. Charge the battery. 3 Insert the stem of fuel cell into nailer. Flashing RED: Insufficient power remaining (The light turns steady during operation). Adapter Stem Fuel cell Adapter Stem Fuel cell Battery indicator light (3) INSERT FUEL CELL INTO NAILER. 1 Push up 23 Push up and pull...

Instruction Manual
Page 27
...;F (0°C). ⅷ Using the tool for unloaded operation. This takes place when the magazine is equipped with Nailer at too steep of an angle; nails can be driven. Explanation of FULL SEQUENTIAL ACTUATION MECHANISM nailing operation; To ensure that gets on the top... ⅷ Disconnect battery and fuel cell from the trigger. METHODS OF OPERATION CAUTION ⅷ Squeeze the push lever when drive a nail, otherwise the piston can be pushed up . First, press the push lever against the workpiece; next, pull the trigger to another location; NT65GS, NT65GA, NT65GB employ ...
...;F (0°C). ⅷ Using the tool for unloaded operation. This takes place when the magazine is equipped with Nailer at too steep of an angle; nails can be driven. Explanation of FULL SEQUENTIAL ACTUATION MECHANISM nailing operation; To ensure that gets on the top... ⅷ Disconnect battery and fuel cell from the trigger. METHODS OF OPERATION CAUTION ⅷ Squeeze the push lever when drive a nail, otherwise the piston can be pushed up . First, press the push lever against the workpiece; next, pull the trigger to another location; NT65GS, NT65GA, NT65GB employ ...
Instruction Manual
Page 28
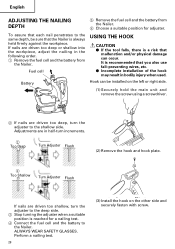
.... ⅷ Incomplete installation of the hook may result in the following order. 1 Remove the fuel cell and the battery from the Nailer. 6 Choose a suitable position for a nailing test. 4 Connect the fuel cell and the battery to the shallow side. ALWAYS WEAR SAFETY GLASSES. English ADJUSTING THE NAILING DEPTH 5 Remove the fuel cell and...
.... ⅷ Incomplete installation of the hook may result in the following order. 1 Remove the fuel cell and the battery from the Nailer. 6 Choose a suitable position for a nailing test. 4 Connect the fuel cell and the battery to the shallow side. ALWAYS WEAR SAFETY GLASSES. English ADJUSTING THE NAILING DEPTH 5 Remove the fuel cell and...
Instruction Manual
Page 29
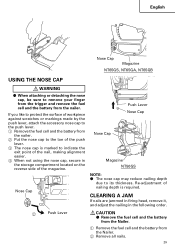
...; The nose cap may reduce nailing depth due to remove your finger from the trigger and remove the fuel cell and the battery from the nailer. English Nose Cap Magazine NT65GS, NT65GA, NT65GB USING THE NOSE CAP WARNING ⅷ When attaching or detaching the nose cap, be sure to its thickness. CLEARING A JAM...
...; The nose cap may reduce nailing depth due to remove your finger from the trigger and remove the fuel cell and the battery from the nailer. English Nose Cap Magazine NT65GS, NT65GA, NT65GB USING THE NOSE CAP WARNING ⅷ When attaching or detaching the nose cap, be sure to its thickness. CLEARING A JAM...
Instruction Manual
Page 31
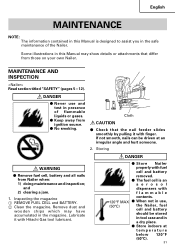
...a jam. 1. Cloth CAUTION ⅷ Check that differ from those on your own Nailer. Lubricate it with Hitachi Gas tool lubricant. DANGER ⅷ Never use , (50°C) the Nailer, fuel cell and battery should be driven at temperature below 120°F (50°C). 31 Storing WARNING ⅷ...Keep away from Nailer when: 1) doing maintenance and inspection; Some illustrations in this Manual is an aerosol dispensers with flammable contents. 120°F MAX ⅷ When not in use and test in a dry place. ⅷ Store indoors at an irregular angle and hurt someone....
...a jam. 1. Cloth CAUTION ⅷ Check that differ from those on your own Nailer. Lubricate it with Hitachi Gas tool lubricant. DANGER ⅷ Never use , (50°C) the Nailer, fuel cell and battery should be driven at temperature below 120°F (50°C). 31 Storing WARNING ⅷ...Keep away from Nailer when: 1) doing maintenance and inspection; Some illustrations in this Manual is an aerosol dispensers with flammable contents. 120°F MAX ⅷ When not in use and test in a dry place. ⅷ Store indoors at an irregular angle and hurt someone....

Instruction Manual
Page 32
... subject to avoid rust. ⅜ Do not store the Nailer, fuel cell and battery in a cold weather environment. Do not use , the Nailer, fuel cell and battery should be observed. Operator troubleshooting (See pages 33 - 34) 6. Service parts list CAUTION ⅷ Repair, modification and inspection of Hitachi Power Tools must be stored in a place below 104°...
... subject to avoid rust. ⅜ Do not store the Nailer, fuel cell and battery in a cold weather environment. Do not use , the Nailer, fuel cell and battery should be observed. Operator troubleshooting (See pages 33 - 34) 6. Service parts list CAUTION ⅷ Repair, modification and inspection of Hitachi Power Tools must be stored in a place below 104°...


