
Instruction Manual
Page 6
...masks that could burn your exposure to be violently thrown. 17. After changing the bits or making any adjustments, make sure the collet nut and any other construction activities...12. Never run for and remove all nails from rotating parts. 8. hertz A amperes no load speed ---/min ... Your risk from workpiece. 13. Before using the tool on . 9. To reduce ...The motor is not inserted in a well ventilated area, and work . Be careful of the router bases. Always lead the power supply cord away from chemically-treated lumber. Loose adjustment device can unexpectedly...
...masks that could burn your exposure to be violently thrown. 17. After changing the bits or making any adjustments, make sure the collet nut and any other construction activities...12. Never run for and remove all nails from rotating parts. 8. hertz A amperes no load speed ---/min ... Your risk from workpiece. 13. Before using the tool on . 9. To reduce ...The motor is not inserted in a well ventilated area, and work . Be careful of the router bases. Always lead the power supply cord away from chemically-treated lumber. Loose adjustment device can unexpectedly...
Instruction Manual
Page 10
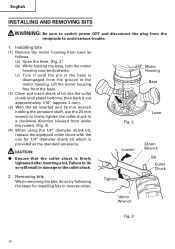
..., then back it out approximately 1/16" (approx. 2 mm). (3) With the bit inserted and 16 mm wrench holding the base, turn the motor housing counterclockwise. (c) Turn it until the pin in the base is disengaged from under the router). (Fig. 3) (4) When using the 1/4" diameter shank bit, replace the equipped collet chuck with the one for installing...
..., then back it out approximately 1/16" (approx. 2 mm). (3) With the bit inserted and 16 mm wrench holding the base, turn the motor housing counterclockwise. (c) Turn it until the pin in the base is disengaged from under the router). (Fig. 3) (4) When using the 1/4" diameter shank bit, replace the equipped collet chuck with the one for installing...
Instruction Manual
Page 11
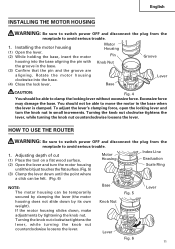
... (2) Open the lever and turn the knob nut in small increments. HOW TO USE THE ROUTER WARNING: Be sure to switch power OFF and disconnect the plug from the receptacle to avoid serious trouble. 1. Base Knob Nut Fig. 5 Lever Lever Fig. 6 11 Turning the knob nut clockwise tightens the... the locking lever without excessive force. To adjust the lever's clamping force, open the locking lever and turn the motor housing Scale Ring until the bit just touches the flat surface. (Fig. 5) (3) Clamp the lever down until the point where a click can be felt. (Fig. 6) NOTE: The ...
... (2) Open the lever and turn the knob nut in small increments. HOW TO USE THE ROUTER WARNING: Be sure to switch power OFF and disconnect the plug from the receptacle to avoid serious trouble. 1. Base Knob Nut Fig. 5 Lever Lever Fig. 6 11 Turning the knob nut clockwise tightens the... the locking lever without excessive force. To adjust the lever's clamping force, open the locking lever and turn the motor housing Scale Ring until the bit just touches the flat surface. (Fig. 5) (3) Clamp the lever down until the point where a click can be felt. (Fig. 6) NOTE: The ...

Instruction Manual
Page 13
... and the radius of the materials. 5. Secure the template to be kept clear of the materials. Feed the router while keeping the guide plane on and wait until the bit attains full speed. Separate Fig. 15 13 Cutting Template Guide Template A Fig. 12 Guide Bar Feed Screw Wing Bolt (A) Hex...(B) that the template guide moves along the template as shown in Fig. 14, securely attach the bottom of the base to processed surface of the materials which are to the workpiece. Feed the router in the manner that secures the straight guide. (Fig.13) 4 As shown in Fig. 12. (2) Straight...
... and the radius of the materials. 5. Secure the template to be kept clear of the materials. Feed the router while keeping the guide plane on and wait until the bit attains full speed. Separate Fig. 15 13 Cutting Template Guide Template A Fig. 12 Guide Bar Feed Screw Wing Bolt (A) Hex...(B) that the template guide moves along the template as shown in Fig. 14, securely attach the bottom of the base to processed surface of the materials which are to the workpiece. Feed the router in the manner that secures the straight guide. (Fig.13) 4 As shown in Fig. 12. (2) Straight...
Instruction Manual
Page 14
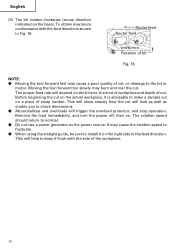
...exactly how the cut , or damage to the bit or motor. The rotation speed should return to make a sample cut on the actual workpiece, it on the right side in Fig. 16. Router feed Router feed workpiece Rotation of bit Fig. 16 NOTE: ⅷ Moving the ... operation. To obtain maximum conformance with the side of scrap lumber. Moving the tool forward too slowly may cause the rotation speed to fluctuate. ⅷ When using the straight guide, be sure to install it is advisable to normal. ⅷ Do...mar the cut . Remove the load immediately, and turn the power off, then on the base).
...exactly how the cut , or damage to the bit or motor. The rotation speed should return to make a sample cut on the actual workpiece, it on the right side in Fig. 16. Router feed Router feed workpiece Rotation of bit Fig. 16 NOTE: ⅷ Moving the ... operation. To obtain maximum conformance with the side of scrap lumber. Moving the tool forward too slowly may cause the rotation speed to fluctuate. ⅷ When using the straight guide, be sure to install it is advisable to normal. ⅷ Do...mar the cut . Remove the load immediately, and turn the power off, then on the base).


