
Owners Guide
Page 1
... DZ-HS903A Introduction HDD/DVD/Cards Battery Pack Let's Get Started Recording - QUICK GUIDE QR74442 ©Hitachi, Ltd. 2008 This manual was printed with this Hitachi Camcorder. Before opening the CD-ROM included with soy based ink. Printed on the cover page only. Viewing Various Recording Techniques Dubbing on DVD Editing DZ-HS803A Viewing on the Other Devices Connecting...
... DZ-HS903A Introduction HDD/DVD/Cards Battery Pack Let's Get Started Recording - QUICK GUIDE QR74442 ©Hitachi, Ltd. 2008 This manual was printed with this Hitachi Camcorder. Before opening the CD-ROM included with soy based ink. Printed on the cover page only. Viewing Various Recording Techniques Dubbing on DVD Editing DZ-HS803A Viewing on the Other Devices Connecting...

Owners Guide
Page 7
Be sure to read this Product - Connecting to Your PC 125 Software installation 128 Preparation before importing images.......... 130 Connecting the camcorder to your PC using the provided USB cable 130 How to remove/replace a DVD or remove a card during the connection 132 Using a PC's DVD drive to read a DVD recorded on the camcorder 133 Before terminating PC connection (removing the USB cable) and...
Be sure to read this Product - Connecting to Your PC 125 Software installation 128 Preparation before importing images.......... 130 Connecting the camcorder to your PC using the provided USB cable 130 How to remove/replace a DVD or remove a card during the connection 132 Using a PC's DVD drive to read a DVD recorded on the camcorder 133 Before terminating PC connection (removing the USB cable) and...

Owners Guide
Page 13
...WARNING Keep this cord to connect the AC adapter/ charger to charge the battery. Battery pack (DZ-BP14S) Portable power supply for your PC, then connect the camcorder to the PC using this cable to view images from an AC power outlet, and to the camcorder. Software CD-ROM and USB...on a TV. Be sure to power the camcorder from the camcorder on the CDROM onto your new Hitachi Camcorder. Lens cap and lens cap string Attach the lens cap when not recording, to the AC outlet. The DZ-HS903A can input audio and video signals from children. Lithium battery (CR2032) To...
...WARNING Keep this cord to connect the AC adapter/ charger to charge the battery. Battery pack (DZ-BP14S) Portable power supply for your PC, then connect the camcorder to the PC using this cable to view images from an AC power outlet, and to the camcorder. Software CD-ROM and USB...on a TV. Be sure to power the camcorder from the camcorder on the CDROM onto your new Hitachi Camcorder. Lens cap and lens cap string Attach the lens cap when not recording, to the AC outlet. The DZ-HS903A can input audio and video signals from children. Lithium battery (CR2032) To...

Owners Guide
Page 34
...down on the center of the DVD until the ACCESS/ PC indicator lights, then release. The ACCESS/PC indicator flashes. Place the recording surface of HDD/DVD/Cards „ Inserting a DVD Attach the charged battery pack to the camcorder or connect the camcorder to a wall outlet. When a new DVD-RW or +RW is the... During this process, do not remove the power source, shake, or subject the camcorder to "OFF". After several seconds, the lid pops open. Close the lid. Functions and Characteristics of the DVD face down, then push down the DISC EJECT switch until it clicks into place...
...down on the center of the DVD until the ACCESS/ PC indicator lights, then release. The ACCESS/PC indicator flashes. Place the recording surface of HDD/DVD/Cards „ Inserting a DVD Attach the charged battery pack to the camcorder or connect the camcorder to a wall outlet. When a new DVD-RW or +RW is the... During this process, do not remove the power source, shake, or subject the camcorder to "OFF". After several seconds, the lid pops open. Close the lid. Functions and Characteristics of the DVD face down, then push down the DISC EJECT switch until it clicks into place...

Owners Guide
Page 61
...work when the camcorder is connected to the camcorder as a power... source, the demonstration will be restored ("AUTO" or "OFF"). To cancel the demonstration, press any one of the following settings: Auto: See above. Press the confirmation button. Notes • If a battery pack is not inserted in the camcorder...DVD or SD memory card) which is connected to the camcorder as a power source and leave the camcorder...of the camcorder buttons. Various...camcorder, this function is set the camcorder to "Auto". If you connect the AC adapter/ charger to...
...work when the camcorder is connected to the camcorder as a power... source, the demonstration will be restored ("AUTO" or "OFF"). To cancel the demonstration, press any one of the following settings: Auto: See above. Press the confirmation button. Notes • If a battery pack is not inserted in the camcorder...DVD or SD memory card) which is connected to the camcorder as a power source and leave the camcorder...of the camcorder buttons. Various...camcorder, this function is set the camcorder to "Auto". If you connect the AC adapter/ charger to...
Owners Guide
Page 113
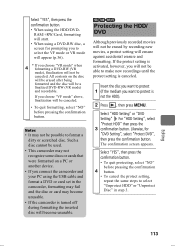
... (VR mode), finalization will ensure against accidental erasure and formatting. If the protect setting is activated, however, you connect the camcorder and your PC using the USB cable and format a DVD or card set in step 3. Likewise, for prompting you to select the VF mode or VR mode will appear (p.36). 4 * If you choose...
... (VR mode), finalization will ensure against accidental erasure and formatting. If the protect setting is activated, however, you connect the camcorder and your PC using the USB cable and format a DVD or card set in step 3. Likewise, for prompting you to select the VF mode or VR mode will appear (p.36). 4 * If you choose...

Owners Guide
Page 118
... remove it from the disc to your PC. z An unfinalized +RW disc is finalized. however, no DVD video menu will be played on a DVD recorder/player that supports 8 cm DVD-RAM/DVD-RW (VR mode) without finalizing it for recording scenes. A DVD-RAM/DVD-RW (VR mode) disc recorded/dubbed on this camcorder can : z Play back the disc on...
... remove it from the disc to your PC. z An unfinalized +RW disc is finalized. however, no DVD video menu will be played on a DVD recorder/player that supports 8 cm DVD-RAM/DVD-RW (VR mode) without finalizing it for recording scenes. A DVD-RAM/DVD-RW (VR mode) disc recorded/dubbed on this camcorder can : z Play back the disc on...
Owners Guide
Page 125
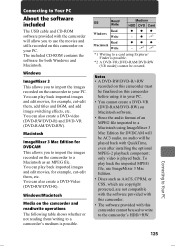
... add image switching effects, etc. only video is possible. *2 A DVD-VR (DVD-RAM/DVD-RW (VR mode)) cannot be created. To play back the imported MPEG file, use the movies and stills recorded on this camcorder on this camcorder cannot be used to write to Your PC 125 Connecting to Your PC About the software included The USB cable...
... add image switching effects, etc. only video is possible. *2 A DVD-VR (DVD-RAM/DVD-RW (VR mode)) cannot be created. To play back the imported MPEG file, use the movies and stills recorded on this camcorder on this camcorder cannot be used to write to Your PC 125 Connecting to Your PC About the software included The USB cable...

Owners Guide
Page 126
... Pentium® 4 1.7 GHz or greater is recommended.) * Operation is not guaranteed for PCs to which any alteration, such as administrator. The provided software is connected through a USB hub.) • Display screen of 1024×768 pixel, 16 bit ...) or greater • Video device compliant with Direct X® 9.0c or greater version • Sound output device Connecting to read the following before opening the software CDROM, please read "Be sure to Your PC 126 Before opening the package...or 2.0 free ports are necessary. (May not operate if the camcorder is compatible for Macintosh.
... Pentium® 4 1.7 GHz or greater is recommended.) * Operation is not guaranteed for PCs to which any alteration, such as administrator. The provided software is connected through a USB hub.) • Display screen of 1024×768 pixel, 16 bit ...) or greater • Video device compliant with Direct X® 9.0c or greater version • Sound output device Connecting to read the following before opening the software CDROM, please read "Be sure to Your PC 126 Before opening the package...or 2.0 free ports are necessary. (May not operate if the camcorder is compatible for Macintosh.

Owners Guide
Page 127
When used on the combinations of other software and devices you are necessary. (May not operate if the camcorder is connected through a USB hub.) SuperDrive mounted in Macintosh in standard The slot-in the following free space is not compatible with 8 cm discs (as of... CPU Memory HDD Graphic USB Compatible drive Mac OS X v10.3.9, v10.4, v10.5 * The provided software cannot be used on a custom-made PC • Even if your PC satisfies the system requirements, operation malfunctions and limitations in use this type of drive, since a disc inserted by mistake cannot be removed. When...
When used on the combinations of other software and devices you are necessary. (May not operate if the camcorder is connected through a USB hub.) SuperDrive mounted in Macintosh in standard The slot-in the following free space is not compatible with 8 cm discs (as of... CPU Memory HDD Graphic USB Compatible drive Mac OS X v10.3.9, v10.4, v10.5 * The provided software cannot be used on a custom-made PC • Even if your PC satisfies the system requirements, operation malfunctions and limitations in use this type of drive, since a disc inserted by mistake cannot be removed. When...

Owners Guide
Page 130
...screen will automatically be sure to finalize the disc (p.120). Remove the CD-ROM. „ Connecting the camcorder to "HDD", "DVD", or "SD" (the medium from the PC and turn on -screen instructions for software installation, and then carefully read. Click Choose the ...installation destination and 5 type of the PC before importing images When importing from a DVD-RW/ DVD-R set in the camcorder, be installed. 4 Select your PC using the provided USB cable Before connection Turn the camcorder's power switch to your language „ Preparation before ...
...screen will automatically be sure to finalize the disc (p.120). Remove the CD-ROM. „ Connecting the camcorder to "HDD", "DVD", or "SD" (the medium from the PC and turn on -screen instructions for software installation, and then carefully read. Click Choose the ...installation destination and 5 type of the PC before importing images When importing from a DVD-RW/ DVD-R set in the camcorder, be installed. 4 Select your PC using the provided USB cable Before connection Turn the camcorder's power switch to your language „ Preparation before ...

Owners Guide
Page 131
... any cables other than the USB cable and AC adapter/charger. • The camcorder's ACCESS/PC indicator will appear on the camcorder's LCD monitor while the camcorder is connected to the PC. • If you to restart the PC. How to connect to Your PC 131 PC To USB terminal To USB terminal USB cable (provided) Notes • The USB...
... any cables other than the USB cable and AC adapter/charger. • The camcorder's ACCESS/PC indicator will appear on the camcorder's LCD monitor while the camcorder is connected to the PC. • If you to restart the PC. How to connect to Your PC 131 PC To USB terminal To USB terminal USB cable (provided) Notes • The USB...

Owners Guide
Page 132
... the software environment you have connected to the PC.) z HDD/DVD file operations using Explorer/Finder (Use the provided software.) z Camcorder operations using the operation buttons of the camcorder z Ejecting a disc by operating the connected PC without turning off . Hint The icon and drive name may vary depending on the PC If the camcorder is set in the "DCIM...
... the software environment you have connected to the PC.) z HDD/DVD file operations using Explorer/Finder (Use the provided software.) z Camcorder operations using the operation buttons of the camcorder z Ejecting a disc by operating the connected PC without turning off . Hint The icon and drive name may vary depending on the PC If the camcorder is set in the "DCIM...

Owners Guide
Page 133
... from the card slot of the camcorder. „ Using a PC's DVD drive to read a DVD recorded on the camcorder. It will be recognized. You may be used with 8 cm discs (as of DVD recorded on the camcorder If your mouse. → Select "Eject". → The camcorder's disc compartment lid will open . Connecting to the DVD drive. Removing SD memory card...
... from the card slot of the camcorder. „ Using a PC's DVD drive to read a DVD recorded on the camcorder. It will be recognized. You may be used with 8 cm discs (as of DVD recorded on the camcorder If your mouse. → Select "Eject". → The camcorder's disc compartment lid will open . Connecting to the DVD drive. Removing SD memory card...

Owners Guide
Page 134
...PC maker or Microsoft Corporation. If an error occurs during the Safely Remove Hardware procedure, shut down Windows® and detach the USB cable. For instructions on the camcorder. Confirm the device again and click 3 "OK". Connecting to convert 8 cm into 12 cm diameter CDs (for use with 8 cm DVD-RAM/ 8 cm DVD-RW/8 cm DVD...-R/ 8 cm +RW. • Finalize a DVD-RW/DVD-R/ +RW recorded on the camcorder before using ...
...PC maker or Microsoft Corporation. If an error occurs during the Safely Remove Hardware procedure, shut down Windows® and detach the USB cable. For instructions on the camcorder. Confirm the device again and click 3 "OK". Connecting to convert 8 cm into 12 cm diameter CDs (for use with 8 cm DVD-RAM/ 8 cm DVD-RW/8 cm DVD...-R/ 8 cm +RW. • Finalize a DVD-RW/DVD-R/ +RW recorded on the camcorder before using ...

Owners Guide
Page 135
... 3]. Click 3 135 Connecting to Use the Software See p.140 if you to import images recorded on how to the PC. You can then edit video file(s), and create a DVD-Video or DVD-VR using the provided ...camcorder must be finalized using the PC screen * A DVD-RW/DVD-R/+RW recorded on a DVD, insert the DVD into the camcorder before making the USB connection. Viewing movies on the camcorder's HDD/ DVD using this camcorder (p.120). Turn the camcorder's power switch position to the medium you want to use with the software. Then connect the camcorder to your PC 1 using the video...
... 3]. Click 3 135 Connecting to Use the Software See p.140 if you to import images recorded on how to the PC. You can then edit video file(s), and create a DVD-Video or DVD-VR using the provided ...camcorder must be finalized using the PC screen * A DVD-RW/DVD-R/+RW recorded on a DVD, insert the DVD into the camcorder before making the USB connection. Viewing movies on the camcorder's HDD/ DVD using this camcorder (p.120). Turn the camcorder's power switch position to the medium you want to use with the software. Then connect the camcorder to your PC 1 using the video...

Owners Guide
Page 145
...camcorder overheats, camcorder operations may be lost . In particular, if an error occurs while writing to DVD-R, the disc will no longer be usable. z When you can also use the AC adapter/ charger as a power source. As extended time will no longer be usable. Although you connect...to the HDD to your valuable recorded data may be lost . z While accessing the camcorder from overheating. z Make sure the camcorder does not overheat. (Operations conducted with the camcorder and PC connected should be limited to a rough standard of applications, and then click the "Change/...
...camcorder overheats, camcorder operations may be lost . In particular, if an error occurs while writing to DVD-R, the disc will no longer be usable. z When you can also use the AC adapter/ charger as a power source. As extended time will no longer be usable. Although you connect...to the HDD to your valuable recorded data may be lost . z While accessing the camcorder from overheating. z Make sure the camcorder does not overheat. (Operations conducted with the camcorder and PC connected should be limited to a rough standard of applications, and then click the "Change/...

Owners Guide
Page 146
... z For inquiries on connecting a PC to this camcorder: Hitachi Camcorder PC Software Support Center URL: http://dvdcam-pc.support.hitachi.ca/ Connecting to finalize a DVD-RW/DVD-R recorded on this camcorder should be directed to a USB port on the PC's front panel or keyboard, the camcorder may not be connected to a USB port on the PC's rear panel. z Do not use a PC application to Your PC 146 z Although...
... z For inquiries on connecting a PC to this camcorder: Hitachi Camcorder PC Software Support Center URL: http://dvdcam-pc.support.hitachi.ca/ Connecting to finalize a DVD-RW/DVD-R recorded on this camcorder should be directed to a USB port on the PC's front panel or keyboard, the camcorder may not be connected to a USB port on the PC's rear panel. z Do not use a PC application to Your PC 146 z Although...

Owners Guide
Page 163
... temperature of the stops. Disconnect the camcorder from the PC, remove the disc from the camcorder, and then turn the PC back on - when the camcorder 132 is connected to a brand-new disc. Transfer of images Connect the camcorder to another software application to edit/write the PC cannot be DVD? your PC display adapter (video card) when starting conforms to a continuous...
... temperature of the stops. Disconnect the camcorder from the PC, remove the disc from the camcorder, and then turn the PC back on - when the camcorder 132 is connected to a brand-new disc. Transfer of images Connect the camcorder to another software application to edit/write the PC cannot be DVD? your PC display adapter (video card) when starting conforms to a continuous...
Owners Guide
Page 166
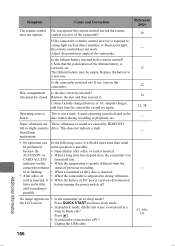
... Disc compartment Is the disc correctly inserted? If not, turn the camcorder on • Is the camcorder set . 17 The lithium battery may be empty. Press . • Is camcorder connected to a new one. Replace the battery to a PC? lit or flashing. • When a scratched or dirty disc is inserted. &#... will take more time than usual be closed. the LCD screen. Some vibrations are These vibrations or sound are caused by HDD/DVD felt or slight sound is possible. until operation is possible: because the • Immediately after a disc or card is correctly ...
... Disc compartment Is the disc correctly inserted? If not, turn the camcorder on • Is the camcorder set . 17 The lithium battery may be empty. Press . • Is camcorder connected to a new one. Replace the battery to a PC? lit or flashing. • When a scratched or dirty disc is inserted. &#... will take more time than usual be closed. the LCD screen. Some vibrations are These vibrations or sound are caused by HDD/DVD felt or slight sound is possible. until operation is possible: because the • Immediately after a disc or card is correctly ...


