
Owners Guide
Page 1
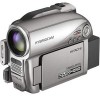
... Hitachi Camcorder. Please read this product, please read p.182. Printed on the cover page only. The Instruction Manual contains an illustration of the DZ-HS803A on recycled paper Printed in Japan OY-K (I) DZ-HS903A DZ-HS803A Before opening the CD-ROM included with soy based ink. After reading the Instruction Manual, store it safely. DZ-HS903A Instruction Manual DZ-HS803A Instruction Manual (English) DZ-HS903A DZ...
... Hitachi Camcorder. Please read this product, please read p.182. Printed on the cover page only. The Instruction Manual contains an illustration of the DZ-HS803A on recycled paper Printed in Japan OY-K (I) DZ-HS903A DZ-HS803A Before opening the CD-ROM included with soy based ink. After reading the Instruction Manual, store it safely. DZ-HS903A Instruction Manual DZ-HS803A Instruction Manual (English) DZ-HS903A DZ...
Owners Guide
Page 5
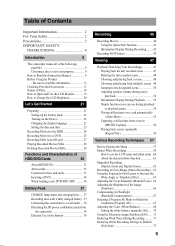
...the display language 22 Setting the date and time 23 Recording Movies to the HDD 24 Recording Movies to a DVD 25 Recording Stills to an SD card 27 Playing Recorded Movies/Stills 28 Deleting Recorded Movies/Stills 29 Functions and Characteristics ... .......... 71 Restoring all of Contents Important Information 2 For Your Safety 2 Precautions 2 IMPORTANT SAFETY INSTRUCTIONS 4 Introduction 8 This camcorder makes all the Recording Settings to Read this Instruction Manual 9 Before Using the Product - Table of the following possible 8 Choosing a disc to suit your purpose 9 How to Default...
...the display language 22 Setting the date and time 23 Recording Movies to the HDD 24 Recording Movies to a DVD 25 Recording Stills to an SD card 27 Playing Recorded Movies/Stills 28 Deleting Recorded Movies/Stills 29 Functions and Characteristics ... .......... 71 Restoring all of Contents Important Information 2 For Your Safety 2 Precautions 2 IMPORTANT SAFETY INSTRUCTIONS 4 Introduction 8 This camcorder makes all the Recording Settings to Read this Instruction Manual 9 Before Using the Product - Table of the following possible 8 Choosing a disc to suit your purpose 9 How to Default...

Owners Guide
Page 9
... this Instruction Manual This Instruction Manual is intended for the DZ-HS903A and DZ-HS803A models. YES NO Re-recordable DVD-RAM DVD-RW (VR mode) Playable on devices that appear on most other DVD players/recorders once they are compatible with 8 cm DVD-RAM or 8 cm DVD-RW (VR mode) accordingly. * For details, refer to Read this camcorder? How to...
... this Instruction Manual This Instruction Manual is intended for the DZ-HS903A and DZ-HS803A models. YES NO Re-recordable DVD-RAM DVD-RW (VR mode) Playable on devices that appear on most other DVD players/recorders once they are compatible with 8 cm DVD-RAM or 8 cm DVD-RW (VR mode) accordingly. * For details, refer to Read this camcorder? How to...
Owners Guide
Page 10
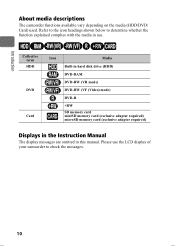
... the media in this manual. Introduction About media descriptions The camcorder functions available vary depending on the media (HDD/DVD/ Card) used. HDD RAM -RW (VR) -RW (VF) R +RW CARD Collective term HDD DVD Card Icon CARD Media Built-in hard disk drive (HDD) DVD-RAM DVD-RW (VR mode) DVD-RW (VF (Video) mode) DVD-R +RW SD memory...
... the media in this manual. Introduction About media descriptions The camcorder functions available vary depending on the media (HDD/DVD/ Card) used. HDD RAM -RW (VR) -RW (VF) R +RW CARD Collective term HDD DVD Card Icon CARD Media Built-in hard disk drive (HDD) DVD-RAM DVD-RW (VR mode) DVD-RW (VF (Video) mode) DVD-R +RW SD memory...

Owners Guide
Page 15
... button (p.67) 15 Card slot (p.27) QUICK MENU button (p.57) Used to choose scenes (movies and stills), select menu items and confirm, play/pause, or manually adjust exposure/focus. Speaker RESET button (p.172) FULL AUTO button (p.72) DISPLAY button (p.42, 48-49, 52) CARD ACCESS indicator Tripod receptacle Used to attach...
... button (p.67) 15 Card slot (p.27) QUICK MENU button (p.57) Used to choose scenes (movies and stills), select menu items and confirm, play/pause, or manually adjust exposure/focus. Speaker RESET button (p.172) FULL AUTO button (p.72) DISPLAY button (p.42, 48-49, 52) CARD ACCESS indicator Tripod receptacle Used to attach...
Owners Guide
Page 21
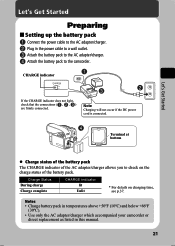
...the battery pack. Let's Get Started Preparing „ Setting up the battery pack Connect the power cable to the AC adapter/charger. Plug in this manual. 21 Attach the battery pack to the AC adapter/charger. Attach the battery pack to a wall outlet. Notes • Charge battery pack in ...temperatures above +50ºF (10ºC) and below +86ºF (30ºC). • Use only the AC adapter/charger which accompanied your camcorder or direct replacement as listed in the power cable to the camcorder. Note Charging will not occur if the DC power cord is connected.
...the battery pack. Let's Get Started Preparing „ Setting up the battery pack Connect the power cable to the AC adapter/charger. Plug in this manual. 21 Attach the battery pack to the AC adapter/charger. Attach the battery pack to a wall outlet. Notes • Charge battery pack in ...temperatures above +50ºF (10ºC) and below +86ºF (30ºC). • Use only the AC adapter/charger which accompanied your camcorder or direct replacement as listed in the power cable to the camcorder. Note Charging will not occur if the DC power cord is connected.
Owners Guide
Page 41
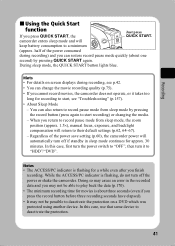
... also return to record pause mode from sleep mode, the zoom position (approx. 1.5×), manual focus, exposure, and backlight compensation will return to their default settings (p.62, 64-67). ...movies is flashing for recording to a minimum (approx. Hints • For details on a DVD which was protected using another device. Notes • The ACCESS/PC indicator is about one second... can change the movie recording quality (p.75). • If you cannot record movies, the camcorder does not operate, or it to deactivate the protection on screen displays during recording) and you...
... also return to record pause mode from sleep mode, the zoom position (approx. 1.5×), manual focus, exposure, and backlight compensation will return to their default settings (p.62, 64-67). ...movies is flashing for recording to a minimum (approx. Hints • For details on a DVD which was protected using another device. Notes • The ACCESS/PC indicator is about one second... can change the movie recording quality (p.75). • If you cannot record movies, the camcorder does not operate, or it to deactivate the protection on screen displays during recording) and you...

Owners Guide
Page 44
Or DVD-R recorded using a HITACHI camcorder marketed before the DZ-HS903A/ DZ-HS803A : +RW : Finalized +RW : SD memory card : Locked SD memory card No icon*2 Movie recording quality (p.75) (when using HDD/DVD) XTRA : Best quality FINE : High quality...Manual Focus (p.64) No gauge : Auto : Manual Current medium and its status (p.30) (HDD/DVD/Card) : HDD : Protected HDD : DVD-RAM : Protected DVD-RAM / : DVD-RW (VR mode/VF mode) : Protected DVD-RW (VR mode) : Finalized DVD-RW (VR mode) : Protected Finalized DVD-RW (VR mode) : Finalized DVD-RW (VF mode) : DVD-R : Finalized DVD...
Or DVD-R recorded using a HITACHI camcorder marketed before the DZ-HS903A/ DZ-HS803A : +RW : Finalized +RW : SD memory card : Locked SD memory card No icon*2 Movie recording quality (p.75) (when using HDD/DVD) XTRA : Best quality FINE : High quality...Manual Focus (p.64) No gauge : Auto : Manual Current medium and its status (p.30) (HDD/DVD/Card) : HDD : Protected HDD : DVD-RAM : Protected DVD-RAM / : DVD-RW (VR mode/VF mode) : Protected DVD-RW (VR mode) : Finalized DVD-RW (VR mode) : Protected Finalized DVD-RW (VR mode) : Finalized DVD-RW (VF mode) : DVD-R : Finalized DVD...
Owners Guide
Page 46
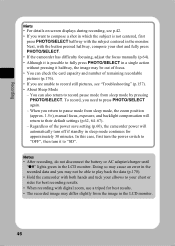
...able to play back the data (p.170). • Hold the camcorder with both hands and tuck your elbows to your shot and fully press PHOTO/SELECT. • If the camcorder has difficulty focusing, adjust the focus manually (p.64). • Although it to record pause mode from sleep ...mode, the zoom position (approx. 1.5×), manual focus, exposure, and backlight compensation will automatically turn it is not ...
...able to play back the data (p.170). • Hold the camcorder with both hands and tuck your elbows to your shot and fully press PHOTO/SELECT. • If the camcorder has difficulty focusing, adjust the focus manually (p.64). • Although it to record pause mode from sleep ...mode, the zoom position (approx. 1.5×), manual focus, exposure, and backlight compensation will automatically turn it is not ...
Owners Guide
Page 64
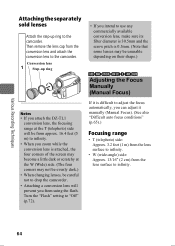
...from the lens surface to "Off" (p.72). Then remove the lens cap from the conversion lens and attach the conversion lens to the camcorder. Various Recording Techniques Attaching the separately sold lenses Attach the step-up ring • If you intend to use any commercially available conversion ...some lenses may be unusable depending on their shape.) HDD RAM -RW (VR) -RW (VF) R +RW CARD Adjusting the Focus Manually (Manual Focus) Notes • If you attach the DZ-TL1 conversion lens, the focusing range at the T (telephoto) side will be from approx. 16.4 feet (5 m) to infinity. •...
...from the lens surface to "Off" (p.72). Then remove the lens cap from the conversion lens and attach the conversion lens to the camcorder. Various Recording Techniques Attaching the separately sold lenses Attach the step-up ring • If you intend to use any commercially available conversion ...some lenses may be unusable depending on their shape.) HDD RAM -RW (VR) -RW (VF) R +RW CARD Adjusting the Focus Manually (Manual Focus) Notes • If you attach the DZ-TL1 conversion lens, the focusing range at the T (telephoto) side will be from approx. 16.4 feet (5 m) to infinity. •...

Owners Guide
Page 65
...subject. The Focus icon appears in step 2. The icon is pressed. Push the zoom lever toward the T 2 (telephoto) side to manual focusing, press e. During record pause or recording, press e (MF). Manual focus icon 1 FINE 0:00:00 REM 3 0 MIN 8 : 0 0 AM 1 2 / 1/2008 Difficult auto focus conditions ... the focus may become blurred if you wish to telephoto zooming. When the focus is turned off, the camcorder returns to auto focus. 3 • To manually adjust the focus, always magnify the subject as in the LCD monitor. Various Recording Techniques Hint If you switch...
...subject. The Focus icon appears in step 2. The icon is pressed. Push the zoom lever toward the T 2 (telephoto) side to manual focusing, press e. During record pause or recording, press e (MF). Manual focus icon 1 FINE 0:00:00 REM 3 0 MIN 8 : 0 0 AM 1 2 / 1/2008 Difficult auto focus conditions ... the focus may become blurred if you wish to telephoto zooming. When the focus is turned off, the camcorder returns to auto focus. 3 • To manually adjust the focus, always magnify the subject as in the LCD monitor. Various Recording Techniques Hint If you switch...

Owners Guide
Page 68
... the beach or on a ski slope. Indoor 1 To record under bright fluorescent light 68 Select "Camera Functions Setup" 2 "Program AE" a Program AE mode Press the confirmation button to confirm, then ...a spot light, you to match the light source or situation. Low Light Allows you can manually adjust white balance to record in dark places with limited light. In such a case, use ...Sports mode under fluorescent light, the LCD screen may flicker. The camcorder normally adjusts the color automatically (during Auto). While the naked eye perceives colors as white images...
... the beach or on a ski slope. Indoor 1 To record under bright fluorescent light 68 Select "Camera Functions Setup" 2 "Program AE" a Program AE mode Press the confirmation button to confirm, then ...a spot light, you to match the light source or situation. Low Light Allows you can manually adjust white balance to record in dark places with limited light. In such a case, use ...Sports mode under fluorescent light, the LCD screen may flicker. The camcorder normally adjusts the color automatically (during Auto). While the naked eye perceives colors as white images...

Owners Guide
Page 70
... is set the white balance. Various Recording Techniques 2 During record pause, press MENU. 3 Select "Camera Functions Setup" "White Balance" "Set" Press the confirmation button. 4 " " flashes in memory,... power is changed again. • In order to flash. „ Setting the white balance manually (Set) Prepare a white object such a thick sheet of white paper that it fills the ...to accurately adjust the color, readjust the settings 6 in memory until " lights steadily. Point the camcorder at the white object so that is positioned in the LCD monitor. Thick white paper 1 Press C...
... is set the white balance. Various Recording Techniques 2 During record pause, press MENU. 3 Select "Camera Functions Setup" "White Balance" "Set" Press the confirmation button. 4 " " flashes in memory,... power is changed again. • In order to flash. „ Setting the white balance manually (Set) Prepare a white object such a thick sheet of white paper that it fills the ...to accurately adjust the color, readjust the settings 6 in memory until " lights steadily. Point the camcorder at the white object so that is positioned in the LCD monitor. Thick white paper 1 Press C...
Owners Guide
Page 77
... confirm, then MENU to play a +RW recorded in "16:9" using DVD-RW (VF mode)/DVD-R, you cannot change the "16:9" setting in the middle of aspect ratio (16:9/ 4:3) in the gaps between video signals. • If you connect the camcorder to your DVD player/recorder' instruction manual). In this case, change the still picture recording quality.
... confirm, then MENU to play a +RW recorded in "16:9" using DVD-RW (VF mode)/DVD-R, you cannot change the "16:9" setting in the middle of aspect ratio (16:9/ 4:3) in the gaps between video signals. • If you connect the camcorder to your DVD player/recorder' instruction manual). In this case, change the still picture recording quality.

Owners Guide
Page 116
... control. In this case, change remote control code. The image shown in the camcorder's LCD screen regardless of your TV screen, using other Hitachi-brand A/V devices, they may be adjusted on your TV. • When operating the camcorder while viewing your TV. HDD RAM -RW (VR) -RW (VF) R +RW CARD &#...TV is set to wide mode, the disc navigation screen may cause damage (ghosting) on your TV's operation manual on how to your TV's operation manual.) • Do not leave the camcorder's Menu screen and disc navigation screen displayed on your TV screen for too long. Turn on the Other ...
... control. In this case, change remote control code. The image shown in the camcorder's LCD screen regardless of your TV screen, using other Hitachi-brand A/V devices, they may be adjusted on your TV. • When operating the camcorder while viewing your TV. HDD RAM -RW (VR) -RW (VF) R +RW CARD &#...TV is set to wide mode, the disc navigation screen may cause damage (ghosting) on your TV's operation manual on how to your TV's operation manual.) • Do not leave the camcorder's Menu screen and disc navigation screen displayed on your TV screen for too long. Turn on the Other ...

Owners Guide
Page 126
... or more USB 1.1 or 2.0 free ports are necessary. (May not operate if the camcorder is excluded. * To use Windows XP screens for Windows and Mac OS X 10.4 ... opening the package of 1024×768 pixel, 16 bit (High color) or greater • Video device compliant with Direct X® 9.0c or greater version • Sound output device Connecting to which... for Japanese, English, German, French, Spanish, Italian, Chinese (simplified characters) users. Screen shots in this manual use this software, you must log in as overclocking, had been added from the original specifications. •...
... or more USB 1.1 or 2.0 free ports are necessary. (May not operate if the camcorder is excluded. * To use Windows XP screens for Windows and Mac OS X 10.4 ... opening the package of 1024×768 pixel, 16 bit (High color) or greater • Video device compliant with Direct X® 9.0c or greater version • Sound output device Connecting to which... for Japanese, English, German, French, Spanish, Italian, Chinese (simplified characters) users. Screen shots in this manual use this software, you must log in as overclocking, had been added from the original specifications. •...

Owners Guide
Page 135
... with the PC. The following shows the basic operations of the camcorder (HDD, DVD, or card), and select "Eject" in the PDF manual. How to Use the Software See p.140 if you want to edit video files) are a Macintosh user. Turn the camcorder's power switch position to the medium you to use images recorded on...
... with the PC. The following shows the basic operations of the camcorder (HDD, DVD, or card), and select "Eject" in the PDF manual. How to Use the Software See p.140 if you want to edit video files) are a Macintosh user. Turn the camcorder's power switch position to the medium you to use images recorded on...
Owners Guide
Page 139
...camcorder for extended hours is too long for cut / edit the video so that was designated when images were saved, and the file name will be saved as a project file. Once the contents on the disc have been deleted, the disc compartment on the disc. Notes • If you load a written DVD... ImageMixer 3 for one disc. "Save project" before writing is being executed. Choosing "Yes" will appear. To display the ImageMixer 3 manual, choose "Help", and then "ImageMixer 3 Help (H) F1", while ImageMixer 3 is complete, the operation status can be saved in the project folder that it , ...
...camcorder for extended hours is too long for cut / edit the video so that was designated when images were saved, and the file name will be saved as a project file. Once the contents on the disc have been deleted, the disc compartment on the disc. Notes • If you load a written DVD... ImageMixer 3 for one disc. "Save project" before writing is being executed. Choosing "Yes" will appear. To display the ImageMixer 3 manual, choose "Help", and then "ImageMixer 3 Help (H) F1", while ImageMixer 3 is complete, the operation status can be saved in the project folder that it , ...
Owners Guide
Page 140
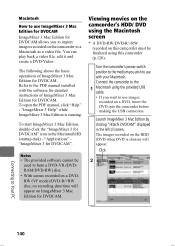
... back a video file, edit it and create a DVD-Video. Notes • The provided software cannot be used to use with the software for detailed instructions of ImageMixer 3 Mac Edition for DVDCAM". Click 2 Connecting to the PDF manual installed with your Macintosh. Refer to Your PC 140 Viewing movies on the camcorder's HDD/ DVD using this camcorder (p.120).
... back a video file, edit it and create a DVD-Video. Notes • The provided software cannot be used to use with the software for detailed instructions of ImageMixer 3 Mac Edition for DVDCAM". Click 2 Connecting to the PDF manual installed with your Macintosh. Refer to Your PC 140 Viewing movies on the camcorder's HDD/ DVD using this camcorder (p.120).

Owners Guide
Page 160
You cannot adjust recording level - Release your subject? Focus is set to manual focus. The camcorder is not correct. If you connect the AC adapter/charger to the camcorder. The camcorder automatically changes. The LCD screen Did you can also use the battery pack for repair (if the...a - If the LCD monitor is not a malfunction. Focus the subject 64 manually, or release manual focus. If the above causes do the repair later. You must connect the AC adapter/charger to the camcorder to make repairs. An error message for Follow the on again. - The ...
You cannot adjust recording level - Release your subject? Focus is set to manual focus. The camcorder is not correct. If you connect the AC adapter/charger to the camcorder. The camcorder automatically changes. The LCD screen Did you can also use the battery pack for repair (if the...a - If the LCD monitor is not a malfunction. Focus the subject 64 manually, or release manual focus. If the above causes do the repair later. You must connect the AC adapter/charger to the camcorder to make repairs. An error message for Follow the on again. - The ...


