
Owners Guide
Page 1
... Instruction Manual contains an illustration of the DZ-HS803A on recycled paper Printed in Japan OY-K (I) DZ-HS903A DZ-HS803A Printed on the cover page only. Please read p.182. Before opening the CD-ROM included with soy based ink. DZ-HS903A Instruction Manual DZ-HS803A Instruction Manual (English) DZ-HS903A DZ-HS803A DZ-HS903A Introduction HDD/DVD/Cards Battery Pack Let's Get Started Recording -
... Instruction Manual contains an illustration of the DZ-HS803A on recycled paper Printed in Japan OY-K (I) DZ-HS903A DZ-HS803A Printed on the cover page only. Please read p.182. Before opening the CD-ROM included with soy based ink. DZ-HS903A Instruction Manual DZ-HS803A Instruction Manual (English) DZ-HS903A DZ-HS803A DZ-HS903A Introduction HDD/DVD/Cards Battery Pack Let's Get Started Recording -
Owners Guide
Page 2
... but some (less than 1. Avoid using and storing the battery pack in -home videotaping of higher class than 0.01%) may apply to the inside part of time, turn it is made by highly precise technology. The DVD video camera/recorder and AC adapter/charger have the following caution marks. ...WARNING: TO PREVENT FIRE OR SHOCK HAZARD, BE SURE TO USE THE SPECIFIED AC ADAPTER/ CHARGER (DZ-ACS3). CAUTION RISK OF ELECTRIC SHOCK DO NOT OPEN CAUTION...
... but some (less than 1. Avoid using and storing the battery pack in -home videotaping of higher class than 0.01%) may apply to the inside part of time, turn it is made by highly precise technology. The DVD video camera/recorder and AC adapter/charger have the following caution marks. ...WARNING: TO PREVENT FIRE OR SHOCK HAZARD, BE SURE TO USE THE SPECIFIED AC ADAPTER/ CHARGER (DZ-ACS3). CAUTION RISK OF ELECTRIC SHOCK DO NOT OPEN CAUTION...
Owners Guide
Page 5
... 28 Deleting Recorded Movies/Stills 29 Functions and Characteristics of HDD/DVD/Cards 30 About HDD/DVD 31 About cards 33 Cautions for discs and cards 33 Inserting a DVD 34 When loading a new DVD-RW/+RW .......... 36 Battery Pack 37 CHARGE lamp status and charging time ..... 37 Recording... time with a fully charged battery. 37 Connecting the camcorder to a wall outlet.... 38 Detaching the DC power cord/battery pack from the camcorder ...
... 28 Deleting Recorded Movies/Stills 29 Functions and Characteristics of HDD/DVD/Cards 30 About HDD/DVD 31 About cards 33 Cautions for discs and cards 33 Inserting a DVD 34 When loading a new DVD-RW/+RW .......... 36 Battery Pack 37 CHARGE lamp status and charging time ..... 37 Recording... time with a fully charged battery. 37 Connecting the camcorder to a wall outlet.... 38 Detaching the DC power cord/battery pack from the camcorder ...

Owners Guide
Page 13
...onto your new Hitachi Camcorder. Lens cap and lens cap string Attach the lens cap when not recording, to the AC outlet. Software CD-ROM and USB cable Install the software on a TV. Be sure to fully charge the battery before use ...battery away from external AV devices using the USB cable. 13 If swallowed, consult a physician immediately for your PC, then connect the camcorder to view images from an AC outlet, use . Introduction Checking Provided Accessories Make sure the following accessories are included in the package. The DZ-HS903A can input audio and video...
...onto your new Hitachi Camcorder. Lens cap and lens cap string Attach the lens cap when not recording, to the AC outlet. Software CD-ROM and USB cable Install the software on a TV. Be sure to fully charge the battery before use ...battery away from external AV devices using the USB cable. 13 If swallowed, consult a physician immediately for your PC, then connect the camcorder to view images from an AC outlet, use . Introduction Checking Provided Accessories Make sure the following accessories are included in the package. The DZ-HS903A can input audio and video...

Owners Guide
Page 14
Power switch (p.22) Hand strap (p.18) 14 When the power switch is set to "HDD", set to "DVD". Names of Parts Power switch side Introduction QUICK START button (p.41) ACCESS/PC indicator (p.11) PHOTO/SELECT button (p.27, 47) DISC EJECT switch (p.25) Disc compartment (p.25) Battery platform (p.21) Battery eject switch (PUSH) (p.38) Record button (p.25) Lock switch (p.22) When the power switch is set the LOCK switch to the upper position to prevent accidentally moving the power switch to "DVD", the LOCK switch cannot be moved.
Power switch (p.22) Hand strap (p.18) 14 When the power switch is set to "HDD", set to "DVD". Names of Parts Power switch side Introduction QUICK START button (p.41) ACCESS/PC indicator (p.11) PHOTO/SELECT button (p.27, 47) DISC EJECT switch (p.25) Disc compartment (p.25) Battery platform (p.21) Battery eject switch (PUSH) (p.38) Record button (p.25) Lock switch (p.22) When the power switch is set the LOCK switch to the upper position to prevent accidentally moving the power switch to "DVD", the LOCK switch cannot be moved.

Owners Guide
Page 17
... instructions on handling batteries, see p.18. 17 Remote control REC PHOTO DISPLAY MENU DIGITAL ZOOM ZOOM SELECT DELETE DISC NAVIGATION Introduction PHOTO button (p.27) REC button (p.24) MENU button (p.... W button (p.62) f (reverse skip) button (p.54) c (forward search) button (p.54) Confirmation button (p.28) C (stop/cancel) button (p.47) e (forward skip) button (p.54) Inserting the provided lithium battery into the remote control While inserting a thin tipped instrument (paperclip, etc.) into the hole marked PUSH, swing the...
... instructions on handling batteries, see p.18. 17 Remote control REC PHOTO DISPLAY MENU DIGITAL ZOOM ZOOM SELECT DELETE DISC NAVIGATION Introduction PHOTO button (p.27) REC button (p.24) MENU button (p.... W button (p.62) f (reverse skip) button (p.54) c (forward search) button (p.54) Confirmation button (p.28) C (stop/cancel) button (p.47) e (forward skip) button (p.54) Inserting the provided lithium battery into the remote control While inserting a thin tipped instrument (paperclip, etc.) into the hole marked PUSH, swing the...

Owners Guide
Page 18
Note Replace the battery with a Hitachi Maxell, Sony, Panasonic, Sanyo, Toshiba CR2032, or Duracell DL2032. Flip the cover. Attaching...the hand strap according to the the hand strap. Pass the small loop end of fire or explosion. Introduction Warning BATTERY MAY EXPLODE IF NOT HANDLED PROPERLY. Replace the belt. Tie the strap to the procedure in the diagram. DO... NOT RECHARGE, DISASSEMBLE, OR DISPOSE OF IN FIRE. Flip the belt. Use of another battery may present a risk of the string through the lens cap eyelet and knot. Replace the cover. Attach the lens cap...
Note Replace the battery with a Hitachi Maxell, Sony, Panasonic, Sanyo, Toshiba CR2032, or Duracell DL2032. Flip the cover. Attaching...the hand strap according to the the hand strap. Pass the small loop end of fire or explosion. Introduction Warning BATTERY MAY EXPLODE IF NOT HANDLED PROPERLY. Replace the belt. Tie the strap to the procedure in the diagram. DO... NOT RECHARGE, DISASSEMBLE, OR DISPOSE OF IN FIRE. Flip the belt. Use of another battery may present a risk of the string through the lens cap eyelet and knot. Replace the cover. Attach the lens cap...

Owners Guide
Page 20
...monitor when it is too dark or too bright to the brightest. 20 At time of purchase of the subject. • The remaining battery charge indicator will not be reset to see the image on while being powered from an AC power outlet, the LCD brightness setting will be...). The brightness changes every time you ) • The LCD monitor displays a mirror image of this case. • A warning message will only appear when battery power is turned off. The LCD brightness setting is retained in this camcorder, the brightness is turned on display. How to Change the LCD Brightness...
...monitor when it is too dark or too bright to the brightest. 20 At time of purchase of the subject. • The remaining battery charge indicator will not be reset to see the image on while being powered from an AC power outlet, the LCD brightness setting will be...). The brightness changes every time you ) • The LCD monitor displays a mirror image of this case. • A warning message will only appear when battery power is turned off. The LCD brightness setting is retained in this camcorder, the brightness is turned on display. How to Change the LCD Brightness...
Owners Guide
Page 21
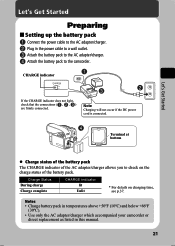
... in this manual. 21 Note Charging will not occur if the DC power cord is connected. Terminal at bottom z Charge status of the battery pack The CHARGE indicator of the AC adapter/charger allows you to the AC adapter/charger. CHARGE indicator Let's Get Started If the CHARGE... indicator does not light, check that the connections ( , , ) are firmly connected. Notes • Charge battery pack in temperatures above +50ºF (10ºC) and below +86ºF (30ºC). • Use only the AC adapter/charger which accompanied your ...
... in this manual. 21 Note Charging will not occur if the DC power cord is connected. Terminal at bottom z Charge status of the battery pack The CHARGE indicator of the AC adapter/charger allows you to the AC adapter/charger. CHARGE indicator Let's Get Started If the CHARGE... indicator does not light, check that the connections ( , , ) are firmly connected. Notes • Charge battery pack in temperatures above +50ºF (10ºC) and below +86ºF (30ºC). • Use only the AC adapter/charger which accompanied your ...
Owners Guide
Page 25
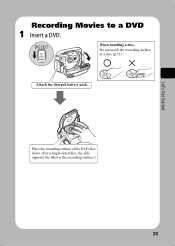
Place the recording surface of a disc (p.11). Attach the charged battery pack. Let's Get Started Recording Movies to a DVD 1 Insert a DVD. When handling a disc: Do not touch the recording surface of the DVD face down. (For a single-sided disc, the side opposite the label is the recording surface.) 25
Place the recording surface of a disc (p.11). Attach the charged battery pack. Let's Get Started Recording Movies to a DVD 1 Insert a DVD. When handling a disc: Do not touch the recording surface of the DVD face down. (For a single-sided disc, the side opposite the label is the recording surface.) 25

Owners Guide
Page 33
... and micro SD memory card can be used . „ Cautions for discs and cards To prevent data loss or damage: • Do not remove the battery and card while reading or writing data. • Do not use the camcorder in a place subject to impact, bending, or dropping. • Do not ...; Do not subject cards to static electricity or electrical noise. • Do not leave a disc unused in the camcorder for an extended period of HDD/DVD/Cards „ About cards z Card Handling • Do not use or store cards in a dusty place • When the erasure prevention switch is Erasure ...
... and micro SD memory card can be used . „ Cautions for discs and cards To prevent data loss or damage: • Do not remove the battery and card while reading or writing data. • Do not use the camcorder in a place subject to impact, bending, or dropping. • Do not ...; Do not subject cards to static electricity or electrical noise. • Do not leave a disc unused in the camcorder for an extended period of HDD/DVD/Cards „ About cards z Card Handling • Do not use or store cards in a dusty place • When the erasure prevention switch is Erasure ...

Owners Guide
Page 34
... the ACCESS/ PC indicator lights, then release. Close the lid. When a new DVD-RW or +RW is the recording surface. • To record on the other side for double-sided discs, remove the disc (p.35), flip it over, ..., or subject the camcorder to "OFF". Open it . Place the recording surface of HDD/DVD/Cards „ Inserting a DVD Attach the charged battery pack to the camcorder or connect the camcorder to a wall outlet. Functions and Characteristics of the DVD face down, then push down the DISC EJECT switch until it clicks into place...
... the ACCESS/ PC indicator lights, then release. Close the lid. When a new DVD-RW or +RW is the recording surface. • To record on the other side for double-sided discs, remove the disc (p.35), flip it over, ..., or subject the camcorder to "OFF". Open it . Place the recording surface of HDD/DVD/Cards „ Inserting a DVD Attach the charged battery pack to the camcorder or connect the camcorder to a wall outlet. Functions and Characteristics of the DVD face down, then push down the DISC EJECT switch until it clicks into place...
Owners Guide
Page 37
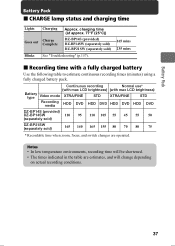
Continuous recording Normal use* (with max LCD brightness) (with max LCD brightness) Battery type Video mode XTRA/FINE STD XTRA/FINE STD Recording media HDD DVD HDD DVD HDD DVD HDD DVD DZ-BP14S (provided) DZ-BP14SW 110 95 110 105 55 45 55 50 (separately sold) DZ-BP21SW (separately sold ) Blinks See "Troubleshooting" (p.157). 165 mins 235 mins „...
Continuous recording Normal use* (with max LCD brightness) (with max LCD brightness) Battery type Video mode XTRA/FINE STD XTRA/FINE STD Recording media HDD DVD HDD DVD HDD DVD HDD DVD DZ-BP14S (provided) DZ-BP14SW 110 95 110 105 55 45 55 50 (separately sold) DZ-BP21SW (separately sold ) Blinks See "Troubleshooting" (p.157). 165 mins 235 mins „...

Owners Guide
Page 38
... adapter/charger can be charged while the DC power cord is connected to the AC adapter/charger even if the battery pack is required in some foreign countries. Notes • The battery pack will not be used around the world. If you need one, purchase it . 38 DC power cord To wall... the camcorder to a wall outlet Connect to the AC adapter/ charger. AC 200-240V AC Plug Adapter (not provided) „ Detaching the DC power cord/battery pack from your local electronics distributor. While pressing and holding PUSH, slide the DC connector or...
... adapter/charger can be charged while the DC power cord is connected to the AC adapter/charger even if the battery pack is required in some foreign countries. Notes • The battery pack will not be used around the world. If you need one, purchase it . 38 DC power cord To wall... the camcorder to a wall outlet Connect to the AC adapter/ charger. AC 200-240V AC Plug Adapter (not provided) „ Detaching the DC power cord/battery pack from your local electronics distributor. While pressing and holding PUSH, slide the DC connector or...

Owners Guide
Page 39
... used. By turning the power save function On, the camcorder will consume a slight amount of power. Battery life The battery life varies greatly depending on and fully deplete the battery charge, then remove the battery and store it in a cool place. Power Save function To save function, see "How to use...every six months, attach it to the camcorder, turn off if left idle for approximately five minutes in record pause mode. When you charge the battery a day before using the camcorder. For power save power, do not leave the camcorder in record pause mode for too long. Purchase a new...
... used. By turning the power save function On, the camcorder will consume a slight amount of power. Battery life The battery life varies greatly depending on and fully deplete the battery charge, then remove the battery and store it in a cool place. Power Save function To save function, see "How to use...every six months, attach it to the camcorder, turn off if left idle for approximately five minutes in record pause mode. When you charge the battery a day before using the camcorder. For power save power, do not leave the camcorder in record pause mode for too long. Purchase a new...
Owners Guide
Page 40
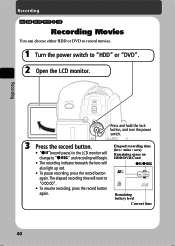
... again. Elapsed recording time • "m"(record pause) in the LCD monitor will (hrs : mins : secs) Remaining space on change to "HDD" or "DVD". 2 Open the LCD monitor. Remaining battery level Current time 40 Recording Press and hold the lock button, and turn the power switch. 3 Press the record button. m/n • To pause...
... again. Elapsed recording time • "m"(record pause) in the LCD monitor will (hrs : mins : secs) Remaining space on change to "HDD" or "DVD". 2 Open the LCD monitor. Remaining battery level Current time 40 Recording Press and hold the lock button, and turn the power switch. 3 Press the record button. m/n • To pause...
Owners Guide
Page 41
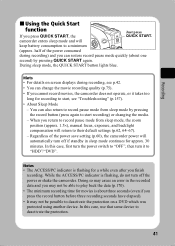
...continues for recording to record pause mode from sleep mode, the zoom position (approx. 1.5×), manual focus, exposure, and backlight compensation will keep battery consumption to deactivate the protection. 41 In this case, first turn the power switch to "OFF", then turn it takes too long for approx.... 30 minutes. camcorder enters sleep mode and will return to "HDD"/"DVD". You can change the movie recording quality (p.75). • If you can restore record pause mode quickly (about one second) by pressing ...
...continues for recording to record pause mode from sleep mode, the zoom position (approx. 1.5×), manual focus, exposure, and backlight compensation will keep battery consumption to deactivate the protection. 41 In this case, first turn the power switch to "OFF", then turn it takes too long for approx.... 30 minutes. camcorder enters sleep mode and will return to "HDD"/"DVD". You can change the movie recording quality (p.75). • If you can restore record pause mode quickly (about one second) by pressing ...

Owners Guide
Page 42
... type Movie recording quality Warnings/Messages Current time/date Flash Self-timer External Input (DZ-HS903A) Recording status Movie recording time Remaining space on HDD/DVD/Card Remaining number of recordable scenes (DZ-HS903A) Remaining battery level FULL AUTO indicator (p.72) Volume * The above display is for explanation and different from the actual display. 42 „...
... type Movie recording quality Warnings/Messages Current time/date Flash Self-timer External Input (DZ-HS903A) Recording status Movie recording time Remaining space on HDD/DVD/Card Remaining number of recordable scenes (DZ-HS903A) Remaining battery level FULL AUTO indicator (p.72) Volume * The above display is for explanation and different from the actual display. 42 „...

Owners Guide
Page 44
... battery level (p.37) Full Almost empty Volume Appears here when "Input Source" is set to 10 or less, the display will be displayed when a protected disc or locked card, or a finalized DVD-RW (VF mode)/ DVD-R/+RW disc is inserted. *4 Sometimes longer recording than the DZ-HS903A/ DZ-... time or number will not increase the remaining number of recordable scenes. 44 If the number is 50 or less. Or DVD-R recorded using a HITACHI camcorder marketed before the DZ-HS903A/ DZ-HS803A : +RW : Finalized +RW : SD memory card : Locked SD memory card No icon*2 Movie recording quality (p.75...
... battery level (p.37) Full Almost empty Volume Appears here when "Input Source" is set to 10 or less, the display will be displayed when a protected disc or locked card, or a finalized DVD-RW (VF mode)/ DVD-R/+RW disc is inserted. *4 Sometimes longer recording than the DZ-HS903A/ DZ-... time or number will not increase the remaining number of recordable scenes. 44 If the number is 50 or less. Or DVD-R recorded using a HITACHI camcorder marketed before the DZ-HS903A/ DZ-HS803A : +RW : Finalized +RW : SD memory card : Locked SD memory card No icon*2 Movie recording quality (p.75...
Owners Guide
Page 46
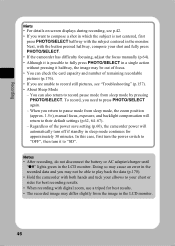
... (approx. 1.5×), manual focus, exposure, and backlight compensation will automatically turn it to press PHOTO/SELECT again. - Notes • After recording, do not disconnect the battery or AC adapter/charger until "m" lights green in the monitor. In this case, first turn the power switch to "OFF", then turn off if standby...
... (approx. 1.5×), manual focus, exposure, and backlight compensation will automatically turn it to press PHOTO/SELECT again. - Notes • After recording, do not disconnect the battery or AC adapter/charger until "m" lights green in the monitor. In this case, first turn the power switch to "OFF", then turn off if standby...


