Owners Guide
Page 1
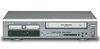
INSTRUCCIONES EN ESPAÑOL INCLUIDAS. Instruction manual To obtain the best performance and ensure years of troublefree use, please read this instruction manual completely. English DVD PLAYER with VIDEO CASSETTE RECORDER INSTRUCTION MANUAL Français Español MODEL DV-PF2U OPEN/ CLOSE POWER/STANDBY VIDEO IN DVD VCR CHANNEL TIMER SET L STOP SKIP PLAY SKIP OUTPUT STOP/EJECT REW PLAY F.FWD IRT (mono) SEARCH VCR/TV CST.IN R AUDIO IN INSTRUCTIONS EN FRANÇAIS INCLUS.
INSTRUCCIONES EN ESPAÑOL INCLUIDAS. Instruction manual To obtain the best performance and ensure years of troublefree use, please read this instruction manual completely. English DVD PLAYER with VIDEO CASSETTE RECORDER INSTRUCTION MANUAL Français Español MODEL DV-PF2U OPEN/ CLOSE POWER/STANDBY VIDEO IN DVD VCR CHANNEL TIMER SET L STOP SKIP PLAY SKIP OUTPUT STOP/EJECT REW PLAY F.FWD IRT (mono) SEARCH VCR/TV CST.IN R AUDIO IN INSTRUCTIONS EN FRANÇAIS INCLUS.
Owners Guide
Page 4
.... Reverse engineering or disassembly is protected by Macrovision Corporation and other intellectual property rights owned by method claims of the DVD/VCR. DVD : Description refers to playback of discs are prohibited. EN 2C15 Batteries should record the number and other limited viewing uses...RARES/ ET 9 +100 0 AUDIO +10DISPLAY TOP MENU ZOOM SUBTITLE ANGLE MENU ENTER SETUP VCR RETURN DVD VCR/TV SPEED SLOW SKIP REC CH PLAY STOP PAUSE/STEP VOL TV POWER VIDEO/TV CH TV DV-RMPF2 (DV-RMPF2) (TS16905) Two AA batteries A/V cables RF Coaxial Cable (approx. 3 feet (100 cm...
.... Reverse engineering or disassembly is protected by Macrovision Corporation and other intellectual property rights owned by method claims of the DVD/VCR. DVD : Description refers to playback of discs are prohibited. EN 2C15 Batteries should record the number and other limited viewing uses...RARES/ ET 9 +100 0 AUDIO +10DISPLAY TOP MENU ZOOM SUBTITLE ANGLE MENU ENTER SETUP VCR RETURN DVD VCR/TV SPEED SLOW SKIP REC CH PLAY STOP PAUSE/STEP VOL TV POWER VIDEO/TV CH TV DV-RMPF2 (DV-RMPF2) (TS16905) Two AA batteries A/V cables RF Coaxial Cable (approx. 3 feet (100 cm...
Owners Guide
Page 5
... DISCS 8 DISC TYPES 8 I OPERATING CONTROLS AND FUNCTIONS 9 DISPLAY 14 DISPLAYS DURING OPERATION 14 LOADING THE BATTERIES 14 I VCR/DVD SWITCHING 15 I HOOKUPS 16 DESCRIPTION-REAR PANEL 16 DVD/VCR TO TV CONNECTION 17 SETTING THE CH3/CH4 SWITCH 17 CONNECTION TO AN AUDIO SYSTEM 18 CONNECTING TO A TV(FOR...Multi-Channel Television Sound) SYSTEM 25 AUTO REWIND 26 REAL TIME TAPE COUNTER 26 I PLAYING A DISC 26 PLAYING A DVD VIDEO OR AN AUDIO CD 26 USING THE DVD MENUS 26 USING THE TITLE MENU 27 PAUSING PLAYBACK OR DISPLAYING A STILL PICTURE 27 RESUMING PLAYBACK FROM THE POINT WHERE ...
... DISCS 8 DISC TYPES 8 I OPERATING CONTROLS AND FUNCTIONS 9 DISPLAY 14 DISPLAYS DURING OPERATION 14 LOADING THE BATTERIES 14 I VCR/DVD SWITCHING 15 I HOOKUPS 16 DESCRIPTION-REAR PANEL 16 DVD/VCR TO TV CONNECTION 17 SETTING THE CH3/CH4 SWITCH 17 CONNECTION TO AN AUDIO SYSTEM 18 CONNECTING TO A TV(FOR...Multi-Channel Television Sound) SYSTEM 25 AUTO REWIND 26 REAL TIME TAPE COUNTER 26 I PLAYING A DISC 26 PLAYING A DVD VIDEO OR AN AUDIO CD 26 USING THE DVD MENUS 26 USING THE TITLE MENU 27 PAUSING PLAYBACK OR DISPLAYING A STILL PICTURE 27 RESUMING PLAYBACK FROM THE POINT WHERE ...
Owners Guide
Page 6
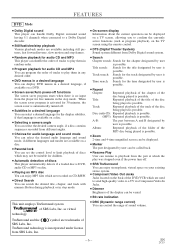
... ¡Selecting a camera angle You can search the desired title, chapter, and track with numeric Button during playback or in stop mode. FEATURES DVD Mode ¡Dolby Digital sound This player can handle Dolby Digital surround sound having 5.1 channels when connected to a Dolby Digital decoder. ¡Still... employs TruSurround system of SRS Labs, Inc. EN 2C15 A-B: The part between A and B designated by user is possible. TruSurround technology is DVD, audio CD or MP3 on disc. ¡Playing an MP3 disc You can enjoy MP3 files which are trademarks of SRS Labs, Inc. When...
... ¡Selecting a camera angle You can search the desired title, chapter, and track with numeric Button during playback or in stop mode. FEATURES DVD Mode ¡Dolby Digital sound This player can handle Dolby Digital surround sound having 5.1 channels when connected to a Dolby Digital decoder. ¡Still... employs TruSurround system of SRS Labs, Inc. EN 2C15 A-B: The part between A and B designated by user is possible. TruSurround technology is DVD, audio CD or MP3 on disc. ¡Playing an MP3 disc You can enjoy MP3 files which are trademarks of SRS Labs, Inc. When...

Owners Guide
Page 7
...¡IRT (Instant Recording Timer) PRECAUTIONS INSTALLATION LOCATION For safety and optimum performance of your fingers or objects into the DVD/VCR cassette holder. MOISTURE CONDENSATION WARNING Moisture condensation may be necessary to view scrambled cable channels.) Automatic functions ¡Auto ...power on system Automatically turns the DVD/VCR on when you insert a cassette. ¡Digital Auto Tracking (DTR) Playback ¡S-VHS Quasi Playback (SQPB) (Allows...
...¡IRT (Instant Recording Timer) PRECAUTIONS INSTALLATION LOCATION For safety and optimum performance of your fingers or objects into the DVD/VCR cassette holder. MOISTURE CONDENSATION WARNING Moisture condensation may be necessary to view scrambled cable channels.) Automatic functions ¡Auto ...power on system Automatically turns the DVD/VCR on when you insert a cassette. ¡Digital Auto Tracking (DTR) Playback ¡S-VHS Quasi Playback (SQPB) (Allows...
Owners Guide
Page 8
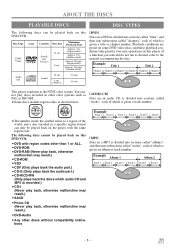
...sided) 8 cm Approx. 80 min (single-sided) Approx. 160 min (double-sided) Audio CD Sound 12 cm 8 cm (singles) 74 min 20 min [DVD] Data on a DVD is divided into sections called "titles", and then into subsections called "chapters", each of which is given a track number. The following discs can only...sections called "albums", and then into subsections called "tracks", each of the world, and a disc encoded in other than 1 or ALL. ¡DVD-ROM ¡DVD-RAM (Never play back, otherwise malfunction may result.) ¡CD-ROM ¡VSD ¡CDV (Only plays back the audio part.) ¡...
...sided) 8 cm Approx. 80 min (single-sided) Approx. 160 min (double-sided) Audio CD Sound 12 cm 8 cm (singles) 74 min 20 min [DVD] Data on a DVD is divided into sections called "titles", and then into subsections called "chapters", each of which is given a track number. The following discs can only...sections called "albums", and then into subsections called "tracks", each of the world, and a disc encoded in other than 1 or ALL. ¡DVD-ROM ¡DVD-RAM (Never play back, otherwise malfunction may result.) ¡CD-ROM ¡VSD ¡CDV (Only plays back the audio part.) ¡...

Owners Guide
Page 9
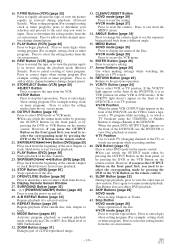
...VCR output mode is selected. CASSETTE COMPARTMENT 5. It flashes if the TIMER SET Button is pressed for a timer recording, but there is in the DVD/VCR. VIDEO In Jack Connect a video cable coming from the video out jack of a camcorder, another VCR, or a video source (laser .... tion, and goes off for a timer recording. 12. mal or slow motion playback; EN 2C15 You can only watch DVDs when the green DVD OUTPUT Light is on the DVD/VCR; Touch Recording. POWER/STANDBY Button [page 24] Press to start a Instant Recording Timer. -9- CHANNEL Buttons [page 20...
...VCR output mode is selected. CASSETTE COMPARTMENT 5. It flashes if the TIMER SET Button is pressed for a timer recording, but there is in the DVD/VCR. VIDEO In Jack Connect a video cable coming from the video out jack of a camcorder, another VCR, or a video source (laser .... tion, and goes off for a timer recording. 12. mal or slow motion playback; EN 2C15 You can only watch DVDs when the green DVD OUTPUT Light is on the DVD/VCR; Touch Recording. POWER/STANDBY Button [page 24] Press to start a Instant Recording Timer. -9- CHANNEL Buttons [page 20...
Owners Guide
Page 10
...or delete channel numbers during playback. (Forward Search). Hold down to change channels at the TV) or watch TV (changing channels at the DVD/VCR. PLAY Button (DVD) [page 26] Starts playback of the disc. 25. OPEN/CLOSE Button [page 26] Press to turn the power on a TV screen... panel first, you want to select the setting modes from the on the remote control. REPEAT Button [page 29] Repeats playback of a DVD-reproduced image. 33. When setting program (For example:setting clock or timer program), press to determine your selection and proceed to the next ...
...or delete channel numbers during playback. (Forward Search). Hold down to change channels at the TV) or watch TV (changing channels at the DVD/VCR. PLAY Button (DVD) [page 26] Starts playback of the disc. 25. OPEN/CLOSE Button [page 26] Press to turn the power on a TV screen... panel first, you want to select the setting modes from the on the remote control. REPEAT Button [page 29] Repeats playback of a DVD-reproduced image. 33. When setting program (For example:setting clock or timer program), press to determine your selection and proceed to the next ...
Owners Guide
Page 11
... during still mode. 50. G VCR mode [page 22] Press to perform a Time Search or an Index Search. - 11 - SEARCH MODE Button G DVD mode [page 28] Press to access or remove the Search display, which allows you want to directly select a Track (Audio CD) for the quickest results...during channel preset. 45. SETUP Button [page 36] Press to correct digits when setting program (For example: setting clock or timer program). DISPLAY Button G DVD mode [page 32] Press to select a desired audio language or sound mode. 61. AUDIO Button [page 33] Press to access or remove the display...
... during still mode. 50. G VCR mode [page 22] Press to perform a Time Search or an Index Search. - 11 - SEARCH MODE Button G DVD mode [page 28] Press to access or remove the Search display, which allows you want to directly select a Track (Audio CD) for the quickest results...during channel preset. 45. SETUP Button [page 36] Press to correct digits when setting program (For example: setting clock or timer program). DISPLAY Button G DVD mode [page 32] Press to select a desired audio language or sound mode. 61. AUDIO Button [page 33] Press to access or remove the display...
Owners Guide
Page 12
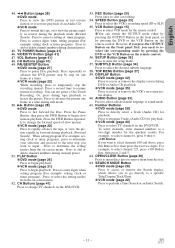
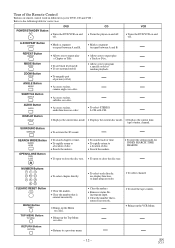
...B. RESET • To select chapter directly. • Clear the makers. • Clear the number that is entered incorrectly. VCR • Turns the DVD/VCR on and off . SURROUND Button SURROUND • To activate the 3D sound. MENU Button MENU TOP MENU Button TOP MENU RETURN Button RETURN •... Button REPEAT MODE Button MODE ZOOM Button ZOOM ANGLE Button ANGLE SUBTITLE Button SUBTITLE AUDIO Button AUDIO • Allows you to the following table for DVD, CD and VCR : Refer to repeat play a Track or Disc. • Allows you to a previous menu. • To select track directly,...
...B. RESET • To select chapter directly. • Clear the makers. • Clear the number that is entered incorrectly. VCR • Turns the DVD/VCR on and off . SURROUND Button SURROUND • To activate the 3D sound. MENU Button MENU TOP MENU Button TOP MENU RETURN Button RETURN •... Button REPEAT MODE Button MODE ZOOM Button ZOOM ANGLE Button ANGLE SUBTITLE Button SUBTITLE AUDIO Button AUDIO • Allows you to the following table for DVD, CD and VCR : Refer to repeat play a Track or Disc. • Allows you to a previous menu. • To select track directly,...

Owners Guide
Page 13
... PAUSE/STEP Button PAUSE/STEP TV POWER Button TV POWER VIDEO/TV Button VIDEO/TV VOL Button VOL • Brings up the DVD player's Setup menu. • Brings up the DVD player's Setup menu. • To skip Chapters. • To skip Tracks. • Allows you to search forward/backward ... To select an item in slow motion. • To select the recoeding speed. • To start a recording. English Tour of the Remote Control DVD ENTER/Arrow Button (UP/DOWN or LEFT/RIGHT Button) ENTER • Moves the cursor and determines its position. CD • Moves the cursor and determines...
... PAUSE/STEP Button PAUSE/STEP TV POWER Button TV POWER VIDEO/TV Button VIDEO/TV VOL Button VOL • Brings up the DVD player's Setup menu. • Brings up the DVD player's Setup menu. • To skip Chapters. • To skip Tracks. • Allows you to search forward/backward ... To select an item in slow motion. • To select the recoeding speed. • To start a recording. English Tour of the Remote Control DVD ENTER/Arrow Button (UP/DOWN or LEFT/RIGHT Button) ENTER • Moves the cursor and determines its position. CD • Moves the cursor and determines...

Owners Guide
Page 14
Stays on the tray. Loading the Disc Power off LOADING THE BATTERIES 1. Lights up when a DVD is inserted on when the inserted disc is being played back. Open the battery compartment cover. 2. DISPLAY Stays on when the A-B repeat function is on ...
Stays on the tray. Loading the Disc Power off LOADING THE BATTERIES 1. Lights up when a DVD is inserted on when the inserted disc is being played back. Open the battery compartment cover. 2. DISPLAY Stays on when the A-B repeat function is on ...
Owners Guide
Page 15
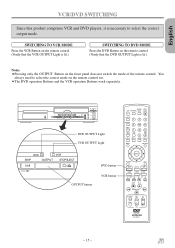
... STOP/EJECT OUTPUT button DVD button VCR button ENTER RETURN SETUP DVD VCR/TV VCR SLOW SPEED REC SKIP CH STOP PLAY PAUSE/STEP TV POWER VOL CH VIDEO/TV TV DV-RMPF2 - 15 - EN 2C15 You always need to select the correct output mode. English VCR/DVD SWITCHING Since this product... comprises VCR and DVD players, it is lit.) Notes ¡Pressing only the OUTPUT Button on ...
... STOP/EJECT OUTPUT button DVD button VCR button ENTER RETURN SETUP DVD VCR/TV VCR SLOW SPEED REC SKIP CH STOP PLAY PAUSE/STEP TV POWER VOL CH VIDEO/TV TV DV-RMPF2 - 15 - EN 2C15 You always need to select the correct output mode. English VCR/DVD SWITCHING Since this product... comprises VCR and DVD players, it is lit.) Notes ¡Pressing only the OUTPUT Button on ...
Owners Guide
Page 16
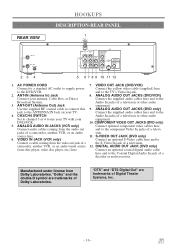
...) Connect your antenna, Cable Box, or Direct Connect the supplied audio cables here and to connect this 9. ANALOG AUDIO OUT JACKS (DVD only) jack to the DVD/VCR. VIDEO IN JACK (VCR only) Connect an optional S-Video cable here and to Connect a cable coming from the video out jack... license from Dolby Laboratories. and to the 4. Connect the supplied audio cables here and to the TV's Video In jack. 2. OUT CH3 CH4 VCR DVD/VCR DVD IN OUT DVD COMPONENT VIDEO OUT L AUDO R VIDEO AUDIO OUT L R Y CB S-VIDEO OUT DIGITAL AUDIO OUT COAXIAL CR 23 4 5 6 7 8 9 10 11 12 1....
...) Connect your antenna, Cable Box, or Direct Connect the supplied audio cables here and to connect this 9. ANALOG AUDIO OUT JACKS (DVD only) jack to the DVD/VCR. VIDEO IN JACK (VCR only) Connect an optional S-Video cable here and to Connect a cable coming from the video out jack... license from Dolby Laboratories. and to the 4. Connect the supplied audio cables here and to the TV's Video In jack. 2. OUT CH3 CH4 VCR DVD/VCR DVD IN OUT DVD COMPONENT VIDEO OUT L AUDO R VIDEO AUDIO OUT L R Y CB S-VIDEO OUT DIGITAL AUDIO OUT COAXIAL CR 23 4 5 6 7 8 9 10 11 12 1....

Owners Guide
Page 17
...IN (supplied) ANT - IN ANT - OUT 3CH 4CH UHF/VHF If your TV to the same channel. DVD/VCR TO TV CONNECTION SETTING THE CH3/CH4 SWITCH 1. Then set the selector switch to CH3 or CH4 (which ...is located in the back of your DVD/VCR), whichever is provided to call the CATV system installer's attention to Article 820-40 of the NEC... that the cable ground should be connected to the DVD/VCR. CH3 CH4 ANT - EN 2C15 Disconnect the antenna or cable from the AC outlet. 2. English...
...IN (supplied) ANT - IN ANT - OUT 3CH 4CH UHF/VHF If your TV to the same channel. DVD/VCR TO TV CONNECTION SETTING THE CH3/CH4 SWITCH 1. Then set the selector switch to CH3 or CH4 (which ...is located in the back of your DVD/VCR), whichever is provided to call the CATV system installer's attention to Article 820-40 of the NEC... that the cable ground should be connected to the DVD/VCR. CH3 CH4 ANT - EN 2C15 Disconnect the antenna or cable from the AC outlet. 2. English...
Owners Guide
Page 18
... or DAT deck. ¡Set Dolby Digital and DTS to set Dolby Digital or DTS to off for audio output in the setup mode. Playing a DVD using incorrect settings may generate noise distortion, and may also damage the speakers. (Refer to page 38 to off for Dolby Digital and DTS) - 18... - EN 2C15 Playing a DVD using incorrect settings may generate noise distortion, and may also damage the speakers. (See page 38) ¡The audio source on for audio output in...
... or DAT deck. ¡Set Dolby Digital and DTS to set Dolby Digital or DTS to off for audio output in the setup mode. Playing a DVD using incorrect settings may generate noise distortion, and may also damage the speakers. (Refer to page 38 to off for Dolby Digital and DTS) - 18... - EN 2C15 Playing a DVD using incorrect settings may generate noise distortion, and may also damage the speakers. (See page 38) ¡The audio source on for audio output in...

Owners Guide
Page 19
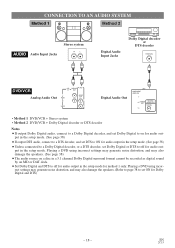
... PB AV Cable S-Video Cable Video Cables VCR DVD/VCR DVD IN OUT L DVD/VCR AUDO R AUDIO OUT L VIDEO R or VCR DVD/VCR DVD IN OUT L AUDO R AUDIO OUT L VIDEO R or DVD COMPONENT VIDEO OUT Y CB S-VIDEO OUT DIGITAL AUDIO OUT COAXIAL CR DVD COMPONENT VIDEO OUT Y CB S-VIDEO OUT DIGITAL ... out S-Video out Component Video out • Method 1 DVD/VCR + TV with Video Input Jack • Method 2 DVD/VCR + TV with S-Video Input Jack • Method 3 DVD/VCR + TV with Component Video Jacks Notes ¡Connect the DVD/VCR directly to the copy protection system. - 19 - EN...
... PB AV Cable S-Video Cable Video Cables VCR DVD/VCR DVD IN OUT L DVD/VCR AUDO R AUDIO OUT L VIDEO R or VCR DVD/VCR DVD IN OUT L AUDO R AUDIO OUT L VIDEO R or DVD COMPONENT VIDEO OUT Y CB S-VIDEO OUT DIGITAL AUDIO OUT COAXIAL CR DVD COMPONENT VIDEO OUT Y CB S-VIDEO OUT DIGITAL ... out S-Video out Component Video out • Method 1 DVD/VCR + TV with Video Input Jack • Method 2 DVD/VCR + TV with S-Video Input Jack • Method 3 DVD/VCR + TV with Component Video Jacks Notes ¡Connect the DVD/VCR directly to the copy protection system. - 19 - EN...

Owners Guide
Page 20
... first, then press the last two digits. ¡You must follow the steps below once. Then, connect the DVD /VCR power plug to a standard AC outlet. 2 Turn on the TV and set the TV to channel 3...SET UP" appears on ). Then, press the F.FWD Button. ¡After scanning, the tuner stops on the DVD/VCR by pressing the F.FWD Button once. Then, press the F.FWD Button. 3 Select "AUTO SET UP"...the POWER and the VCR/TV light will come on the lowest memorized channel.The TV screen returns to the DVD/VCR first. CH 01 AUTO SET UP 6 After scanning, the tuner stops on . 4 Select the On...
... first, then press the last two digits. ¡You must follow the steps below once. Then, connect the DVD /VCR power plug to a standard AC outlet. 2 Turn on the TV and set the TV to channel 3...SET UP" appears on ). Then, press the F.FWD Button. ¡After scanning, the tuner stops on the DVD/VCR by pressing the F.FWD Button once. Then, press the F.FWD Button. 3 Select "AUTO SET UP"...the POWER and the VCR/TV light will come on the lowest memorized channel.The TV screen returns to the DVD/VCR first. CH 01 AUTO SET UP 6 After scanning, the tuner stops on . 4 Select the On...
Owners Guide
Page 21
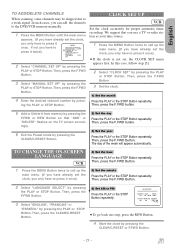
... year Press the PLAY or the STOP Button repeatedly. ing the PLAY or STOP Button. In such cases, you can add the channels to the DVD/VCR memory manually. 1 Press the MENU Button until the main menu appears. (If you have already set the clock, you have to press it once...
... year Press the PLAY or the STOP Button repeatedly. ing the PLAY or STOP Button. In such cases, you can add the channels to the DVD/VCR memory manually. 1 Press the MENU Button until the main menu appears. (If you have already set the clock, you have to press it once...
Owners Guide
Page 22
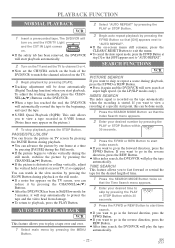
...by pressing [PAUSE] during the still mode, stabilize the picture by pressing the CHANNEL(o/p) Buttons. ¡After the DVD/VCR has been in the LP/SLP modes only). TIME SEARCH 2 : 50 3 Press the F.FWD or ...If the picture begins to fast forward or rewind the tape for 5 minutes, it again and the DVD/VCR will automatically rewind the tape to the beginning, and eject the tape. ¡S-VHS Quasi ...you want to go in the reverse direction, press the REW Button. ¡After time search, the DVD/VCR will be done easily. 1 Press the SEARCH MODE Button so that the Time Search menu appears....
...by pressing [PAUSE] during the still mode, stabilize the picture by pressing the CHANNEL(o/p) Buttons. ¡After the DVD/VCR has been in the LP/SLP modes only). TIME SEARCH 2 : 50 3 Press the F.FWD or ...If the picture begins to fast forward or rewind the tape for 5 minutes, it again and the DVD/VCR will automatically rewind the tape to the beginning, and eject the tape. ¡S-VHS Quasi ...you want to go in the reverse direction, press the REW Button. ¡After time search, the DVD/VCR will be done easily. 1 Press the SEARCH MODE Button so that the Time Search menu appears....


