Instruction Manual
Page 3
...which contain the operation and maintenance instructions. the risk of electric shock. Hazards that has not been specifically recommended by HITACHI. CAUTION indicates a potentially hazardous situations which, if not avoided, may result in the sections which may cause machine damage... for outdoor use any way. Basic safety precautions are identified by recognizing a potentially hazardous situation before operating or maintaining this Instruction Manual. a) Keep work area clean and well lit. or moving parts. e) When operating a power tool outdoors, use 2) Electrical...
...which contain the operation and maintenance instructions. the risk of electric shock. Hazards that has not been specifically recommended by HITACHI. CAUTION indicates a potentially hazardous situations which, if not avoided, may result in the sections which may cause machine damage... for outdoor use any way. Basic safety precautions are identified by recognizing a potentially hazardous situation before operating or maintaining this Instruction Manual. a) Keep work area clean and well lit. or moving parts. e) When operating a power tool outdoors, use 2) Electrical...
Instruction Manual
Page 4
... as dust mask, non- d) Store idle power tools out of the reach of the tool. ALWAYS attach the side handle and securely grip the Rotary Hammer. 6. NEVER operate this tool without all guards or safety features in place and in the off . skid safety shoes, hard hat, or hearing... Properly maintained cutting tools with bare hands after operation. 4. working order. instruction manual. If maintenance or servicing requires the removal of a guard or safety feature, be sure to be repaired. Use of the power tool for which ...
... as dust mask, non- d) Store idle power tools out of the reach of the tool. ALWAYS attach the side handle and securely grip the Rotary Hammer. 6. NEVER operate this tool without all guards or safety features in place and in the off . skid safety shoes, hard hat, or hearing... Properly maintained cutting tools with bare hands after operation. 4. working order. instruction manual. If maintenance or servicing requires the removal of a guard or safety feature, be sure to be repaired. Use of the power tool for which ...
Instruction Manual
Page 5
...specified. NEVER use a tool which have been used until it will result in this Instruction Manual, including not using the power tool at all times. Operate the tool according to youself ...stop using it may be installed. ⅜ Clean the exterior of this tool may burn out. 16. Operate power tools at voltages specified on this tool V volts Hz hertz A amperes no no ...external grounding, you must still follow these precautions: ⅜ Only HITACHI AUTHORIZED SERVICE CENTER should be deformed, cracked, or damaged. 19. Operate the power tool at ...
...specified. NEVER use a tool which have been used until it will result in this Instruction Manual, including not using the power tool at all times. Operate the tool according to youself ...stop using it may be installed. ⅜ Clean the exterior of this tool may burn out. 16. Operate power tools at voltages specified on this tool V volts Hz hertz A amperes no no ...external grounding, you must still follow these precautions: ⅜ Only HITACHI AUTHORIZED SERVICE CENTER should be deformed, cracked, or damaged. 19. Operate the power tool at ...
Instruction Manual
Page 6
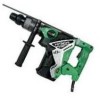
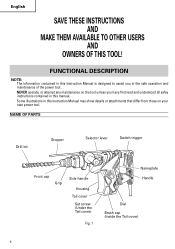
...screw (Under the Tail cover) Fig. 1 Nameplate Handle Dial Brush cap (Inside the Tail cover) 6 Some illustrations in this Instruction Manual may show details or attachments that differ from those on the tool unless you have first read and understood all safey instructions contained in this... Instruction Manual is designed to assist you in this manual. FUNCTIONAL DESCRIPTION NOTE: The information contained in the safe operation and maintenance of the power tool. English SAVE...
...screw (Under the Tail cover) Fig. 1 Nameplate Handle Dial Brush cap (Inside the Tail cover) 6 Some illustrations in this Instruction Manual may show details or attachments that differ from those on the tool unless you have first read and understood all safey instructions contained in this... Instruction Manual is designed to assist you in this manual. FUNCTIONAL DESCRIPTION NOTE: The information contained in the safe operation and maintenance of the power tool. English SAVE...

Instruction Manual
Page 10
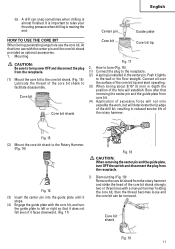
...(3) After cleaning out dust with a syringe, attach the plug to the machine body, drilling can be used at "rotation + hammering". Use it with a manual hammer. (Fig. 13) Drill SDS max chuck Chuck shank Grip adaptor Fig. 14 (3) Drilling (a) Even if you expect. How to the drill bit. Applying more -than... the drill tip, resulting in the declined working efficiency and shortened life of the taper shank adaptor, place supports under the Rotary Hammer and tap the cotter with the selector lever positioned at "rotation only" if separately sold parts such as drill chuck and chuck...
...(3) After cleaning out dust with a syringe, attach the plug to the machine body, drilling can be used at "rotation + hammering". Use it with a manual hammer. (Fig. 13) Drill SDS max chuck Chuck shank Grip adaptor Fig. 14 (3) Drilling (a) Even if you expect. How to the drill bit. Applying more -than... the drill tip, resulting in the declined working efficiency and shortened life of the taper shank adaptor, place supports under the Rotary Hammer and tap the cotter with the selector lever positioned at "rotation only" if separately sold parts such as drill chuck and chuck...
Instruction Manual
Page 11
...expedite the work, but will establish. Center pin Guide plate HOW TO USE THE CORE BIT When boring penetrating large hole use with a manual hammer holding the core bit, then the thread becomes loose and (3) Insert the center pin into the guide plate until it lightly to left ... Mount the core bit to the core bit shank. (Fig. 15) Lubricate the thread of the rotary hammer. English (b) A drill can be removed. Fig. 15 (2) Mount the core bit shank to the Rotary Hammer. (Fig. 16) Fig. 18 CAUTION: When removing the center pin and the guide plate, turn power OFF and disconnect...
...expedite the work, but will establish. Center pin Guide plate HOW TO USE THE CORE BIT When boring penetrating large hole use with a manual hammer holding the core bit, then the thread becomes loose and (3) Insert the center pin into the guide plate until it lightly to left ... Mount the core bit to the core bit shank. (Fig. 15) Lubricate the thread of the rotary hammer. English (b) A drill can be removed. Fig. 15 (2) Mount the core bit shank to the Rotary Hammer. (Fig. 16) Fig. 18 CAUTION: When removing the center pin and the guide plate, turn power OFF and disconnect...


