
Instruction Manual
Page 10
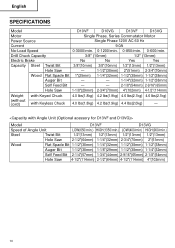
...LOW(400/min) HIGH(900/min.) Steel Twist Bit 1/2"(13mm) 1/2"(13mm) 1/2"(13mm) 1/2"(13mm) Hole Saw 2-1/2"(64mm) 1-1/4"(32mm) 2-3/4"(70mm) 2"(51mm) Wood Flat Spade Bit 1-1/2"(38mm) 1-1/4"(32mm) 1-1/2"(38mm) 1-1/2"(38mm) Auger Bit 1-1/2"(38mm) 1-1/8"(29mm) 1-1/2"(38mm) 1-1/4"(32mm) Self Feed Bit 2-1/4"(57mm) 1-3/4"(44mm) 2-9/16"(65mm) 2-1/8"(54mm) Hole Saw 4-1/2"(114mm) 2-1/2"(64mm) 4-1/2"(114mm) 4"(102mm) 10 Drill... Model D10VF D10VG D13VF D13VG Motor Single Phase, Series Commutator Motor Power Source Single Phase 120V AC 60 Hz Current 9.0A No-Load Speed 0-3000/min. ...
...LOW(400/min) HIGH(900/min.) Steel Twist Bit 1/2"(13mm) 1/2"(13mm) 1/2"(13mm) 1/2"(13mm) Hole Saw 2-1/2"(64mm) 1-1/4"(32mm) 2-3/4"(70mm) 2"(51mm) Wood Flat Spade Bit 1-1/2"(38mm) 1-1/4"(32mm) 1-1/2"(38mm) 1-1/2"(38mm) Auger Bit 1-1/2"(38mm) 1-1/8"(29mm) 1-1/2"(38mm) 1-1/4"(32mm) Self Feed Bit 2-1/4"(57mm) 1-3/4"(44mm) 2-9/16"(65mm) 2-1/8"(54mm) Hole Saw 4-1/2"(114mm) 2-1/2"(64mm) 4-1/2"(114mm) 4"(102mm) 10 Drill... Model D10VF D10VG D13VF D13VG Motor Single Phase, Series Commutator Motor Power Source Single Phase 120V AC 60 Hz Current 9.0A No-Load Speed 0-3000/min. ...
Instruction Manual
Page 13
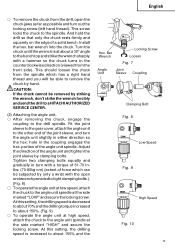
... strike the wrench forcibly and send the drill to a HITACHI AUTHORIZED SERVICE CENTER. (2) Attaching the angle unit. ⅜ After removing the chuck, engage the coupling to remove the chuck by clamping bolts. English ⅜ To remove the chuck from the drill, open end wrench provided to tight clamping... bolts.). (Fig. 8) ⅜ To operate the angle unit at the side marked "LOW" and secure the locking screw. At this setting, the drilling speed is decreased to about 70% and the drilling torque increased to about 150%. (Fig. 9) ⅜ To operate the angle unit at the...
... strike the wrench forcibly and send the drill to a HITACHI AUTHORIZED SERVICE CENTER. (2) Attaching the angle unit. ⅜ After removing the chuck, engage the coupling to remove the chuck by clamping bolts. English ⅜ To remove the chuck from the drill, open end wrench provided to tight clamping... bolts.). (Fig. 8) ⅜ To operate the angle unit at the side marked "LOW" and secure the locking screw. At this setting, the drilling speed is decreased to about 70% and the drilling torque increased to about 150%. (Fig. 9) ⅜ To operate the angle unit at the...
Instruction Manual
Page 15
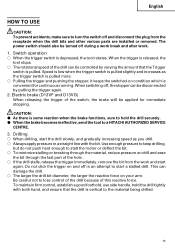
... again. 2. Speed is low when the trigger switch is pulled slightly and increases as you drill. ⅜ Always apply pressure in an attempt to start the drill slowly, and gradually increasing speed as the trigger switch is convenient for immediate stopping. Electric brake (D13VF and D13VG) ...handle, hold the drill securely. ⅷ When the brake becomes ineffective, send the tool to a HITACHI AUTHORIZED SERVICE CENTRE. 3. English HOW TO USE CAUTION: To prevent accidents, make sure to turn the switch off and disconnect the plug from the work . 1. The power switch should also ...
... again. 2. Speed is low when the trigger switch is pulled slightly and increases as you drill. ⅜ Always apply pressure in an attempt to start the drill slowly, and gradually increasing speed as the trigger switch is convenient for immediate stopping. Electric brake (D13VF and D13VG) ...handle, hold the drill securely. ⅷ When the brake becomes ineffective, send the tool to a HITACHI AUTHORIZED SERVICE CENTRE. 3. English HOW TO USE CAUTION: To prevent accidents, make sure to turn the switch off and disconnect the plug from the work . 1. The power switch should also ...
