
Instruction Manual
Page 10
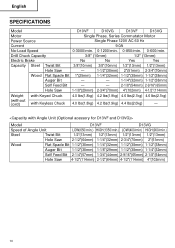
...LOW(400/min) HIGH(900/min.) Steel Twist Bit 1/2"(13mm) 1/2"(13mm) 1/2"(13mm) 1/2"(13mm) Hole Saw 2-1/2"(64mm) 1-1/4"(32mm) 2-3/4"(70mm) 2"(51mm) Wood Flat Spade Bit 1-1/2"(38mm) 1-1/4"(32mm) 1-1/2"(38mm) 1-1/2"(38mm) Auger Bit 1-1/2"(38mm) 1-1/8"(29mm) 1-1/2"(38mm) 1-1/4"(32mm) Self Feed Bit 2-1/4"(57mm) 1-3/4"(44mm) 2-9/16"(65mm) 2-1/8"(54mm) Hole Saw 4-1/2"(114mm) 2-1/2"(64mm) 4-1/2"(114mm) 4"(102mm) 10 Drill... Model D10VF D10VG D13VF D13VG Motor Single Phase, Series Commutator Motor Power Source Single Phase 120V AC 60 Hz Current 9.0A No-Load Speed 0-3000/min. ...
...LOW(400/min) HIGH(900/min.) Steel Twist Bit 1/2"(13mm) 1/2"(13mm) 1/2"(13mm) 1/2"(13mm) Hole Saw 2-1/2"(64mm) 1-1/4"(32mm) 2-3/4"(70mm) 2"(51mm) Wood Flat Spade Bit 1-1/2"(38mm) 1-1/4"(32mm) 1-1/2"(38mm) 1-1/2"(38mm) Auger Bit 1-1/2"(38mm) 1-1/8"(29mm) 1-1/2"(38mm) 1-1/4"(32mm) Self Feed Bit 2-1/4"(57mm) 1-3/4"(44mm) 2-9/16"(65mm) 2-1/8"(54mm) Hole Saw 4-1/2"(114mm) 2-1/2"(64mm) 4-1/2"(114mm) 4"(102mm) 10 Drill... Model D10VF D10VG D13VF D13VG Motor Single Phase, Series Commutator Motor Power Source Single Phase 120V AC 60 Hz Current 9.0A No-Load Speed 0-3000/min. ...
Instruction Manual
Page 13
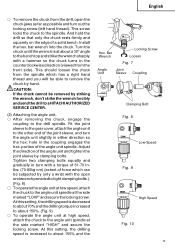
...of a solid bench. Bar Wrench Locking Screw Loosen Fig. 7 Angle Unit Joint Sleeve Coupling Clamping Bolt Fig. 8 Low Speed Fig. 9 High Speed Fig. 10 13 And hold the drill so that only the chuck rests firmly and squarely on the edge of the angle unit and tighten the joint sleeve ...provided to tight clamping bolts.). (Fig. 8) ⅜ To operate the angle unit at low speed, attach the chuck to remove the chuck by striking the wrench, don't strike the wrench forcibly and send the drill to a HITACHI AUTHORIZED SERVICE CENTER. (2) Attaching the angle unit. ⅜ After removing the chuck, ...
...of a solid bench. Bar Wrench Locking Screw Loosen Fig. 7 Angle Unit Joint Sleeve Coupling Clamping Bolt Fig. 8 Low Speed Fig. 9 High Speed Fig. 10 13 And hold the drill so that only the chuck rests firmly and squarely on the edge of the angle unit and tighten the joint sleeve ...provided to tight clamping bolts.). (Fig. 8) ⅜ To operate the angle unit at low speed, attach the chuck to remove the chuck by striking the wrench, don't strike the wrench forcibly and send the drill to a HITACHI AUTHORIZED SERVICE CENTER. (2) Attaching the angle unit. ⅜ After removing the chuck, ...
Instruction Manual
Page 15
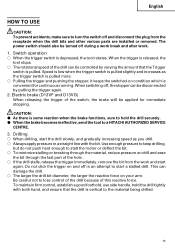
... various parts are installed or removed. The power switch should also be controlled by pulling the trigger again. 2. Speed is low when the trigger switch is pulled slightly and increases as you drill. ⅜ Always apply pressure in an attempt to start the drill slowly, and gradually increasing speed as the trigger switch is pulled more...
... various parts are installed or removed. The power switch should also be controlled by pulling the trigger again. 2. Speed is low when the trigger switch is pulled slightly and increases as you drill. ⅜ Always apply pressure in an attempt to start the drill slowly, and gradually increasing speed as the trigger switch is pulled more...
