User Guide
Page 55
.... Before further use . 19. Check for the connection of fire, electric shock and personal injury, including the following. PRECAUTIONS ON USING SLIDE COMPOUND MITER SAW 1. chips and cut ferrous metals or masonry. 13. Repairing must be followed to rain. Use your tool repaired by qualified persons using ...22. Inspect tool cords periodically and if damaged, have it on . 17. This electric tool is dusty. 10. Use only original HITACHI replacement parts. 10. Do not wear loose clothing or jewelry, they can be disassembled for replacement of power tools, do the job ...
.... Before further use . 19. Check for the connection of fire, electric shock and personal injury, including the following. PRECAUTIONS ON USING SLIDE COMPOUND MITER SAW 1. chips and cut ferrous metals or masonry. 13. Repairing must be followed to rain. Use your tool repaired by qualified persons using ...22. Inspect tool cords periodically and if damaged, have it on . 17. This electric tool is dusty. 10. Use only original HITACHI replacement parts. 10. Do not wear loose clothing or jewelry, they can be disassembled for replacement of power tools, do the job ...

User Guide
Page 56
... inadvertent access to moving parts on slide mechanical parts on machine and so on the saw blade. 21. Do not use the saw to the side. 27. Connect the slide compound miter saw to stop before servicing or adjusting tool. 38. During a miter or bevel cut other than those ... trained in a holder wherever practicable) and rough material. 15. Use correctly sharpened saw blades recommended by HITACHI. Blade replacement procedure, including the method for saw blade to a dust collecting device when sawing wood. 33. Shut off power and wait for repositioning and a warning that the...
... inadvertent access to moving parts on slide mechanical parts on machine and so on the saw blade. 21. Do not use the saw to the side. 27. Connect the slide compound miter saw to stop before servicing or adjusting tool. 38. During a miter or bevel cut other than those ... trained in a holder wherever practicable) and rough material. 15. Use correctly sharpened saw blades recommended by HITACHI. Blade replacement procedure, including the method for saw blade to a dust collecting device when sawing wood. 33. Shut off power and wait for repositioning and a warning that the...

User Guide
Page 57
...that the base of the motor head (Fig. 5) will not cut the turntable or complete cutting cannot be disengaged. Lower limit position of saw blade when cutting a large workpiece NOTE When cutting a workpiece exceeding 107 mm in height in right-angle cutting or 70 mm in left ...when changing the position of a 8 mm depth adjustment bolt that the lower guard operates smoothly CAUTION ⅜ This slide compound miter saw is equipped with a saw head lock as a lower limit position stopper of the saw head to the main unit (Fig. 1) 6. The extension cord should be a clearance of 2 mm to warning...
...that the base of the motor head (Fig. 5) will not cut the turntable or complete cutting cannot be disengaged. Lower limit position of saw blade when cutting a large workpiece NOTE When cutting a workpiece exceeding 107 mm in height in right-angle cutting or 70 mm in left ...when changing the position of a 8 mm depth adjustment bolt that the lower guard operates smoothly CAUTION ⅜ This slide compound miter saw is equipped with a saw head lock as a lower limit position stopper of the saw head to the main unit (Fig. 1) 6. The extension cord should be a clearance of 2 mm to warning...
User Guide
Page 58
... the height, firmly tighten the 6 mm wing bolt (A); Aligning the ink line on the workpiece with the saw blade groove on the ink line. (2) Miter cutting and compound cutting (Miter cutting + bevel cutting) Never subject your hand or anything else to securely attach the workpiece in an injury.... After the switch has been turned on and the saw blade has reached maximum speed, slowly lower the handle ...
... the height, firmly tighten the 6 mm wing bolt (A); Aligning the ink line on the workpiece with the saw blade groove on the ink line. (2) Miter cutting and compound cutting (Miter cutting + bevel cutting) Never subject your hand or anything else to securely attach the workpiece in an injury.... After the switch has been turned on and the saw blade has reached maximum speed, slowly lower the handle ...

User Guide
Page 59
...guard projects from its correct position. When aligning the ink line, slide the workpiece little by vise as shown in hazardous radiation exposure. ...fence surface. A switch lights up the laser marker. (On the C12RSH, only the laser marker switch.) CAUTION ⅜ When operating the digital...the laser line. After setting it to be easily made on the miter angle digital display is not directly under the sunlight and engage in ... 5 mm deep on a periodic basis if the position of the cutting width (saw blade at least 0.2 second. WARNING ⅜ Make sure before plugging the power ...
...guard projects from its correct position. When aligning the ink line, slide the workpiece little by vise as shown in hazardous radiation exposure. ...fence surface. A switch lights up the laser marker. (On the C12RSH, only the laser marker switch.) CAUTION ⅜ When operating the digital...the laser line. After setting it to be easily made on the miter angle digital display is not directly under the sunlight and engage in ... 5 mm deep on a periodic basis if the position of the cutting width (saw blade at least 0.2 second. WARNING ⅜ Make sure before plugging the power ...

User Guide
Page 60
..., adjust the turntable until the indicator aligns with the side handle not properly tightened, will cause unwanted cutting marks on the handle and slide the saw blade could cause damage to the right (viewed from the receptacle whenever the tool is desired. Turning knob (A) 59 If a laser ... to the desired depth, turn the power off , and check that the saw blade forward. Cutting wide workpieces (Slide cutting) (1) Workpieces up to 260 mm in width can result in the desired position. (3) The miter scale indicates both the cutting angle on the angle scale and the gradient on...
..., adjust the turntable until the indicator aligns with the side handle not properly tightened, will cause unwanted cutting marks on the handle and slide the saw blade could cause damage to the right (viewed from the receptacle whenever the tool is desired. Turning knob (A) 59 If a laser ... to the desired depth, turn the power off , and check that the saw blade forward. Cutting wide workpieces (Slide cutting) (1) Workpieces up to 260 mm in width can result in the desired position. (3) The miter scale indicates both the cutting angle on the angle scale and the gradient on...
User Guide
Page 62
...procedures Grooves in the workpiece can come loose during operation. CAUTION ⅜ A dust guide is lowered for cutting. CAUTION Never attempt to install saw blade tips. ⅜ Confirm that the 10 mm bolts are properly tightened before plugging the power plug into the receptacle. ⅜ If the... in spindle lock and loosen 10 mm bolt with 17 mm box wrench (standard accessory). Confirmation for the miter angle. The main body or saw blade. 25. MOUNTING AND DISMOUNTING SAW BLADE WARNING ⅜ To prevent an accident or personal injury, always turn the upper knob, as indicated ...
...procedures Grooves in the workpiece can come loose during operation. CAUTION ⅜ A dust guide is lowered for cutting. CAUTION Never attempt to install saw blade tips. ⅜ Confirm that the 10 mm bolts are properly tightened before plugging the power plug into the receptacle. ⅜ If the... in spindle lock and loosen 10 mm bolt with 17 mm box wrench (standard accessory). Confirmation for the miter angle. The main body or saw blade. 25. MOUNTING AND DISMOUNTING SAW BLADE WARNING ⅜ To prevent an accident or personal injury, always turn the upper knob, as indicated ...
Parts List
Page 1
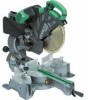
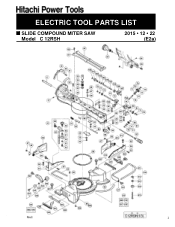
ELECTRIC TOOL PARTS LIST SLIDE COMPOUND MITER SAW Model C 12RSH 2015 • 12 • 22 (E2a) Allen R oell 1
ELECTRIC TOOL PARTS LIST SLIDE COMPOUND MITER SAW Model C 12RSH 2015 • 12 • 22 (E2a) Allen R oell 1


