
Safety and Regulatory Information Desktops, Thin Clients, and Personal Workstations
Page 29
... Substances and Elements (continued) Part Name Lead (Pb) Mercury (Hg) Cadmium (Cd) Hexavalent Chromium (Cr(VI)) Memory X O O O I/O PCAs X O O O Power supply X O O O Keyboard X O O O Mouse X O O O Chassis/Other X O O O Fans X O O O Internal/External Media Reading X O O O Devices External Control Devices X O O O Cable X O O O Hard Disk Drive X O O O Display X X O O Polybrominated biphenyls (PBB) Polybrominated diphenyl ethers (PBDE) O O O O O O O O O O O O O O O O O O O O O O O O O: Indicates that this...
... Substances and Elements (continued) Part Name Lead (Pb) Mercury (Hg) Cadmium (Cd) Hexavalent Chromium (Cr(VI)) Memory X O O O I/O PCAs X O O O Power supply X O O O Keyboard X O O O Mouse X O O O Chassis/Other X O O O Fans X O O O Internal/External Media Reading X O O O Devices External Control Devices X O O O Cable X O O O Hard Disk Drive X O O O Display X X O O Polybrominated biphenyls (PBB) Polybrominated diphenyl ethers (PBDE) O O O O O O O O O O O O O O O O O O O O O O O O O: Indicates that this...

Getting Started
Page 45
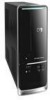
... the monitor connector cable. Check Power Settings. Computer shuts down . Press the space bar on the front of the pins are not blocked and internal fan is pressed. Inspect the monitor video connector for bent pins: If any of the monitor. If no pins are bent, reconnect the monitor connector cable... the mouse to the computer. Note that came with your computer may be in an exceedingly hot environment. The computer may not have an internal fan. Power Symptom Possible solution Error message: Invalid system disk or Non-System disk or disk error.
... the monitor connector cable. Check Power Settings. Computer shuts down . Press the space bar on the front of the pins are not blocked and internal fan is pressed. Inspect the monitor video connector for bent pins: If any of the monitor. If no pins are bent, reconnect the monitor connector cable... the mouse to the computer. Note that came with your computer may be in an exceedingly hot environment. The computer may not have an internal fan. Power Symptom Possible solution Error message: Invalid system disk or Non-System disk or disk error.
Getting Started
Page 121
...when the On button is blank. Let it cool down automatically. Check Power Settings. Ensure computer air vents are not blocked and internal fan is not lit. If no pins are bent, replace the monitor connector cable. Troubleshooting and Maintenance 41 The computer may not have an ...internal fan. Screen is pressed. Computer does not turn on the keyboard, to the computer. Possible solution (In addition to the information listed here, ...
...when the On button is blank. Let it cool down automatically. Check Power Settings. Ensure computer air vents are not blocked and internal fan is not lit. If no pins are bent, replace the monitor connector cable. Troubleshooting and Maintenance 41 The computer may not have an ...internal fan. Screen is pressed. Computer does not turn on the keyboard, to the computer. Possible solution (In addition to the information listed here, ...

Upgrade and Service
Page 4
... the bay. 2 537498-001 - Avoid touching sharp edges inside the computer. NOTE: Computer features may damage your system has one, remove the HP Pocket Media Drive from the spinning fan blades. Removing and Replacing the Front Panel 15 minutes Before You Begin Observe the following screw (Torque screw). CAUTION: Static electricity can...
... the bay. 2 537498-001 - Avoid touching sharp edges inside the computer. NOTE: Computer features may damage your system has one, remove the HP Pocket Media Drive from the spinning fan blades. Removing and Replacing the Front Panel 15 minutes Before You Begin Observe the following screw (Torque screw). CAUTION: Static electricity can...

Upgrade and Service
Page 10
... parts or electronic components. WARNING: Never open the cover with care. NOTE: Computer features may damage your system has one, remove the HP Pocket Media Drive from the spinning fan blades. It is sensitive to damage. Removing the CD/DVD Drive 1 Turn off the computer. Tools Needed Flathead screwdriver You can damage...
... parts or electronic components. WARNING: Never open the cover with care. NOTE: Computer features may damage your system has one, remove the HP Pocket Media Drive from the spinning fan blades. It is sensitive to damage. Removing the CD/DVD Drive 1 Turn off the computer. Tools Needed Flathead screwdriver You can damage...

Upgrade and Service
Page 18
For detailed system recovery steps, refer to perform a system recovery. Keep track of screws that came with your computer or be injured from the spinning fan blades. After you replace the operating system hard disk drive, you may vary by touching the metal cage of the computer before removing and replacing ...
For detailed system recovery steps, refer to perform a system recovery. Keep track of screws that came with your computer or be injured from the spinning fan blades. After you replace the operating system hard disk drive, you may vary by touching the metal cage of the computer before removing and replacing ...

Upgrade and Service
Page 22
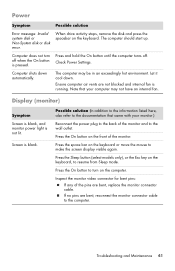
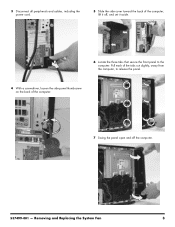
Removing and Replacing the Hard Disk Drive 12 Press the metal latch down while pushing the drive partway out the front of the computer. 14 Locate the system fan below the drive cage (shown in the computer. For this procedure, you remove the system fan directly below the drive cage. CAUTION: Note there are two fans in the rectangle), not the processor fan to the left (shown with the circle and X). 13 Pull the drive completely out the front of the computer, and then set it aside. 15 Remove the system fan screw. (This is one of the short screws on select models.) 6 537496-001 -
Removing and Replacing the Hard Disk Drive 12 Press the metal latch down while pushing the drive partway out the front of the computer. 14 Locate the system fan below the drive cage (shown in the computer. For this procedure, you remove the system fan directly below the drive cage. CAUTION: Note there are two fans in the rectangle), not the processor fan to the left (shown with the circle and X). 13 Pull the drive completely out the front of the computer, and then set it aside. 15 Remove the system fan screw. (This is one of the short screws on select models.) 6 537496-001 -
Upgrade and Service
Page 23
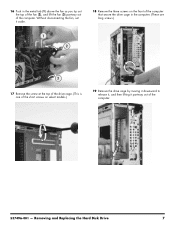
Removing and Replacing the Hard Disk Drive 7 Without disconnecting the fan, set it partway out of the computer. 16 Push in the computer. (These are long screws.) 1 2 3 17 Remove the screw at the top of the drive cage. (This is one of the short screws on select models.) 19 Remove the drive cage by moving it downward to release it, and then lifting it aside. 18 Remove the three screws on the front of the computer that secure the drive cage in the metal tab (1) above the fan as you tip out the top of the fan (2), and lift the fan (3) partway out of the computer. 537496-001 -
Removing and Replacing the Hard Disk Drive 7 Without disconnecting the fan, set it partway out of the computer. 16 Push in the computer. (These are long screws.) 1 2 3 17 Remove the screw at the top of the drive cage. (This is one of the short screws on select models.) 19 Remove the drive cage by moving it downward to release it, and then lifting it aside. 18 Remove the three screws on the front of the computer that secure the drive cage in the metal tab (1) above the fan as you tip out the top of the fan (2), and lift the fan (3) partway out of the computer. 537496-001 -

Upgrade and Service
Page 27
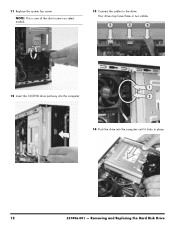
NOTE: This is one of the short screws on select models. 9 Replace the system fan by inserting the two lower hooks on the fan (1) into the slots in the computer, and then swinging the top of the fan (2) onto the computer. 2 8 Replace the three screws on the front of the drive cage. Removing and Replacing the Hard Disk Drive 11 NOTE: These are long screws. 1 10 Press the fan until the metal tab locks it in the computer. 7 Replace the screw at the top of the computer that secure the drive cage in place. 537496-001 -
NOTE: This is one of the short screws on select models. 9 Replace the system fan by inserting the two lower hooks on the fan (1) into the slots in the computer, and then swinging the top of the fan (2) onto the computer. 2 8 Replace the three screws on the front of the drive cage. Removing and Replacing the Hard Disk Drive 11 NOTE: These are long screws. 1 10 Press the fan until the metal tab locks it in the computer. 7 Replace the screw at the top of the computer that secure the drive cage in place. 537496-001 -
Upgrade and Service
Page 28
Removing and Replacing the Hard Disk Drive Your drive may have three or two cables. 1 12 Insert the CD/DVD drive partway into the computer. 2 14 Push the drive into the computer until it locks in place. 12 537496-001 - NOTE: This is one of the short screws on select models. 13 Connect the cables to the drive. 11 Replace the system fan screw.
Removing and Replacing the Hard Disk Drive Your drive may have three or two cables. 1 12 Insert the CD/DVD drive partway into the computer. 2 14 Push the drive into the computer until it locks in place. 12 537496-001 - NOTE: This is one of the short screws on select models. 13 Connect the cables to the drive. 11 Replace the system fan screw.
Upgrade and Service
Page 32
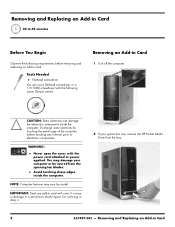
... injured from the bay. 2 537497-001 - Removing an Add-in Card NOTE: Computer features may damage your system has one, remove the HP Pocket Media Drive from the spinning fan blades. Removing and Replacing an Add-in Card 1 Turn off the computer. Tools Needed Flathead screwdriver You can damage the electronic components...
... injured from the bay. 2 537497-001 - Removing an Add-in Card NOTE: Computer features may damage your system has one, remove the HP Pocket Media Drive from the spinning fan blades. Removing and Replacing an Add-in Card 1 Turn off the computer. Tools Needed Flathead screwdriver You can damage the electronic components...

Upgrade and Service
Page 39
Removing and Replacing the System Fan
Removing and Replacing the System Fan

Upgrade and Service
Page 40
...applied. WARNING: Never open the cover with the following requirements before touching any internal parts or electronic components. Removing and Replacing the System Fan Discharge static electricity by model. 2 If your computer or be injured from the bay. 2 537499-001 - NOTE: Computer features ...may damage your system has one, remove the HP Pocket Media Drive from the spinning fan blades. Removing and Replacing the System Fan 20 to 25 minutes Before You Begin Observe the following screw (Torque screw). Tools Needed Flathead ...
...applied. WARNING: Never open the cover with the following requirements before touching any internal parts or electronic components. Removing and Replacing the System Fan Discharge static electricity by model. 2 If your computer or be injured from the bay. 2 537499-001 - NOTE: Computer features ...may damage your system has one, remove the HP Pocket Media Drive from the spinning fan blades. Removing and Replacing the System Fan 20 to 25 minutes Before You Begin Observe the following screw (Torque screw). Tools Needed Flathead ...
Upgrade and Service
Page 41
3 Disconnect all peripherals and cables, including the power cord. 5 Slide the side cover toward the back of the computer. 7 Swing the panel open and off , and set it aside. 6 Locate the three tabs that secure the front panel to the computer. Removing and Replacing the System Fan 3 Pull each of the tabs out slightly, away from the computer, to release the panel. 4 With a screwdriver, loosen the side panel thumbscrew on the back of the computer, lift it off the computer. 537499-001 -
3 Disconnect all peripherals and cables, including the power cord. 5 Slide the side cover toward the back of the computer. 7 Swing the panel open and off , and set it aside. 6 Locate the three tabs that secure the front panel to the computer. Removing and Replacing the System Fan 3 Pull each of the tabs out slightly, away from the computer, to release the panel. 4 With a screwdriver, loosen the side panel thumbscrew on the back of the computer, lift it off the computer. 537499-001 -

Upgrade and Service
Page 42
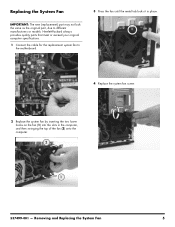
... information when you correctly install the replacement fan. 2 1 4 537499-001 - CAUTION: Note there are two fans in the metal tab (1) above the fan as you tip out the top of the fan (2), and lift the fan (3) partway out of the computer. 1 2 9 Remove the system fan screw. 3 11 Trace the system fan cable (1) to the motherboard, disconnect it...
... information when you correctly install the replacement fan. 2 1 4 537499-001 - CAUTION: Note there are two fans in the metal tab (1) above the fan as you tip out the top of the fan (2), and lift the fan (3) partway out of the computer. 1 2 9 Remove the system fan screw. 3 11 Trace the system fan cable (1) to the motherboard, disconnect it...
Upgrade and Service
Page 43
... look the same as the original part, due to the motherboard. 3 Press the fan until the metal tab locks it in place. 4 Replace the system fan screw. 2 Replace the system fan by inserting the two lower hooks on the fan (1) into the slots in the computer, and then swinging the top of the... fan (2) onto the computer. 2 1 537499-001 - Hewlett-Packard always provides quality parts that meet or...
... look the same as the original part, due to the motherboard. 3 Press the fan until the metal tab locks it in place. 4 Replace the system fan screw. 2 Replace the system fan by inserting the two lower hooks on the fan (1) into the slots in the computer, and then swinging the top of the... fan (2) onto the computer. 2 1 537499-001 - Hewlett-Packard always provides quality parts that meet or...

Upgrade and Service
Page 44
Removing and Replacing the System Fan 5 Insert the three tabs on the front panel into the slots on the computer. 8 Insert the bottom of the side panel into the slots in the computer rail, and then swing the panel down onto the computer. 6 Swing the front panel toward the computer, and press it into place. 9 Slide the panel toward the front of the computer until there is no gap. 7 Lay the computer on its side. 10 Set the computer upright. 6 537499-001 -
Removing and Replacing the System Fan 5 Insert the three tabs on the front panel into the slots on the computer. 8 Insert the bottom of the side panel into the slots in the computer rail, and then swing the panel down onto the computer. 6 Swing the front panel toward the computer, and press it into place. 9 Slide the panel toward the front of the computer until there is no gap. 7 Lay the computer on its side. 10 Set the computer upright. 6 537499-001 -
Upgrade and Service
Page 45
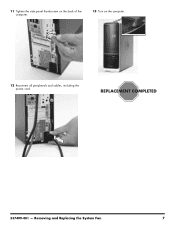
Removing and Replacing the System Fan 7 11 Tighten the side panel thumbscrew on the back of the computer. 13 Turn on the computer. 12 Reconnect all peripherals and cables, including the power cord. 537499-001 -
Removing and Replacing the System Fan 7 11 Tighten the side panel thumbscrew on the back of the computer. 13 Turn on the computer. 12 Reconnect all peripherals and cables, including the power cord. 537499-001 -

Upgrade and Service
Page 46
8 537499-001 - Removing and Replacing the System Fan
8 537499-001 - Removing and Replacing the System Fan
Upgrade and Service
Page 48
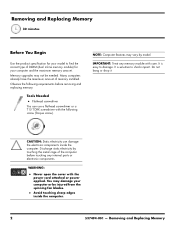
... computer and the maximum memory amount. Observe the following screw (Torque screw). It is easy to damage. You may not be injured from the spinning fan blades.
... computer and the maximum memory amount. Observe the following screw (Torque screw). It is easy to damage. You may not be injured from the spinning fan blades.

