
HP USB Digital Drive
Page 2
The Digital Drive can purchase one (in various storage capacities) from any computer that is a pocket-sized SD (Secure Digital) memory drive for storing and transferring files such as digital pictures, music, video, and data. However, you will need an SD memory card to operate the Digital Drive. The HP USB Digital Drive 1 is running Microsoft Windows XP Home, Windows XP Pro, or Windows 2000. You can be included. User Guide 1 An SD memory card 2 may not be used with any HP authorized reseller.
The Digital Drive can purchase one (in various storage capacities) from any computer that is a pocket-sized SD (Secure Digital) memory drive for storing and transferring files such as digital pictures, music, video, and data. However, you will need an SD memory card to operate the Digital Drive. The HP USB Digital Drive 1 is running Microsoft Windows XP Home, Windows XP Pro, or Windows 2000. You can be included. User Guide 1 An SD memory card 2 may not be used with any HP authorized reseller.
HP USB Digital Drive
Page 112
The information contained herein is a trademark. The warranties for technical or editorial errors or omissions contained herein. User Guide HP USB Digital Drive First Edition July 2003 Microsoft and Windows are set forth in the U.S. and/or other countries. HP shall not be liable for HP products and services are trademarks of Microsoft Corporation in the express warranty statements accompanying such products and services. SD Logo is subject to change without notice. © 2003 Hewlett-Packard Development Company, L.P.
The information contained herein is a trademark. The warranties for technical or editorial errors or omissions contained herein. User Guide HP USB Digital Drive First Edition July 2003 Microsoft and Windows are set forth in the U.S. and/or other countries. HP shall not be liable for HP products and services are trademarks of Microsoft Corporation in the express warranty statements accompanying such products and services. SD Logo is subject to change without notice. © 2003 Hewlett-Packard Development Company, L.P.

HP Client Manager 6.1
Page 2
... connected to be visited individually for tasks such as workstations, business PCs, and notebooks. Managing the hardware and software on client computers can be challenging and often requires that allows HP workstations, business PCs, and notebook computers running Microsoft Windows to a Microsoft Windows 2000 server or Microsoft Windows 2003 server running HPCM 6.1 2 To help solve these problems, Hewlett...
... connected to be visited individually for tasks such as workstations, business PCs, and notebooks. Managing the hardware and software on client computers can be challenging and often requires that allows HP workstations, business PCs, and notebook computers running Microsoft Windows to a Microsoft Windows 2000 server or Microsoft Windows 2003 server running HPCM 6.1 2 To help solve these problems, Hewlett...
HP Client Manager 6.1
Page 3
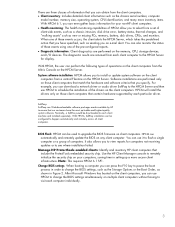
...chassis intrusion, disk drive error, battery status, thermal changes, and "walking assets" such as new or missing PCs, memory, battery, disk drives, CPUs, and monitors. HPCM will install the drivers only on any client computer...security chip. Normally, a SoftPaq would be configured to remotely initialize the security chip on your non-HP client computers. • Health monitoring: The health monitoring capabilities of HPCM allow you specify. The... a more secure client infrastructure. After Microsoft Windows has booted on the client computers, you to view reports for display.
...chassis intrusion, disk drive error, battery status, thermal changes, and "walking assets" such as new or missing PCs, memory, battery, disk drives, CPUs, and monitors. HPCM will install the drivers only on any client computer...security chip. Normally, a SoftPaq would be configured to remotely initialize the security chip on your non-HP client computers. • Health monitoring: The health monitoring capabilities of HPCM allow you specify. The... a more secure client infrastructure. After Microsoft Windows has booted on the client computers, you to view reports for display.
HP Client Manager 6.1
Page 6
..., in concert with NS 6.0, downloads several HPCM agents to each client computer to store the HPCM configuration information that will be managed. The Altiris Console window receives its reports from Altiris, including Altiris Client Management Suite and Altiris Asset Management Suite. This database is also used to be installed on the...
..., in concert with NS 6.0, downloads several HPCM agents to each client computer to store the HPCM configuration information that will be managed. The Altiris Console window receives its reports from Altiris, including Altiris Client Management Suite and Altiris Asset Management Suite. This database is also used to be installed on the...
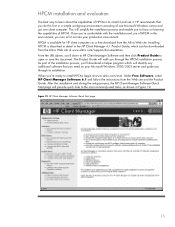
HP Client Manager 6.1
Page 13
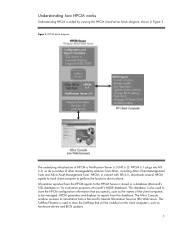
... the capabilities of HPCM. Installing HPCM is available for HP client computers as shown in a simple workgroup environment consisting of one Microsoft Windows server and just one client computer. HPCM is described in detail in the HP Client Manager 6.1 Product Guide, which will simplify the ...installation process and enable you 're comfortable with the installation and use it out into your Microsoft Windows 2000/2003 server and guide you through its installation...
... the capabilities of HPCM. Installing HPCM is available for HP client computers as shown in a simple workgroup environment consisting of one Microsoft Windows server and just one client computer. HPCM is described in detail in the HP Client Manager 6.1 Product Guide, which will simplify the ...installation process and enable you 're comfortable with the installation and use it out into your Microsoft Windows 2000/2003 server and guide you through its installation...
HP Client Manager 6.1
Page 16
Microsoft and Windows are set forth in the express warranty statements accompanying such products and services. The information contained herein is subject to verify for HP products and services are U.S. The only warranties for yourself that you perform a trial download and installation of HPCM to change without notice. registered trademarks of ...
Microsoft and Windows are set forth in the express warranty statements accompanying such products and services. The information contained herein is subject to verify for HP products and services are U.S. The only warranties for yourself that you perform a trial download and installation of HPCM to change without notice. registered trademarks of ...
Using LightScribe (Select Models Only)
Page 9
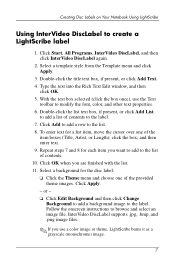
Click Start, All Programs, InterVideo DiscLabel, and then click InterVideo DiscLabel again. 2. Type the text into the Rich Text Edit window, and then click OK. 5. Click Add to add a row to create a LightScribe label 1. Repeat steps 7 and 8 for each item you want to add to modify ...; Click the Theme menu and choose one of contents to add a list of the item boxes (Title, Artist, or Length); Creating Disc Labels on Your Notebook Using LightScribe Using InterVideo DiscLabel to the list. 8. Click OK when you use the Text toolbar to the list of the provided theme images. or...
Click Start, All Programs, InterVideo DiscLabel, and then click InterVideo DiscLabel again. 2. Type the text into the Rich Text Edit window, and then click OK. 5. Click Add to add a row to create a LightScribe label 1. Repeat steps 7 and 8 for each item you want to add to modify ...; Click the Theme menu and choose one of contents to add a list of the item boxes (Title, Artist, or Length); Creating Disc Labels on Your Notebook Using LightScribe Using InterVideo DiscLabel to the list. 8. Click OK when you use the Text toolbar to the list of the provided theme images. or...
Using LightScribe (Select Models Only)
Page 12
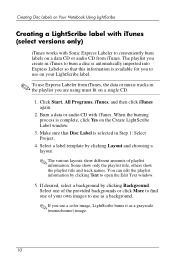
...a background. ✎ If you are using must fit on a single CD. 1. The playlist you create in iTunes to open the Edit Text window. 5. Select one of the provided backgrounds or click More to use Express Labeler from iTunes. If desired, select a background by clicking Background. Click...Programs, iTunes, and then click iTunes again. 2. Make sure that this information is complete, click Yes on the Create LightScribe Label window. 3. Creating Disc Labels on Your Notebook Using LightScribe Creating a LightScribe label with iTunes (select versions only) iTunes works with iTunes.
...a background. ✎ If you are using must fit on a single CD. 1. The playlist you create in iTunes to open the Edit Text window. 5. Select one of the provided backgrounds or click More to use Express Labeler from iTunes. If desired, select a background by clicking Background. Click...Programs, iTunes, and then click iTunes again. 2. Make sure that this information is complete, click Yes on the Create LightScribe Label window. 3. Creating Disc Labels on Your Notebook Using LightScribe Creating a LightScribe label with iTunes (select versions only) iTunes works with iTunes.

Hardware and Software Guide
Page 2
...by its proprietor. Hardware and Software Guide HP Compaq Notebook Series Second Edition June 2005 First Edition April 2005 Document Part Number: 393677-002 © Copyright 2005 Hewlett-Packard Development Company, L.P. Nothing herein should be liable for HP products and services are U.S. Bluetooth is... or omissions contained herein. The information contained herein is subject to change without notice. HP shall not be construed as constituting an additional warranty. Microsoft and Windows are set forth in the express warranty statements accompanying such products and services.
...by its proprietor. Hardware and Software Guide HP Compaq Notebook Series Second Edition June 2005 First Edition April 2005 Document Part Number: 393677-002 © Copyright 2005 Hewlett-Packard Development Company, L.P. Nothing herein should be liable for HP products and services are U.S. Bluetooth is... or omissions contained herein. The information contained herein is subject to change without notice. HP shall not be construed as constituting an additional warranty. Microsoft and Windows are set forth in the express warranty statements accompanying such products and services.

Hardware and Software Guide
Page 5
... (Select Models Only 4-6 Using the S-Video-out Jack 4-7 Connecting a Monitor or Projector 4-8 Multimedia Software 4-9 Observing the Copyright Warning 4-9 Installing Software 4-10 Enabling AutoPlay 4-11 Using Windows Media Player 4-11 Using WinDVD Player 4-12 Hardware and Software Guide vii
... (Select Models Only 4-6 Using the S-Video-out Jack 4-7 Connecting a Monitor or Projector 4-8 Multimedia Software 4-9 Observing the Copyright Warning 4-9 Installing Software 4-10 Enabling AutoPlay 4-11 Using Windows Media Player 4-11 Using WinDVD Player 4-12 Hardware and Software Guide vii
Hardware and Software Guide
Page 8
...11 Wireless and Bluetooth Devices 6-17 7 Security Security Features 7-1 Security Preferences in Computer Setup 7-3 Passwords 7-4 HP and Windows Passwords 7-4 HP and Windows Password Guidelines 7-6 HP Administrator Passwords 7-7 Setting HP Administrator Passwords 7-8 Entering HP Administrator Passwords 7-8 Power-On Passwords 7-9 Setting Power-On Passwords 7-9 Entering Power-On Passwords 7-10 Requiring a... 7-18 Setting System Information Options 7-19 Antivirus Software 7-20 Firewall Software 7-21 Critical Security Updates for Windows XP 7-23 x Hardware and Software Guide
...11 Wireless and Bluetooth Devices 6-17 7 Security Security Features 7-1 Security Preferences in Computer Setup 7-3 Passwords 7-4 HP and Windows Passwords 7-4 HP and Windows Password Guidelines 7-6 HP Administrator Passwords 7-7 Setting HP Administrator Passwords 7-8 Entering HP Administrator Passwords 7-8 Power-On Passwords 7-9 Setting Power-On Passwords 7-9 Entering Power-On Passwords 7-10 Requiring a... 7-18 Setting System Information Options 7-19 Antivirus Software 7-20 Firewall Software 7-21 Critical Security Updates for Windows XP 7-23 x Hardware and Software Guide

Hardware and Software Guide
Page 18
... and Switches ✎ Refer to turn off the notebook. (Continued) 1-8 Hardware and Software Guide If the notebook has stopped responding and Microsoft® Windows® shutdown procedures cannot be used, press the power/standby button and hold for 5 seconds to turn on the notebook. ■ In standby, briefly press the button to exit standby...
... and Switches ✎ Refer to turn off the notebook. (Continued) 1-8 Hardware and Software Guide If the notebook has stopped responding and Microsoft® Windows® shutdown procedures cannot be used, press the power/standby button and hold for 5 seconds to turn on the notebook. ■ In standby, briefly press the button to exit standby...

Hardware and Software Guide
Page 19
Refer to "Info Center (Select Models Only)" in standby if the display is closed while the notebook is turned on. For information about changing the functions of wireless features, see the "Power Options" section in Chapter 2 , .... 6 Volume mute button Mutes system sound. 7 Volume down button Decreases system volume. 8 Volume up . Notebook Features Component 2 Display switch 3 Info Center button 4 Wireless button* Description Puts the notebook in Chapter 4, "Multimedia" for more information about establishing a wireless connection from Windows, visit http://www.hp.com/go/wireless.
Refer to "Info Center (Select Models Only)" in standby if the display is closed while the notebook is turned on. For information about changing the functions of wireless features, see the "Power Options" section in Chapter 2 , .... 6 Volume mute button Mutes system sound. 7 Volume down button Decreases system volume. 8 Volume up . Notebook Features Component 2 Display switch 3 Info Center button 4 Wireless button* Description Puts the notebook in Chapter 4, "Multimedia" for more information about establishing a wireless connection from Windows, visit http://www.hp.com/go/wireless.

Hardware and Software Guide
Page 20
Notebook Features Component 1 Power/standby button* Description When the notebook is: ■ Off, press the button to turn on the notebook. ■ In standby, briefly press the button to exit standby. ■ In hibernation, briefly press the button to turn off the notebook. (Continued) 1-10 Hardware and Software Guide If the notebook has stopped responding and Microsoft Windows shutdown procedures cannot be used, press the power/standby button and hold for 5 seconds to exit hibernation.
Notebook Features Component 1 Power/standby button* Description When the notebook is: ■ Off, press the button to turn on the notebook. ■ In standby, briefly press the button to exit standby. ■ In hibernation, briefly press the button to turn off the notebook. (Continued) 1-10 Hardware and Software Guide If the notebook has stopped responding and Microsoft Windows shutdown procedures cannot be used, press the power/standby button and hold for 5 seconds to exit hibernation.

Hardware and Software Guide
Page 21
... changing the functions of power features, see Chapter 6 , "Wireless." Hardware and Software Guide 1-11 Notebook Features Component 2 Display switch 3 Wireless button* Description Puts the notebook in Chapter 2 , "Power." For information about changing the functions of wireless features, see the "Power... Options" section in standby if the display is closed while the notebook is turned on or off, but does not create a wireless connection. ✎ To establish a wireless connection, a wireless network ...
... changing the functions of power features, see Chapter 6 , "Wireless." Hardware and Software Guide 1-11 Notebook Features Component 2 Display switch 3 Wireless button* Description Puts the notebook in Chapter 2 , "Power." For information about changing the functions of wireless features, see the "Power... Options" section in standby if the display is closed while the notebook is turned on or off, but does not create a wireless connection. ✎ To establish a wireless connection, a wireless network ...

Hardware and Software Guide
Page 22
... menu. Component 1 Function keys 2 fn key 3 Windows logo key 4 Windows applications key 5 Keypad keys Description Execute frequently used system functions when pressed in combination with a function key or the esc key. Executes frequently used like ... numeric keypad. 1-12 Hardware and Software Guide Displays a shortcut menu for items beneath the pointer. Can be used system functions when pressed in this section. Notebook Features Keys ✎ Your notebook may look slightly different from the illustration in combination with the fn key.
... menu. Component 1 Function keys 2 fn key 3 Windows logo key 4 Windows applications key 5 Keypad keys Description Execute frequently used system functions when pressed in combination with a function key or the esc key. Executes frequently used like ... numeric keypad. 1-12 Hardware and Software Guide Displays a shortcut menu for items beneath the pointer. Can be used system functions when pressed in this section. Notebook Features Keys ✎ Your notebook may look slightly different from the illustration in combination with the fn key.

Hardware and Software Guide
Page 37
... you may need when you contact Customer Care. Wireless certification labels are affixed to the bottom of your notebook. You may need the Product Key to the bottom of Authenticity-Contains the Microsoft Windows Product Key. You may need this information when traveling internationally. You may need this information when traveling internationally...
... you may need when you contact Customer Care. Wireless certification labels are affixed to the bottom of your notebook. You may need the Product Key to the bottom of Authenticity-Contains the Microsoft Windows Product Key. You may need this information when traveling internationally. You may need this information when traveling internationally...

Hardware and Software Guide
Page 39
...: ■ Off, press the button to turn on . If the notebook has stopped responding and Microsoft Windows shutdown procedures cannot be used, press the power/standby button and hold for at least 5 seconds to exit hibernation. Off: The notebook is off the notebook. (Continued) 2-2 Hardware and Software Guide Power Component 1 Power/standby light 2 Power...
...: ■ Off, press the button to turn on . If the notebook has stopped responding and Microsoft Windows shutdown procedures cannot be used, press the power/standby button and hold for at least 5 seconds to exit hibernation. Off: The notebook is off the notebook. (Continued) 2-2 Hardware and Software Guide Power Component 1 Power/standby light 2 Power...

Hardware and Software Guide
Page 43
... connect or disconnect external devices. ■ Do not insert or remove a PC Card or a Digital Media Slot card. Power Hibernation Ä CAUTION: If the configuration of the intervals in the Power Options window. Click one of the notebook is in Microsoft Windows Control Panel to select it has been disabled. You can disable hibernation...
... connect or disconnect external devices. ■ Do not insert or remove a PC Card or a Digital Media Slot card. Power Hibernation Ä CAUTION: If the configuration of the intervals in the Power Options window. Click one of the notebook is in Microsoft Windows Control Panel to select it has been disabled. You can disable hibernation...


