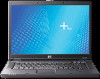
HP Compaq notebook single image white paper
Page 1
... the ROM Version Using Windows System Information 8 Determining the ROM version using QuickLaunch Buttons for Windows 8 Creating a ROMPaq diskette ...8 Upgrading the ROM...8 Appendix B: SoftPaqs...9 Unpacking a SoftPaq file...9 Appendix C: Known anomalies ...10 Appendix D: Questions and answers 11 For more information...12 HP Compaq notebook single image white paper Introduction...2 Purpose ...2 Audience ...2 System requirements and prerequisites...
... the ROM Version Using Windows System Information 8 Determining the ROM version using QuickLaunch Buttons for Windows 8 Creating a ROMPaq diskette ...8 Upgrading the ROM...8 Appendix B: SoftPaqs...9 Unpacking a SoftPaq file...9 Appendix C: Known anomalies ...10 Appendix D: Questions and answers 11 For more information...12 HP Compaq notebook single image white paper Introduction...2 Purpose ...2 Audience ...2 System requirements and prerequisites...
HP Compaq notebook single image white paper
Page 4
...primary hard drive from the nc8200. - Apply power to the nc6200 and allow the OS to enumerate all of the new devices. 10. Removal procedures are available in the order provided. Apply power to the nc6100 and allow the OS to complete the ROM upgrade. ... Professional installation. 4 Preparing for the preinstalled image for users who perform a clean installation of Microsoft Windows XP Professional. Removal procedures are available in the Maintenance and Service Guide: "HP Compaq Business Notebook nc6200 Series." 4. Power down the nc6200 and remove the hard drive. 7. Apply power...
...primary hard drive from the nc8200. - Apply power to the nc6200 and allow the OS to enumerate all of the new devices. 10. Removal procedures are available in the order provided. Apply power to the nc6100 and allow the OS to complete the ROM upgrade. ... Professional installation. 4 Preparing for the preinstalled image for users who perform a clean installation of Microsoft Windows XP Professional. Removal procedures are available in the Maintenance and Service Guide: "HP Compaq Business Notebook nc6200 Series." 4. Power down the nc6200 and remove the hard drive. 7. Apply power...
HP Compaq notebook single image white paper
Page 5
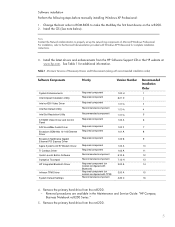
... 1.01 A 1.00 B 1.00 A 1.02 A 5.10 A 7.12 H 3.00 A 3.00 A 4.20 C Recommended Installation Order 1 2 3 4 5 6 7 8 9 10 11 12 13 14 15 16 4. Table 1 Minimum Versions of Microsoft Windows Professional. Software installation Perform the following steps before manually installing Windows XP Professional: 1. Note Contact the Network Administrators to make the... Agere Systems AC'97 Modem Driver TI Cardbus Driver Quick Launch Button Software Synaptics Touchpad HP Integrated Bluetooth Driver Infineon TPM Driver System Default Settings Priority Required component Required component Required ...
... 1.01 A 1.00 B 1.00 A 1.02 A 5.10 A 7.12 H 3.00 A 3.00 A 4.20 C Recommended Installation Order 1 2 3 4 5 6 7 8 9 10 11 12 13 14 15 16 4. Table 1 Minimum Versions of Microsoft Windows Professional. Software installation Perform the following steps before manually installing Windows XP Professional: 1. Note Contact the Network Administrators to make the... Agere Systems AC'97 Modem Driver TI Cardbus Driver Quick Launch Button Software Synaptics Touchpad HP Integrated Bluetooth Driver Infineon TPM Driver System Default Settings Priority Required component Required component Required ...
HP Compaq notebook single image white paper
Page 10
Appendix C: Known anomalies Mobile Intel 915GM/GM, 910GML Express Chipset Software Anomaly: Windows logo testing error may appear during video driver installation Description: Windows may display a logo testing error if the Intel video driver is installed prior to any other ... should be installed prior to installation of systems Intel video chipsets. 10 It is preloaded on the some models. Systems Affected: HP Compaq Business Notebook nc6100 and nc6220 models Operating Systems Affected: Windows XP Resolution: This software should be used simultaneously on systems with models...
Appendix C: Known anomalies Mobile Intel 915GM/GM, 910GML Express Chipset Software Anomaly: Windows logo testing error may appear during video driver installation Description: Windows may display a logo testing error if the Intel video driver is installed prior to any other ... should be installed prior to installation of systems Intel video chipsets. 10 It is preloaded on the some models. Systems Affected: HP Compaq Business Notebook nc6100 and nc6220 models Operating Systems Affected: Windows XP Resolution: This software should be used simultaneously on systems with models...
Hardware and Software Guide
Page 4
Contents Initiating or Restoring from Hibernation 2-11 Using Emergency Shutdown Procedures 2-12 Power Options 2-13 Accessing the Power Options Window 2-14 Displaying the Power Meter Icon 2-14 Setting or Changing a Power Scheme 2-15 Using a Security Password 2-15 Processor ... Stick (Select Models Only) . . . . 3-4 Mouse Properties 3-5 Hotkeys 3-6 Hotkey Quick Reference 3-7 Using Hotkey Commands 3-8 Viewing Battery Charge Information (fn+f8). . . . . 3-10 Decreasing Screen Brightness (fn+f9 3-10 Keypads 3-11 Using the Embedded Numeric Keypad 3-12 iv Hardware and Software Guide
Contents Initiating or Restoring from Hibernation 2-11 Using Emergency Shutdown Procedures 2-12 Power Options 2-13 Accessing the Power Options Window 2-14 Displaying the Power Meter Icon 2-14 Setting or Changing a Power Scheme 2-15 Using a Security Password 2-15 Processor ... Stick (Select Models Only) . . . . 3-4 Mouse Properties 3-5 Hotkeys 3-6 Hotkey Quick Reference 3-7 Using Hotkey Commands 3-8 Viewing Battery Charge Information (fn+f8). . . . . 3-10 Decreasing Screen Brightness (fn+f9 3-10 Keypads 3-11 Using the Embedded Numeric Keypad 3-12 iv Hardware and Software Guide

Hardware and Software Guide
Page 7
...Using a WLAN Connection 11-7 Using Wireless Security Features 11-8 Installing Wireless Software (Optional 11-8 Troubleshooting Wireless Devices 11-10 Bluetooth (Select Models Only 11-11 Device Power States 11-13 Turning On the Devices 11-15 Turning Off and ...with Infrared 11-18 Mobile Printing 11-19 12 Security Security Features 12-1 Security Preferences in Computer Setup 12-4 Passwords 12-4 HP and Windows Passwords 12-5 HP and Windows Password Guidelines 12-6 HP Administrator Passwords 12-7 Setting HP Administrator Passwords 12-8 Entering HP Administrator Passwords 12-9 ...
...Using a WLAN Connection 11-7 Using Wireless Security Features 11-8 Installing Wireless Software (Optional 11-8 Troubleshooting Wireless Devices 11-10 Bluetooth (Select Models Only 11-11 Device Power States 11-13 Turning On the Devices 11-15 Turning Off and ...with Infrared 11-18 Mobile Printing 11-19 12 Security Security Features 12-1 Security Preferences in Computer Setup 12-4 Passwords 12-4 HP and Windows Passwords 12-5 HP and Windows Password Guidelines 12-6 HP Administrator Passwords 12-7 Setting HP Administrator Passwords 12-8 Entering HP Administrator Passwords 12-9 ...

Hardware and Software Guide
Page 38
...; Shut down the notebook through the operating system using one of the following procedures: ❐ Select Start > Turn Off Computer > Turn Off. ❐ Press the Windows logo key, and then select Turn Off Computer > Turn Off. ■ The power/standby lights are unable to shut down . ■ The notebook is turned... the display while the power is shut down the notebook with these procedures, refer to the "Using Emergency Shutdown Procedures" section, later in this chapter. 2-10 Hardware and Software Guide
...; Shut down the notebook through the operating system using one of the following procedures: ❐ Select Start > Turn Off Computer > Turn Off. ❐ Press the Windows logo key, and then select Turn Off Computer > Turn Off. ■ The power/standby lights are unable to shut down . ■ The notebook is turned... the display while the power is shut down the notebook with these procedures, refer to the "Using Emergency Shutdown Procedures" section, later in this chapter. 2-10 Hardware and Software Guide
Hardware and Software Guide
Page 39
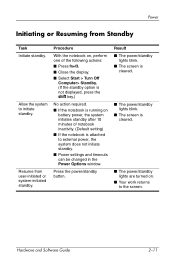
...The screen is attached to external power, the system does not initiate standby. ■ Power settings and timeouts can be changed in the Power Options window. Hardware and Software Guide 2-11 Procedure With the notebook on, perform one of the following actions: ■ Press fn+f3. ■ Close...is not displayed, press the shift key.) No action required. ■ If the notebook is running on battery power, the system initiates standby after 10 minutes of notebook inactivity. (Default setting) ■ If the notebook is cleared. ■ The power/standby lights are turned on. ■...
...The screen is attached to external power, the system does not initiate standby. ■ Power settings and timeouts can be changed in the Power Options window. Hardware and Software Guide 2-11 Procedure With the notebook on, perform one of the following actions: ■ Press fn+f3. ■ Close...is not displayed, press the shift key.) No action required. ■ If the notebook is running on battery power, the system initiates standby after 10 minutes of notebook inactivity. (Default setting) ■ If the notebook is cleared. ■ The power/standby lights are turned on. ■...

Hardware and Software Guide
Page 94
...refer to your drive, a "Playback Of Content From This Region Is Not Permitted" message is displayed in the Remaining Times Until Permanent field in Windows that contain copyrighted files also contain region codes. Changing DVD Region Settings Ä CAUTION: The region settings on your optical drive. You can ...be changed through the operating system or through some DVD players. 4-10 Hardware and Software Guide By default, AutoPlay is enabled on a disc as soon as it is inserted into the drive and the drive door...
...refer to your drive, a "Playback Of Content From This Region Is Not Permitted" message is displayed in the Remaining Times Until Permanent field in Windows that contain copyrighted files also contain region codes. Changing DVD Region Settings Ä CAUTION: The region settings on your optical drive. You can ...be changed through the operating system or through some DVD players. 4-10 Hardware and Software Guide By default, AutoPlay is enabled on a disc as soon as it is inserted into the drive and the drive door...

Hardware and Software Guide
Page 153
...can be traditional LAN data access points or group ad-hoc networks that represent a set of devices that are represented in the Bluetooth for Windows software provides the following functions: ■ Personal Information Management (PIM) item transfer-Sends and receives information files such as ■ Network ... by graphical icons that resemble their physical features, which makes them easily recognizable and distinguishes them from another . 11-10 Hardware and Software Guide The devices are attached only to one another Bluetooth computer. ■ Network access (Personal Area...
...can be traditional LAN data access points or group ad-hoc networks that represent a set of devices that are represented in the Bluetooth for Windows software provides the following functions: ■ Personal Information Management (PIM) item transfer-Sends and receives information files such as ■ Network ... by graphical icons that resemble their physical features, which makes them easily recognizable and distinguishes them from another . 11-10 Hardware and Software Guide The devices are attached only to one another Bluetooth computer. ■ Network access (Personal Area...

Hardware and Software Guide
Page 217
Software Update and Recovery 6. Press enter to the notebook. The notebook restarts in Windows when the process is complete.) Reinstalling Device Drivers and Other Software After the operating system... the on-screen instructions for installing the drivers. Press enter to format the drive. (The reinstallation process begins. While running Windows, insert the Application and Driver Recovery disc into the optical drive. Press C to continue installing a new copy of the operating...notebook: 1. If you must reinstall any software you added to set up the operating system. 10.
Software Update and Recovery 6. Press enter to the notebook. The notebook restarts in Windows when the process is complete.) Reinstalling Device Drivers and Other Software After the operating system... the on-screen instructions for installing the drivers. Press enter to format the drive. (The reinstallation process begins. While running Windows, insert the Application and Driver Recovery disc into the optical drive. Press C to continue installing a new copy of the operating...notebook: 1. If you must reinstall any software you added to set up the operating system. 10.

Hardware and Software Guide
Page 243
... displaying contents 5-17 inserting 5-14 removing 5-15, 5-16 DVI-D 3-9 E electrostatic discharge (ESD) 5-2 Embedded Security for Windows XP 12-23 D dial tones 10-6 dialing settings 10-5 disc, optical. DVDs; See CDs; DVDs display switching image 3-7, 3-9 turning off 2-10 display release latches 1-9 display switch 1-5, 2-3, 2-13 docking connector 1-15 drive media affected by airport security 5-2 DriveLock 12...
... displaying contents 5-17 inserting 5-14 removing 5-15, 5-16 DVI-D 3-9 E electrostatic discharge (ESD) 5-2 Embedded Security for Windows XP 12-23 D dial tones 10-6 dialing settings 10-5 disc, optical. DVDs; See CDs; DVDs display switching image 3-7, 3-9 turning off 2-10 display release latches 1-9 display switch 1-5, 2-3, 2-13 docking connector 1-15 drive media affected by airport security 5-2 DriveLock 12...

Hardware and Software Guide
Page 247
... battery power 2-32, 6-4 switching sources 2-18 See also battery pack; standby power connector 1-10 power cord 1-16 See also cables Power Meter icon 2-14 power options 2-13 Power Options window 2-14 power schemes 2-15, 2-16 power settings 2-9 power sources 2-4 power/standby button 1-5,... 2-2 power/standby light 1-1, 2-1, 2-3 power-on password. DVDs ownership tag 12-18 P passwords HP administrator 12-7 security 2-15 PC Card drivers 6-1 ...
... battery power 2-32, 6-4 switching sources 2-18 See also battery pack; standby power connector 1-10 power cord 1-16 See also cables Power Meter icon 2-14 power options 2-13 Power Options window 2-14 power schemes 2-15, 2-16 power settings 2-9 power sources 2-4 power/standby button 1-5,... 2-2 power/standby light 1-1, 2-1, 2-3 power-on password. DVDs ownership tag 12-18 P passwords HP administrator 12-7 security 2-15 PC Card drivers 6-1 ...
Hardware and Software Guide
Page 250
... 4-9 wireless button 1-6, 11-13 wireless certification label 1-17 wireless light 1-2 Index-10 Hardware and Software Guide See passwords V vents 1-13, 1-14 VGA 3-9 video devices, connecting 4-6 video features 4-5 video transmission types 3-9 viruses, antivirus software 12-20 volume buttons 1-6, 4-1, 4-4 volume mute light 1-2 W Windows administrator password. See passwords WinDVD Creator. Index resuming from standby 2-11...
... 4-9 wireless button 1-6, 11-13 wireless certification label 1-17 wireless light 1-2 Index-10 Hardware and Software Guide See passwords V vents 1-13, 1-14 VGA 3-9 video devices, connecting 4-6 video features 4-5 video transmission types 3-9 viruses, antivirus software 12-20 volume buttons 1-6, 4-1, 4-4 volume mute light 1-2 W Windows administrator password. See passwords WinDVD Creator. Index resuming from standby 2-11...

Getting Started
Page 2
... 1-7 Connecting the Modem with an Adapter 1-8 Step 4: Connect the Notebook to External Power 1-9 Step 5: Charge the Battery Pack 1-10 Step 6: Open the Notebook 1-11 Step 7: Turn On the Notebook 1-12 2 Software Setup Welcome to Windows 2-2 Select Your Regional Preferences 2-4 Accept the License Agreements 2-5 Help Protect Your Notebook 2-6 Name Your Notebook 2-6 Register Online...
... 1-7 Connecting the Modem with an Adapter 1-8 Step 4: Connect the Notebook to External Power 1-9 Step 5: Charge the Battery Pack 1-10 Step 6: Open the Notebook 1-11 Step 7: Turn On the Notebook 1-12 2 Software Setup Welcome to Windows 2-2 Select Your Regional Preferences 2-4 Accept the License Agreements 2-5 Help Protect Your Notebook 2-6 Name Your Notebook 2-6 Register Online...

Getting Started
Page 46
... is not connected to the Internet, refer to the printed Worldwide Telephone Numbers booklet (English only) included with the notebook. A-10 Getting Started Troubleshooting Contacting Customer Care by E-mail or Telephone If the notebook is located on the Notebook Documentation CD..... ■ For information about deleting a Microsoft Windows password, refer to Start > Help and Support. (The deletion procedures vary with the types of Windows passwords you have set). ■ For information about deleting an HP password, refer to the Hardware and Software Guide, which...
... is not connected to the Internet, refer to the printed Worldwide Telephone Numbers booklet (English only) included with the notebook. A-10 Getting Started Troubleshooting Contacting Customer Care by E-mail or Telephone If the notebook is located on the Notebook Documentation CD..... ■ For information about deleting a Microsoft Windows password, refer to Start > Help and Support. (The deletion procedures vary with the types of Windows passwords you have set). ■ For information about deleting an HP password, refer to the Hardware and Software Guide, which...

Getting Started
Page 55
Press enter to complete. Select Format the partition using this partition. 11. This process takes 1 to 2 hours to set up the operating system. 10. System Restore 6. Press C to format the drive. (The reinstallation process begins. Press F to continue setup using the NTFS file system (Quick), and then press enter. &#... accept the agreement and continue. (The "Setup" page is displayed.) 8. Press enter to continue. (A "Licensing Agreement" page is complete.) Getting Started B-9 The notebook restarts in Windows when the process is displayed.) 7.
Press enter to complete. Select Format the partition using this partition. 11. This process takes 1 to 2 hours to set up the operating system. 10. System Restore 6. Press C to format the drive. (The reinstallation process begins. Press F to continue setup using the NTFS file system (Quick), and then press enter. &#... accept the agreement and continue. (The "Setup" page is displayed.) 8. Press enter to continue. (A "Licensing Agreement" page is complete.) Getting Started B-9 The notebook restarts in Windows when the process is displayed.) 7.
Getting Started
Page 56
... drivers are reinstalled, you must reinstall drivers. While running Windows, insert the Driver Recovery disc into the optical drive. Follow the on your former configuration, some software may have autorun enabled, select Start > Run. Follow the installation instructions provided with the notebook: 1. B-10 Getting Started To reinstall drivers, use the Driver...
... drivers are reinstalled, you must reinstall drivers. While running Windows, insert the Driver Recovery disc into the optical drive. Follow the on your former configuration, some software may have autorun enabled, select Start > Run. Follow the installation instructions provided with the notebook: 1. B-10 Getting Started To reinstall drivers, use the Driver...

Getting Started
Page 61
overheating A-7 power A-3 response A-6 software A-5 virus A-5 troubleshooting resources, Help and Support Center A-8 troubleshooting, notebook does not turn on 1-12 turning off notebook 3-6, A-6 turning on notebook A-3 tutorials and tours A-8 U updates, software B-10 USB port 4-5 V vents 4-6, A-7 viruses, computer 3-2, A-5 volume buttons 4-3 W Windows firewall 3-3 wireless button 4-3 wireless light 4-3 Wireless Regulatory Notices 3-5 Worldwide Telephone Numbers A-10 Getting Started Index Index-5
overheating A-7 power A-3 response A-6 software A-5 virus A-5 troubleshooting resources, Help and Support Center A-8 troubleshooting, notebook does not turn on 1-12 turning off notebook 3-6, A-6 turning on notebook A-3 tutorials and tours A-8 U updates, software B-10 USB port 4-5 V vents 4-6, A-7 viruses, computer 3-2, A-5 volume buttons 4-3 W Windows firewall 3-3 wireless button 4-3 wireless light 4-3 Wireless Regulatory Notices 3-5 Worldwide Telephone Numbers A-10 Getting Started Index Index-5

HP Compaq nc8230, nx8220 and nw8240 Notebook PC - Maintenance and Service Guide
Page 67
Press f8 to set up the operating system. 10. Press enter to accept the agreement and continue. The reinstallation process begins. A licensing agreement page is displayed. 8. Press C to select your language, and then the ... displayed. 7. Press esc to format the drive. Press F to continue installing a new copy of the operating system instead of repairing it. 9. The computer restarts in Windows when the process is complete. Maintenance and Service Guide 3-13 When prompted, press any key to complete. This process takes 1 to 2 hours to start from...
Press f8 to set up the operating system. 10. Press enter to accept the agreement and continue. The reinstallation process begins. A licensing agreement page is displayed. 8. Press C to select your language, and then the ... displayed. 7. Press esc to format the drive. Press F to continue installing a new copy of the operating system instead of repairing it. 9. The computer restarts in Windows when the process is complete. Maintenance and Service Guide 3-13 When prompted, press any key to complete. This process takes 1 to 2 hours to start from...


