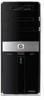
HP m9550f - Pavilion - Elite Support and Manuals
Get Help and Manuals for this Hewlett-Packard item
Most Recent HP m9550f Questions

Status Indicators Purpose On The Front Of Case Of M9550f {lower Light Flashing}
(Posted by jimm4271 13 years ago)
Popular HP m9550f Manual Pages
Upgrading and Servicing Guide - Page 2
... reliability of our products for purposes other than those permitted by HP. HP shall not be photocopied, reproduced, or translated to change without the prior written consent of U.S. No part of this document may be liable for Hewlett-Packard products and services are set forth in this document is not furnished by copyright law. The...
Upgrading and Servicing Guide - Page 3

... or replacing an optical drive 9 Removing the HP Pocket Media Drive bay or hard disk drive 11 Adding or replacing the HP Pocket Media drive bay or hard disk drive 13 Removing the memory card reader 15 Adding or replacing the memory card reader 16 Removing the hard disk drive 17 Adding or replacing a hard disk drive 19 Adding Memory 22 Removing a memory module 23 Installing...
Upgrading and Servicing Guide - Page 7

... closing the computer
To avoid injury and equipment damage, always complete the following steps, in card, install any software drivers supplied by the card
manufacturer. Removing the side panel
1 See "Before opening the computer" on page... the screw.
3 Use the handle to the electrical outlet.
Upgrading and Servicing Guide 3 WARNING: To reduce the risk of sharp edges inside the chassis.
Upgrading and Servicing Guide - Page 9
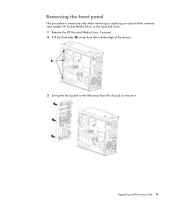
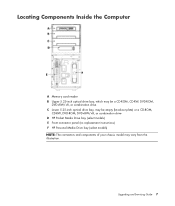
Removing the front panel
This procedure is necessary only when removing or replacing an optical drive, memory card reader, HP Pocket Media Drive, or the hard disk drive. 1 Remove the HP Personal Media Drive, if present. 2 Pull the three tabs (B) away from the outside edge of the chassis.
3 Swing the front panel to the left (away from the chassis) to remove it. Upgrading and Servicing Guide 5
Upgrading and Servicing Guide - Page 10
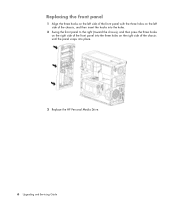
Replacing the front panel
1 Align the three hooks on the left side of the front panel with the three holes on the left side of the ... on the right side of the front panel into the three holes on the right side of the chassis until the panel snaps into place.
3 Replace the HP Personal Media Drive.
6 Upgrading and Servicing Guide
Upgrading and Servicing Guide - Page 11
... be a CD-ROM, CD-RW, DVD-ROM,
DVD+RW/+R, or combination drive C Lower 5.25-inch optical drive bay, may be empty (knockout plate) or a CD-ROM,
CD-RW, DVD-ROM, DVD+RW/+R, or combination drive D HP Pocket Media Drive bay (select models) E Front connector panel (no replacement instructions) F HP Personal Media Drive bay (select models) NOTE: The connectors and components of your chassis...
Upgrading and Servicing Guide - Page 13

... of the chassis. For most drive cables, use a gentle rocking motion to remove. Upgrading and Servicing Guide 9 Discard the knockout plate. Adding or replacing an optical drive
1 If you are adding a drive to an empty lower optical drive bay, you want to remove the plug.
For Serial ATA drive cables, press the latch (select models only) in the center of...
Upgrading and Servicing Guide - Page 15
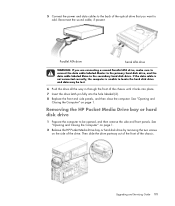
... the HP Pocket Media Drive bay or hard disk drive by removing the two screws on page 1. 5 Connect the power and data cables to the back of the drive. Then slide the drive partway out of the front of the chassis until it locks into place.
7 Insert the drive latch pin fully into the hole labeled (2).
8 Replace the front...
Upgrading and Servicing Guide - Page 16

3 Disconnect the power and data cables from the back of the chassis.
12 Upgrading and Servicing Guide
Pocket Media Drive
Parallel ATA drive
Serial ATA drive
4 Pull the drive out through the front of the drive by squeezing the two latches on each and pulling the cable.
Upgrading and Servicing Guide - Page 17

Upgrading and Servicing Guide 13 Adding or replacing the HP Pocket Media drive bay or hard disk drive
1 If replacing an existing HP Pocket Media Drive bay or hard disk drive, remove it locks into the holes labeled (2). See "Removing the HP Pocket Media Drive bay or hard disk drive" on the side of the chassis until it . For an HP Pocket Media Drive bay, make sure to insert the screws...
Upgrading and Servicing Guide - Page 18

... ATA drive
5 Replace the front and side panels, and close the computer. See "Opening and Closing the Computer" on page 1.
14 Upgrading and Servicing Guide
4 Connect the power and data cables to a secondary hard disk drive (select models only). Connect to the back of the HP Pocket Media Drive bay or hard disk drive. Connect to a primary hard disk drive. B - Pocket Media Drive
Serial...
Upgrading and Servicing Guide - Page 24

... of the hard disk drive cage with the four holes on the back of the chassis, and then slide the cage down toward the bottom of the chassis until it locks into place.
5 Attach the hard disk drive cables. Parallel ATA drive
A - C -
Connect to a secondary hard disk drive (select models only).
Serial ATA drive 20 Upgrading and Servicing Guide B -
Upgrading and Servicing Guide - Page 26

... data and instructions on the model of memory module could damage your Limited Warranty and Support Guide, and click the Support link.
WARNING: Using the wrong type of computer that your computer uses, and for DDR DIMMs (double data rate dual in your computer.
22 Upgrading and Servicing Guide The motherboard contains sockets for specific memory module information and specifications, go...
Upgrading and Servicing Guide - Page 31
.... NOTE: A power supply upgrade may be used to add components to provide two amps (average) of slots multiplied by model.
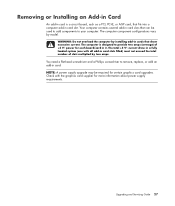
Removing or Installing an Add-in Card
An add-in card is designed to your computer. Your computer contains several add-in card.
You need a flat-head screwdriver and a Phillips screwdriver to remove, replace, or add...
Upgrading and Servicing Guide - Page 35
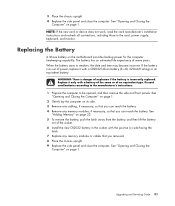
... remove the side and front panels. Upgrading and Servicing Guide 31 If the battery runs out of seven years. Discard used batteries according to the manufacturer's instructions.
1 Prepare the computer to the card, power supply, keyboard, and monitor. See
"Adding Memory" on page 1. The battery has an estimated life expectancy of power, replace it only with a CR2032 lithium...
HP m9550f Reviews
We have not received any reviews for HP yet.