Limited Warranty and Support Guide - Refurbished
Page 15
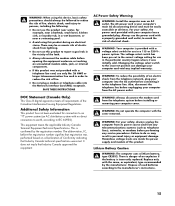
... a bathtub, wash bowl, kitchen sink, or laundry tub, in personal injury or equipment damage. For your computer into the Network Interface Card (NIC) receptacle. The voltage select switch has been pre-set to the correct voltage setting for use the power cord with a telephone... incorrectly replaced. SAVE THESE INSTRUCTIONS DOC Statement (Canada Only) This Class B digital apparatus meets all times. AC Power Safety Warning WARNING: Install the computer near a swimming pool. • Avoid using this device, basic safety precautions should always be easily accessible at all requirements of...
... a bathtub, wash bowl, kitchen sink, or laundry tub, in personal injury or equipment damage. For your computer into the Network Interface Card (NIC) receptacle. The voltage select switch has been pre-set to the correct voltage setting for use the power cord with a telephone... incorrectly replaced. SAVE THESE INSTRUCTIONS DOC Statement (Canada Only) This Class B digital apparatus meets all times. AC Power Safety Warning WARNING: Install the computer near a swimming pool. • Avoid using this device, basic safety precautions should always be easily accessible at all requirements of...

Advanced Setup Guide
Page 4
... speakers 26 Connecting your home stereo system (optional 29 2.1 home stereo installation 30 5.1 home audio installation 31 5.1 home audio installation procedure 31 7.1 home audio installation 33 7.1 home audio installation procedure 34 Connecting digital audio 35 Connecting Speakers Using the Creative Sound Blaster X-Fi Sound Card 37 Connecting the speakers 37 Connecting the FlexiJack connector 38 Connecting...
... speakers 26 Connecting your home stereo system (optional 29 2.1 home stereo installation 30 5.1 home audio installation 31 5.1 home audio installation procedure 31 7.1 home audio installation 33 7.1 home audio installation procedure 34 Connecting digital audio 35 Connecting Speakers Using the Creative Sound Blaster X-Fi Sound Card 37 Connecting the speakers 37 Connecting the FlexiJack connector 38 Connecting...

Advanced Setup Guide
Page 24
...in the instructions. Software configuration is different for select models) or digital speakers to the audio card on the back of your computer model, as noted in the installation procedure steps. 18 Advanced Setup Guide (features vary by model) Six connectors Your computer model... may include a audio See the following S connector card. Type 3 6 Audio card Your computer may include six sound connectors on the ...
...in the instructions. Software configuration is different for select models) or digital speakers to the audio card on the back of your computer model, as noted in the installation procedure steps. 18 Advanced Setup Guide (features vary by model) Six connectors Your computer model... may include a audio See the following S connector card. Type 3 6 Audio card Your computer may include six sound connectors on the ...
Advanced Setup Guide
Page 29
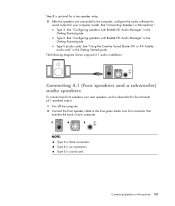
... Getting Started guide. Type S is three connectors. The following diagram shows a typical 2.1 audio installation: Connecting 4.1 (Four speakers and a subwoofer) audio speakers To connect two front speakers, two rear speakers, and a subwoofer for your computer. 3 6 S NOTE: Type 3 is sound card. Connecting Speakers or Microphone 23 Type 3: See "Configuring speakers with Realtek HD Audio...
... Getting Started guide. Type S is three connectors. The following diagram shows a typical 2.1 audio installation: Connecting 4.1 (Four speakers and a subwoofer) audio speakers To connect two front speakers, two rear speakers, and a subwoofer for your computer. 3 6 S NOTE: Type 3 is sound card. Connecting Speakers or Microphone 23 Type 3: See "Configuring speakers with Realtek HD Audio...
Advanced Setup Guide
Page 30
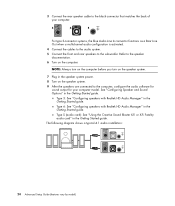
...the speaker system. 7 Plug in the speaker system power. 8 Turn on the computer. Type S (audio card): See "Using the Creative Sound Blaster X-Fi or X-Fi Fatality audio card" in the Getting Started guide. 3 Connect the rear speaker cable to the subwoofer. The following diagram shows ...a typical 4.1 audio installation: 24 Advanced Setup Guide (features vary by model) Type 3: See "Configuring speakers ...
...the speaker system. 7 Plug in the speaker system power. 8 Turn on the computer. Type S (audio card): See "Using the Creative Sound Blaster X-Fi or X-Fi Fatality audio card" in the Getting Started guide. 3 Connect the rear speaker cable to the subwoofer. The following diagram shows ...a typical 4.1 audio installation: 24 Advanced Setup Guide (features vary by model) Type 3: See "Configuring speakers ...
Advanced Setup Guide
Page 32
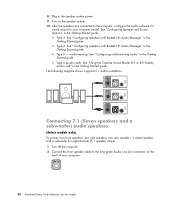
multistreaming: See "Configuring multistreaming audio" in the Getting Started guide. The following diagram shows a typical 5.1 audio installation: Connecting 7.1 (Seven speakers and a subwoofer) audio speakers (Select models only) To connect two front speakers, two side speakers, two rear speakers.... Type 3: See "Configuring speakers with Realtek HD Audio Manager" in the Getting Started guide. Type S (audio card): See "Using the Creative Sound Blaster X-Fi or X-Fi Fatality audio card" in the Getting Started guide. Type 6 - 8 Plug in the speaker system power. 9 Turn on the speaker...
multistreaming: See "Configuring multistreaming audio" in the Getting Started guide. The following diagram shows a typical 5.1 audio installation: Connecting 7.1 (Seven speakers and a subwoofer) audio speakers (Select models only) To connect two front speakers, two side speakers, two rear speakers.... Type 3: See "Configuring speakers with Realtek HD Audio Manager" in the Getting Started guide. Type S (audio card): See "Using the Creative Sound Blaster X-Fi or X-Fi Fatality audio card" in the Getting Started guide. Type 6 - 8 Plug in the speaker system power. 9 Turn on the speaker...
Advanced Setup Guide
Page 36
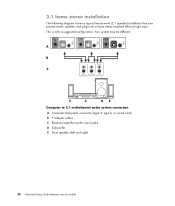
2.1 home stereo installation The following diagram shows a typical two-channel (2.1 speaker) installation that uses passive stereo speakers and plugs into a home stereo standard left and right) 30 Advanced Setup Guide (features vary by model) This is only a suggested configuration. A B C E C DE Computer to 2.1 multichannel audio system connection A Computer back-panel connectors (type 3, type 6, or sound card) B Y adapter cables C Receiver/amplifier (audio input jacks) D Subwoofer E Front speakers (left and right input. Your system may be different.
2.1 home stereo installation The following diagram shows a typical two-channel (2.1 speaker) installation that uses passive stereo speakers and plugs into a home stereo standard left and right) 30 Advanced Setup Guide (features vary by model) This is only a suggested configuration. A B C E C DE Computer to 2.1 multichannel audio system connection A Computer back-panel connectors (type 3, type 6, or sound card) B Y adapter cables C Receiver/amplifier (audio input jacks) D Subwoofer E Front speakers (left and right input. Your system may be different.

Advanced Setup Guide
Page 37
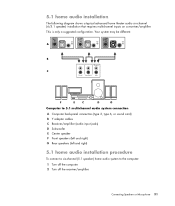
... A B C F E C D G Computer to 5.1 multichannel audio system connection A Computer back-panel connectors (type 3, type 6, or sound card) B Y adapter cables C Receiver/amplifier (audio input jacks) D Subwoofer E Center speaker F Front speakers (left and right) G Rear speakers (left and right) 5.1 home audio installation procedure To connect a six-channel (5.1 speaker) home audio system to the computer: 1 Turn off...
... A B C F E C D G Computer to 5.1 multichannel audio system connection A Computer back-panel connectors (type 3, type 6, or sound card) B Y adapter cables C Receiver/amplifier (audio input jacks) D Subwoofer E Center speaker F Front speakers (left and right) G Rear speakers (left and right) 5.1 home audio installation procedure To connect a six-channel (5.1 speaker) home audio system to the computer: 1 Turn off...

Advanced Setup Guide
Page 39
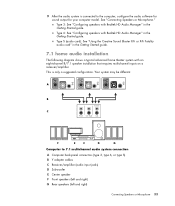
... audio card" in the Getting Started guide. A B C F E C D G Computer to the computer, configure the audio software for sound output for your computer model. Type 3: See "Configuring speakers with Realtek HD Audio Manager" in the Getting Started guide. 7.1 home audio installation The ...system with Realtek HD Audio Manager" in the Getting Started guide. Type 6: See "Configuring speakers with an eight-channel 8/7.1 speaker installation that requires multichannel inputs on a receiver/amplifier. 9 After the audio system is only a suggested configuration. This is connected to 7.1...
... audio card" in the Getting Started guide. A B C F E C D G Computer to the computer, configure the audio software for sound output for your computer model. Type 3: See "Configuring speakers with Realtek HD Audio Manager" in the Getting Started guide. 7.1 home audio installation The ...system with Realtek HD Audio Manager" in the Getting Started guide. Type 6: See "Configuring speakers with an eight-channel 8/7.1 speaker installation that requires multichannel inputs on a receiver/amplifier. 9 After the audio system is only a suggested configuration. This is connected to 7.1...

Advanced Setup Guide
Page 40
7.1 home audio installation procedure To connect an eight-channel (7.1 speaker) home audio system to the computer: 1 Turn off the computer. 2 Turn off the receiver/amplifier. 3 Connect the front .... NOTE: Receiver/amplifier input connectors may be labeled Surround, 7.1 Channel inputs, 6 Channel inputs, CD, DVD, or DVD In. Type 6 has six connectors. Type S has audio card.
7.1 home audio installation procedure To connect an eight-channel (7.1 speaker) home audio system to the computer: 1 Turn off the computer. 2 Turn off the receiver/amplifier. 3 Connect the front .... NOTE: Receiver/amplifier input connectors may be labeled Surround, 7.1 Channel inputs, 6 Channel inputs, CD, DVD, or DVD In. Type 6 has six connectors. Type S has audio card.

Advanced Setup Guide
Page 4
... speakers 26 Connecting your home stereo system (optional 29 2.1 home stereo installation 30 5.1 home audio installation 31 5.1 home audio installation procedure 31 7.1 home audio installation 33 7.1 home audio installation procedure 34 Connecting digital audio 35 Connecting Speakers Using the Creative Sound Blaster X-Fi Sound Card 37 Connecting the speakers 37 Connecting the FlexiJack connector 38 Connecting...
... speakers 26 Connecting your home stereo system (optional 29 2.1 home stereo installation 30 5.1 home audio installation 31 5.1 home audio installation procedure 31 7.1 home audio installation 33 7.1 home audio installation procedure 34 Connecting digital audio 35 Connecting Speakers Using the Creative Sound Blaster X-Fi Sound Card 37 Connecting the speakers 37 Connecting the FlexiJack connector 38 Connecting...

Advanced Setup Guide
Page 24
...model may include six sound connectors on the computer. You can connect up to a 5.1 audio system to the computer. Type S has audio card. Six connectors Your computer model may include three sound connectors. NOTE: Type 3 has three connectors. You can connect up to a 7.1 ...Software configuration is different for select models) or digital speakers to the audio card on the back of your computer model, as noted in the installation procedure steps. 18 Advanced Setup Guide (features vary by model) When installing cables, use the sound connectors that match your computer.
...model may include six sound connectors on the computer. You can connect up to a 5.1 audio system to the computer. Type S has audio card. Six connectors Your computer model may include three sound connectors. NOTE: Type 3 has three connectors. You can connect up to a 7.1 ...Software configuration is different for select models) or digital speakers to the audio card on the back of your computer model, as noted in the installation procedure steps. 18 Advanced Setup Guide (features vary by model) When installing cables, use the sound connectors that match your computer.

Advanced Setup Guide
Page 29
The following diagram shows a typical 2.1 audio installation: Connecting 4.1 (Four speakers and a subwoofer) audio speakers To connect two front speakers, two rear speakers, and a subwoofer for your computer. 3 6 S NOTE: Type 3 is three connectors. Type 6 is sound card. Type 3: See "Configuring speakers with Realtek...See "Configuring speakers with Realtek HD Audio Manager" in the Getting Started guide. Type S (audio card): See "Using the Creative Sound Blaster X-Fi or X-Fi Fatality audio card" in the Getting Started guide. Step 8 is optional for a two-speaker setup. 8 After ...
The following diagram shows a typical 2.1 audio installation: Connecting 4.1 (Four speakers and a subwoofer) audio speakers To connect two front speakers, two rear speakers, and a subwoofer for your computer. 3 6 S NOTE: Type 3 is three connectors. Type 6 is sound card. Type 3: See "Configuring speakers with Realtek...See "Configuring speakers with Realtek HD Audio Manager" in the Getting Started guide. Type S (audio card): See "Using the Creative Sound Blaster X-Fi or X-Fi Fatality audio card" in the Getting Started guide. Step 8 is optional for a two-speaker setup. 8 After ...

Advanced Setup Guide
Page 30
... guide. Type 3: See "Configuring speakers with Realtek HD Audio Manager" in the Getting Started guide. The following diagram shows a typical 4.1 audio installation: 24 Advanced Setup Guide (features vary by model) NOTE: Always turn on the computer before you turn on the speaker system. 7 Plug in... cables to the audio system. 5 Connect the front and rear speakers to the subwoofer. Type S (audio card): See "Using the Creative Sound Blaster X-Fi or X-Fi Fatality audio card" in the Getting Started guide. 3 Connect the rear speaker cable to the black connector that matches the back...
... guide. Type 3: See "Configuring speakers with Realtek HD Audio Manager" in the Getting Started guide. The following diagram shows a typical 4.1 audio installation: 24 Advanced Setup Guide (features vary by model) NOTE: Always turn on the computer before you turn on the speaker system. 7 Plug in... cables to the audio system. 5 Connect the front and rear speakers to the subwoofer. Type S (audio card): See "Using the Creative Sound Blaster X-Fi or X-Fi Fatality audio card" in the Getting Started guide. 3 Connect the rear speaker cable to the black connector that matches the back...

Advanced Setup Guide
Page 32
... "Using the Creative Sound Blaster X-Fi or X-Fi Fatality audio card" in the Getting Started guide. The following diagram shows a typical 5.1 audio installation: Connecting 7.1 (Seven speakers and a subwoofer) audio speakers (Select models only) To connect two front speakers, two side speakers, two rear speakers, a center speaker, and a subwoofer ...
... "Using the Creative Sound Blaster X-Fi or X-Fi Fatality audio card" in the Getting Started guide. The following diagram shows a typical 5.1 audio installation: Connecting 7.1 (Seven speakers and a subwoofer) audio speakers (Select models only) To connect two front speakers, two side speakers, two rear speakers, a center speaker, and a subwoofer ...

Advanced Setup Guide
Page 36
2.1 home stereo installation The following diagram shows a typical two-channel (2.1 speaker) installation that uses passive stereo speakers and plugs into a home stereo standard left and right) 30 Advanced Setup Guide (features vary by model) This is only a suggested configuration. A B C E C DE Computer to 2.1 multichannel audio system connection A Computer back-panel connectors (type 3, type 6, or sound card) B Y adapter cables C Receiver/amplifier (audio input jacks) D Subwoofer E Front speakers (left and right input. Your system may be different.
2.1 home stereo installation The following diagram shows a typical two-channel (2.1 speaker) installation that uses passive stereo speakers and plugs into a home stereo standard left and right) 30 Advanced Setup Guide (features vary by model) This is only a suggested configuration. A B C E C DE Computer to 2.1 multichannel audio system connection A Computer back-panel connectors (type 3, type 6, or sound card) B Y adapter cables C Receiver/amplifier (audio input jacks) D Subwoofer E Front speakers (left and right input. Your system may be different.
Advanced Setup Guide
Page 37
... A B C F E C D G Computer to 5.1 multichannel audio system connection A Computer back-panel connectors (type 3, type 6, or sound card) B Y adapter cables C Receiver/amplifier (audio input jacks) D Subwoofer E Center speaker F Front speakers (left and right) G Rear speakers (left and right) 5.1 home audio installation procedure To connect a six-channel (5.1 speaker) home audio system to the computer: 1 Turn off...
... A B C F E C D G Computer to 5.1 multichannel audio system connection A Computer back-panel connectors (type 3, type 6, or sound card) B Y adapter cables C Receiver/amplifier (audio input jacks) D Subwoofer E Center speaker F Front speakers (left and right) G Rear speakers (left and right) 5.1 home audio installation procedure To connect a six-channel (5.1 speaker) home audio system to the computer: 1 Turn off...
Advanced Setup Guide
Page 39
Type 6: See "Configuring speakers with Realtek HD Audio Manager" in the Getting Started guide. 7.1 home audio installation The following diagram shows a typical advanced home theater system with Realtek HD Audio Manager" in the Getting Started guide. A B C F ...audio system is only a suggested configuration. Type S (audio card): See "Using the Creative Sound Blaster X-Fi or X-Fi Fatality audio card" in the Getting Started guide. Type 3: See "Configuring speakers with an eight-channel 8/7.1 speaker installation that requires multichannel inputs on a receiver/amplifier. This is ...
Type 6: See "Configuring speakers with Realtek HD Audio Manager" in the Getting Started guide. 7.1 home audio installation The following diagram shows a typical advanced home theater system with Realtek HD Audio Manager" in the Getting Started guide. A B C F ...audio system is only a suggested configuration. Type S (audio card): See "Using the Creative Sound Blaster X-Fi or X-Fi Fatality audio card" in the Getting Started guide. Type 3: See "Configuring speakers with an eight-channel 8/7.1 speaker installation that requires multichannel inputs on a receiver/amplifier. This is ...

Upgrading and Servicing Guide
Page 7
... risk of sharp edges inside the chassis. After Closing the PC To avoid injury and equipment damage, always follow this procedure in card, install any software drivers supplied by the card manufacturer. Removing the Side Panel 1 See "Before Opening the PC" on the PC and all peripherals such as the keyboard, mouse, and...
... risk of sharp edges inside the chassis. After Closing the PC To avoid injury and equipment damage, always follow this procedure in card, install any software drivers supplied by the card manufacturer. Removing the Side Panel 1 See "Before Opening the PC" on the PC and all peripherals such as the keyboard, mouse, and...

Upgrading and Servicing Guide
Page 7
... the computer: 1 Reconnect the power cord to the computer and to use a screwdriver the first time you installed an add-in card, install any software drivers supplied by the card manufacturer. Removing the side panel 1 See "Before opening the computer" on the computer and all other cables.... WARNING: Beware of electrical shock, fire, or damage to the equipment, do not plug telecommunications or telephone connectors into the network interface card (NIC) (labeled as an Ethernet connector). 2 Reconnect the modem/telephone cable and all peripherals, such as the keyboard, mouse, and monitor...
... the computer: 1 Reconnect the power cord to the computer and to use a screwdriver the first time you installed an add-in card, install any software drivers supplied by the card manufacturer. Removing the side panel 1 See "Before opening the computer" on the computer and all other cables.... WARNING: Beware of electrical shock, fire, or damage to the equipment, do not plug telecommunications or telephone connectors into the network interface card (NIC) (labeled as an Ethernet connector). 2 Reconnect the modem/telephone cable and all peripherals, such as the keyboard, mouse, and monitor...


