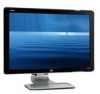
User's Guide w2228h, 2229h w2448h, w2448hc, w2558hc LCD Display
Page 10
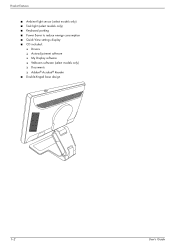
Product Features ■ Ambient light sensor (select models only) ■ Task light (select models only) ■ Keyboard parking ■ Power Saver to reduce energy consumption ■ Quick View settings display ■ CD included: ❏ Drivers ❏ Auto-adjustment software ❏ My Display software ❏ Webcam software (select models only) ❏ Documents ❏ Adobe® Acrobat® Reader ■ Double-hinged base design 1-2 User's Guide
Product Features ■ Ambient light sensor (select models only) ■ Task light (select models only) ■ Keyboard parking ■ Power Saver to reduce energy consumption ■ Quick View settings display ■ CD included: ❏ Drivers ❏ Auto-adjustment software ❏ My Display software ❏ Webcam software (select models only) ❏ Documents ❏ Adobe® Acrobat® Reader ■ Double-hinged base design 1-2 User's Guide
User's Guide w2228h, 2229h w2448h, w2448hc, w2558hc LCD Display
Page 12
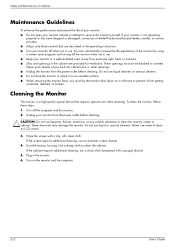
...an LCD screen. 3. Turn off the monitor when not in use . Unplug your monitor off when not in use . ■ Keep your monitor cabinet or attempt to prevent it from getting scratched, defaced, or broken. Never use liquid cleaners or aerosol cleaners. ■ Do not drop the monitor ...or place it on an unstable surface. ■ When removing the monitor base, you must not be blocked or covered. Plug in the monitor. 6. To clean the monitor, follow these steps: 1. CAUTION: Do not use an antistatic screen ...
...an LCD screen. 3. Turn off the monitor when not in use . Unplug your monitor off when not in use . ■ Keep your monitor cabinet or attempt to prevent it from getting scratched, defaced, or broken. Never use liquid cleaners or aerosol cleaners. ■ Do not drop the monitor ...or place it on an unstable surface. ■ When removing the monitor base, you must not be blocked or covered. Plug in the monitor. 6. To clean the monitor, follow these steps: 1. CAUTION: Do not use an antistatic screen ...
User's Guide w2228h, 2229h w2448h, w2448hc, w2558hc LCD Display
Page 13
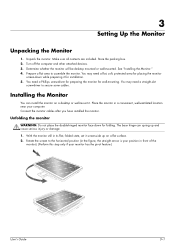
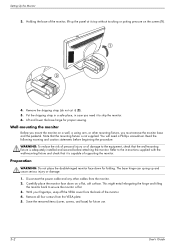
... need a flat, soft, protected area for placing the monitor screen-down for installation. 5. Unfolding the monitor WARNING: Do not place the double-hinged monitor face down while preparing it screen-side up and cause ...monitor. Store the packing box. 2. Connect the monitor cables after you have installed the monitor. Place the monitor in front of the monitor). (Perform this step only if your computer. The base hinge can install the monitor on a flat surface. 2. See "Installing the Monitor." 4. 3 Setting Up the Monitor Unpacking the Monitor 1. Determine whether the monitor...
... need a flat, soft, protected area for placing the monitor screen-down for installation. 5. Unfolding the monitor WARNING: Do not place the double-hinged monitor face down while preparing it screen-side up and cause ...monitor. Store the packing box. 2. Connect the monitor cables after you have installed the monitor. Place the monitor in front of the monitor). (Perform this step only if your computer. The base hinge can install the monitor on a flat surface. 2. See "Installing the Monitor." 4. 3 Setting Up the Monitor Unpacking the Monitor 1. Determine whether the monitor...
User's Guide w2228h, 2229h w2448h, w2448hc, w2558hc LCD Display
Page 14
...secured before beginning the procedure. Save the removed items (cover, screws, and base) for proper viewing. Read the following warning and caution statements before attaching the monitor. Note that it ) (2). 5. Refer to ship the monitor. 6. Remove the shipping strap (do not cut it is capable of damage...at its top without touching or putting pressure on a flat, soft surface. Holding the base of the monitor. 4. Put the shipping strap in a safe place, in case you must remove the monitor base and the pedestal. You will need it to the instructions supplied with the wall-mounting ...
...secured before beginning the procedure. Save the removed items (cover, screws, and base) for proper viewing. Read the following warning and caution statements before attaching the monitor. Note that it ) (2). 5. Refer to ship the monitor. 6. Remove the shipping strap (do not cut it is capable of damage...at its top without touching or putting pressure on a flat, soft surface. Holding the base of the monitor. 4. Put the shipping strap in a safe place, in case you must remove the monitor base and the pedestal. You will need it to the instructions supplied with the wall-mounting ...

User's Guide w2228h, 2229h w2448h, w2448hc, w2558hc LCD Display
Page 20
... the pivot feature, make sure the cords are hidden when viewed from you do not topple the monitor while changing the tilt. 2. Face the front of the monitor either side for cable management. Cables can be easily secured and are set loosely enough so they will not pull and... disconnect when the monitor is pivoted. . Adjust the tilt by moving the top edge of the monitor and hold the base so that you , without touching the screen. 3-8 User's Guide NOTE: If your own preference, as follows: 1. Setting Up the Monitor Cable Management The HP LCD monitors have two cable tunnels on ...
... the pivot feature, make sure the cords are hidden when viewed from you do not topple the monitor while changing the tilt. 2. Face the front of the monitor either side for cable management. Cables can be easily secured and are set loosely enough so they will not pull and... disconnect when the monitor is pivoted. . Adjust the tilt by moving the top edge of the monitor and hold the base so that you , without touching the screen. 3-8 User's Guide NOTE: If your own preference, as follows: 1. Setting Up the Monitor Cable Management The HP LCD monitors have two cable tunnels on ...

User's Guide w2228h, 2229h w2448h, w2448hc, w2558hc LCD Display
Page 22
Setting Up the Monitor Adjusting the Height The monitor adjusts up and down , tilt the monitor backward 10 to 30 degrees by extending or lowering the hinge. Facing the monitor and holding its base down easily by pulling the bottom of this pivot feature (select models only), the My Display ...software may need to install this software. See "My Display Software (Select Models)" in the Operating the Monitor chapter for information on ...
Setting Up the Monitor Adjusting the Height The monitor adjusts up and down , tilt the monitor backward 10 to 30 degrees by extending or lowering the hinge. Facing the monitor and holding its base down easily by pulling the bottom of this pivot feature (select models only), the My Display ...software may need to install this software. See "My Display Software (Select Models)" in the Operating the Monitor chapter for information on ...
User's Guide w2228h, 2229h w2448h, w2448hc, w2558hc LCD Display
Page 23
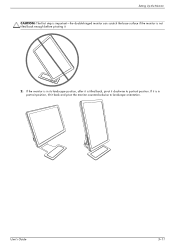
User's Guide 3-11 Setting Up the Monitor CAUTION: The first step is important-the double-hinged monitor can scratch the base surface if the monitor is in its landscape position, after it is tilted back, pivot it clockwise to landscape orientation. If it is not tilted back enough before pivoting it back and pivot the monitor counterclockwise to portrait position. If the monitor is in portrait position, tilt it . 2.
User's Guide 3-11 Setting Up the Monitor CAUTION: The first step is important-the double-hinged monitor can scratch the base surface if the monitor is in its landscape position, after it is tilted back, pivot it clockwise to landscape orientation. If it is not tilted back enough before pivoting it back and pivot the monitor counterclockwise to portrait position. If the monitor is in portrait position, tilt it . 2.
User's Guide w2228h, 2229h w2448h, w2448hc, w2558hc LCD Display
Page 45
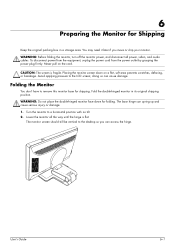
... from the equipment, unplug the power cord from the power outlet by grasping the power plug firmly. Turn the monitor to the LCD screen; CAUTION: The screen is flat. The monitor screen should still be vertical to remove this monitor base for Shipping Keep the original packing box in its original shipping position. Lower the...
... from the equipment, unplug the power cord from the power outlet by grasping the power plug firmly. Turn the monitor to the LCD screen; CAUTION: The screen is flat. The monitor screen should still be vertical to remove this monitor base for Shipping Keep the original packing box in its original shipping position. Lower the...
User's Guide w2228h, 2229h w2448h, w2448hc, w2558hc LCD Display
Page 46
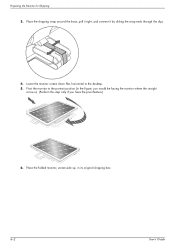
Place the shipping strap around the base, pull it tight, and connect it by sliding the strap ends through the slips. 4. Place the folded monitor, screen-side up, in the figure, you would be facing the monitor where the straight arrow is). (Perform this step only if you have the pivot feature.) 6. Pivot the monitor to the desktop. 5. Preparing the Monitor for Shipping 3. Lower the monitor screen down flat, horizontal to the portrait position (in its original shipping box. 6-2 User's Guide
Place the shipping strap around the base, pull it tight, and connect it by sliding the strap ends through the slips. 4. Place the folded monitor, screen-side up, in the figure, you would be facing the monitor where the straight arrow is). (Perform this step only if you have the pivot feature.) 6. Pivot the monitor to the desktop. 5. Preparing the Monitor for Shipping 3. Lower the monitor screen down flat, horizontal to the portrait position (in its original shipping box. 6-2 User's Guide
HP L2445m LCD Monitor - User Guide
Page 5
... Cleaning the Monitor ...3 Shipping the Monitor ...3 3 Setting Up the Monitor Installing the Monitor Base ...4 Rear Components ...5 Connecting the Cables ...6 Adjusting the Monitor ...8 Turning on the Monitor ...8 Using the Accessory Rails ...9 Removing the Monitor Pedestal Base 10 Mounting the Monitor ...11 Locating the Rating Labels ...11 4 Operating the Monitor Software and ... 13 Using the Auto-Adjustment Function 13 Front Panel Controls ...15 Adjusting the Monitor Settings ...16 Using the On-Screen Display Menu 16 OSD Menu Selections 17 Optimizing Digital Conversion 21 ENWW v
... Cleaning the Monitor ...3 Shipping the Monitor ...3 3 Setting Up the Monitor Installing the Monitor Base ...4 Rear Components ...5 Connecting the Cables ...6 Adjusting the Monitor ...8 Turning on the Monitor ...8 Using the Accessory Rails ...9 Removing the Monitor Pedestal Base 10 Mounting the Monitor ...11 Locating the Rating Labels ...11 4 Operating the Monitor Software and ... 13 Using the Auto-Adjustment Function 13 Front Panel Controls ...15 Adjusting the Monitor Settings ...16 Using the On-Screen Display Menu 16 OSD Menu Selections 17 Optimizing Digital Conversion 21 ENWW v
HP L2445m LCD Monitor - User Guide
Page 7
... moving side-to-side ● Tilt capability ● Removable base for flexible monitor panel mounting solutions ● Video signal input to support VGA analog... DVI digital ● Accessory rail on monitor to accept optional mounted devices, such as an HP speaker bar ● Plug and play capability...monitor for optional cable lock ● Internal speakers ● Audio input signal with 1920 x 1200 resolution, plus full-screen support for reduced power consumption ● Energy Star qualified ENWW L2445m Model 1 1 Product Features L2445m Model The LCD (liquid crystal display) monitor...
... moving side-to-side ● Tilt capability ● Removable base for flexible monitor panel mounting solutions ● Video signal input to support VGA analog... DVI digital ● Accessory rail on monitor to accept optional mounted devices, such as an HP speaker bar ● Plug and play capability...monitor for optional cable lock ● Internal speakers ● Audio input signal with 1920 x 1200 resolution, plus full-screen support for reduced power consumption ● Energy Star qualified ENWW L2445m Model 1 1 Product Features L2445m Model The LCD (liquid crystal display) monitor...

HP L2445m LCD Monitor - User Guide
Page 9
... to prevent it from excessive light, heat or moisture. ● When removing the monitor base, you must not be blocked or covered. Dust the monitor by using a screen saver program and turning off the monitor when not in the operating instructions. These chemicals may run behind the bezel and damage...plug firmly and pulling it later if you can substantially increase the life expectancy of the monitor by wiping the screen and the cabinet with a "burned-in image" are not covered under the HP warranty. ● Slots and openings in the cabinet are covered in use cleaners that ...
... to prevent it from excessive light, heat or moisture. ● When removing the monitor base, you must not be blocked or covered. Dust the monitor by using a screen saver program and turning off the monitor when not in the operating instructions. These chemicals may run behind the bezel and damage...plug firmly and pulling it later if you can substantially increase the life expectancy of the monitor by wiping the screen and the cabinet with a "burned-in image" are not covered under the HP warranty. ● Slots and openings in the cabinet are covered in use cleaners that ...
HP L2445m LCD Monitor - User Guide
Page 10
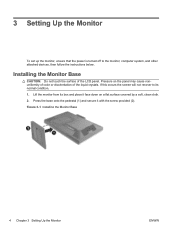
...Monitor To set up the monitor, ensure that the power is turned off to its box and place it with the screw provided (2). If this occurs the screen will not recover to the monitor,... computer system, and other attached devices, then follow the instructions below. Pressure on a flat surface covered by a soft, clean cloth. 2. Installing the Monitor Base CAUTION: Do not... touch the surface of the liquid crystals. Press the base onto the pedestal (1) and secure it face down on ...
...Monitor To set up the monitor, ensure that the power is turned off to its box and place it with the screw provided (2). If this occurs the screen will not recover to the monitor,... computer system, and other attached devices, then follow the instructions below. Pressure on a flat surface covered by a soft, clean cloth. 2. Installing the Monitor Base CAUTION: Do not... touch the surface of the liquid crystals. Press the base onto the pedestal (1) and secure it face down on ...

HP L2445m LCD Monitor - User Guide
Page 16
... signal cables are four screws that connect the monitor panel with the pedestal base. Removing the Monitor Pedestal Base You can remove the monitor panel from the pedestal base to the pedestal base. If the monitor has a connected audio cable, disconnect it from the back of the monitor that connect the monitor panel to install the panel on a flat surface...
... signal cables are four screws that connect the monitor panel with the pedestal base. Removing the Monitor Pedestal Base You can remove the monitor panel from the pedestal base to the pedestal base. If the monitor has a connected audio cable, disconnect it from the back of the monitor that connect the monitor panel to install the panel on a flat surface...

HP L2445m LCD Monitor - User Guide
Page 17
...is intended to support the weight of the monitor display head. To attach the monitor to Removing the Monitor Pedestal Base on the monitor. Remove the monitor panel from the pedestal base. Refer to other mounting fixture. To attach the monitor to the monitor, four 4 mm, 0.7 pitch, and ...instructions included with the mounting fixture to the monitor panel. For best performance, it is safely attached. 3. Mounting the Monitor The monitor panel can be used because they may need these numbers when contacting HP about the monitor model. Figure 3-8 Locating the Rating Labels ...
...is intended to support the weight of the monitor display head. To attach the monitor to Removing the Monitor Pedestal Base on the monitor. Remove the monitor panel from the pedestal base. Refer to other mounting fixture. To attach the monitor to the monitor, four 4 mm, 0.7 pitch, and ...instructions included with the mounting fixture to the monitor panel. For best performance, it is safely attached. 3. Mounting the Monitor The monitor panel can be used because they may need these numbers when contacting HP about the monitor model. Figure 3-8 Locating the Rating Labels ...

HP L2445m LCD Monitor - User Guide
Page 22
... remain untouched for 10 seconds while displaying a menu, new adjustments will revert to previous settings and exit the menu. 16 Chapter 4 Operating the Monitor ENWW buttons to scroll to and highlight your viewing preferences. To access the OSD, do the following: 1. After adjusting the function, select Save ...from the OSD Menu, use the + or - Using the On-Screen Display Menu Use the On-Screen Display (OSD) to adjust the screen image based on your selection, then press the Menu button to select that function. 5. Adjust the item using the + or - To navigate through the OSD ...
... remain untouched for 10 seconds while displaying a menu, new adjustments will revert to previous settings and exit the menu. 16 Chapter 4 Operating the Monitor ENWW buttons to scroll to and highlight your viewing preferences. To access the OSD, do the following: 1. After adjusting the function, select Save ...from the OSD Menu, use the + or - Using the On-Screen Display Menu Use the On-Screen Display (OSD) to adjust the screen image based on your selection, then press the Menu button to select that function. 5. Adjust the item using the + or - To navigate through the OSD ...

HP L2445m LCD Monitor - User Guide
Page 32
...Online Technical Support For the online access to technical support information, self-solve tools, online assistance, community forums of IT experts, broad mutlivendor knowledge base, monitoring and diagnostic tools, go to unlock the power button function. Press and hold the Menu button for 10 seconds to http://www....hp.com/support. Preparing to Call Technical Support If you cannot solve a problem using the trouble shooting tips in this section, you are using 26 ...
...Online Technical Support For the online access to technical support information, self-solve tools, online assistance, community forums of IT experts, broad mutlivendor knowledge base, monitoring and diagnostic tools, go to unlock the power button function. Press and hold the Menu button for 10 seconds to http://www....hp.com/support. Preparing to Call Technical Support If you cannot solve a problem using the trouble shooting tips in this section, you are using 26 ...


