
Security - Window Vista and Windows 7
Page 8
... the Setup Utility must be entered at a Setup Utility prompt. Several types of the computer, record each password immediately and store it in the non-Windows Setup Utility preinstalled on the computer. ● Do not use your information. For additional information about Windows passwords, such as they are set in Windows or in a secure place. Because most passwords are not displayed as screen-saver passwords, select Start > Help and Support. 2 Chapter 2 Using passwords...
... the Setup Utility must be entered at a Setup Utility prompt. Several types of the computer, record each password immediately and store it in the non-Windows Setup Utility preinstalled on the computer. ● Do not use your information. For additional information about Windows passwords, such as they are set in Windows or in a secure place. Because most passwords are not displayed as screen-saver passwords, select Start > Help and Support. 2 Chapter 2 Using passwords...

Setup Utility - Windows Vista and Windows 7
Page 10
... on a secondary hard drive. NOTE: On models with two hard drives, this Run a comprehensive self-test on the hard drive. Enabled/disable Fan Always On. Run a comprehensive self-test on . Run a diagnostic test on Key ◦ USB Hard drive ◦ Network adapter Diagnostics menu Select Hard Disk Self Test Secondary Hard Disk Self Test (select models only) Memory Test To do this Change the Setup Utility language. Enable/disable LAN Power Saving. Enable/disable the processor C6 sleep state. Set the following boot options: ● f9...
... on a secondary hard drive. NOTE: On models with two hard drives, this Run a comprehensive self-test on the hard drive. Enabled/disable Fan Always On. Run a comprehensive self-test on . Run a diagnostic test on Key ◦ USB Hard drive ◦ Network adapter Diagnostics menu Select Hard Disk Self Test Secondary Hard Disk Self Test (select models only) Memory Test To do this Change the Setup Utility language. Enable/disable LAN Power Saving. Enable/disable the processor C6 sleep state. Set the following boot options: ● f9...
Software Update, Backup and Recovery - Windows Vista
Page 5
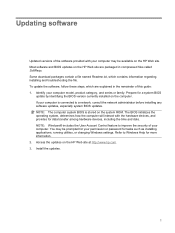
... available on the system ROM. Most software and BIOS updates on the HP Web site are explained in compressed files called SoftPaqs. NOTE: Windows® includes the User Account Control feature to Windows Help for tasks such as installing applications, running utilities, or changing Windows settings. Identify your computer is stored on the HP Web site. Install the updates. 1 If your computer model, product category, and series or family.
... available on the system ROM. Most software and BIOS updates on the HP Web site are explained in compressed files called SoftPaqs. NOTE: Windows® includes the User Account Control feature to Windows Help for tasks such as installing applications, running utilities, or changing Windows settings. Identify your computer is stored on the HP Web site. Install the updates. 1 If your computer model, product category, and series or family.

Software Update, Backup and Recovery - Windows Vista
Page 6
... installation, download and install a BIOS update only when the computer is displayed. 3. Access the page on the HP Web site that is later than those currently installed on battery power, docked in an optional docking device, or connected to an optional power source. To use the arrow keys to select Exit > Exit Discarding Changes, and then press enter. When the Main menu is selected, BIOS and other identifier. Follow the instructions on the screen...
... installation, download and install a BIOS update only when the computer is displayed. 3. Access the page on the HP Web site that is later than those currently installed on battery power, docked in an optional docking device, or connected to an optional power source. To use the arrow keys to select Exit > Exit Discarding Changes, and then press enter. When the Main menu is selected, BIOS and other identifier. Follow the instructions on the screen...

Software Update, Backup and Recovery - Windows Vista
Page 8
... the file is displayed, click an updated driver to open a window containing additional information. 6. Open your Internet browser, go to your hard drive. Proceed to install the updated driver. Select your country or region. 2. When the list of the device. 4 Updating software Click the option for software and driver downloads, type your specific product from the models listed. 4. Click your computer model number in the Search box, press enter, and follow these steps: To use the HP Web site...
... the file is displayed, click an updated driver to open a window containing additional information. 6. Open your Internet browser, go to your hard drive. Proceed to install the updated driver. Select your country or region. 2. When the list of the device. 4 Updating software Click the option for software and driver downloads, type your specific product from the models listed. 4. Click your computer model number in the Search box, press enter, and follow these steps: To use the HP Web site...
Wireless (Select Models Only) - Windows Vista
Page 24
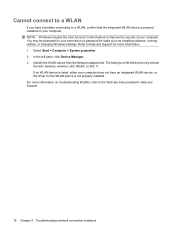
.... Select Start > Computer > System properties. 2. The listing for a WLAN device may be prompted for your permission or password for tasks such as installing software, running utilities, or changing Windows settings. Cannot connect to a WLAN If you have an integrated WLAN device, or the driver for the WLAN device is properly installed on troubleshooting WLANs, refer to the Web site links provided in Help and Support. 18 Chapter 5 Troubleshooting wireless connection problems
.... Select Start > Computer > System properties. 2. The listing for a WLAN device may be prompted for your permission or password for tasks such as installing software, running utilities, or changing Windows settings. Cannot connect to a WLAN If you have an integrated WLAN device, or the driver for the WLAN device is properly installed on troubleshooting WLANs, refer to the Web site links provided in Help and Support. 18 Chapter 5 Troubleshooting wireless connection problems
Drives - Windows Vista and Windows 7
Page 18
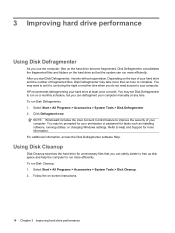
... Help and Support for your hard drive at any time. HP recommends defragmenting your permission or password for unnecessary files that the system can defragment your computer. Disk Defragmenter consolidates the fragmented files and folders on -screen instructions. 14 Chapter 3 Improving hard drive performance For additional information, access the Disk Defragmenter software Help. Using Disk Cleanup Disk Cleanup searches the hard drive for tasks such as installing software, running utilities, or changing Windows settings.
... Help and Support for your hard drive at any time. HP recommends defragmenting your permission or password for unnecessary files that the system can defragment your computer. Disk Defragmenter consolidates the fragmented files and folders on -screen instructions. 14 Chapter 3 Improving hard drive performance For additional information, access the Disk Defragmenter software Help. Using Disk Cleanup Disk Cleanup searches the hard drive for tasks such as installing software, running utilities, or changing Windows settings.

Drives - Windows Vista and Windows 7
Page 23
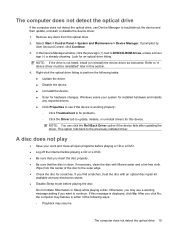
... installed hardware and installs any discs from the optical drive. 2. Right-click the optical drive listing to troubleshoot the device and then update, uninstall, or disable the device driver: 1. Select Start > Control Panel > System and Maintenance > Device Manager. If prompted by User Account Control, click Continue. 3. This option rolls back to update, disable, or uninstall drivers for an optical drive listing. The computer does not detect the optical drive 19 Refer to DVD/CD-ROM drives, unless a minus sign (-) is not listed, install...
... installed hardware and installs any discs from the optical drive. 2. Right-click the optical drive listing to troubleshoot the device and then update, uninstall, or disable the device driver: 1. Select Start > Control Panel > System and Maintenance > Device Manager. If prompted by User Account Control, click Continue. 3. This option rolls back to update, disable, or uninstall drivers for an optical drive listing. The computer does not detect the optical drive 19 Refer to DVD/CD-ROM drives, unless a minus sign (-) is not listed, install...
Drives - Windows Vista and Windows 7
Page 29
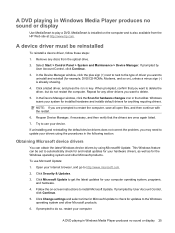
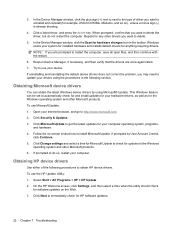
... to install Microsoft Update. Click a listed driver, and press the delete key. Select Start > Control Panel > System and Maintenance > Device Manager. When prompted, confirm that the drivers are prompted to automatically check for and install updates for your computer. Try to delete the driver, but do so, restart your hardware drivers, as well as for the Windows operating system and other Microsoft products. 6. A DVD playing in Windows Media Player produces no sound or display Use...
... to install Microsoft Update. Click a listed driver, and press the delete key. Select Start > Control Panel > System and Maintenance > Device Manager. When prompted, confirm that the drivers are prompted to automatically check for and install updates for your computer. Try to delete the driver, but do so, restart your hardware drivers, as well as for the Windows operating system and other Microsoft products. 6. A DVD playing in Windows Media Player produces no sound or display Use...
Notebook Tour - Windows Vista
Page 21
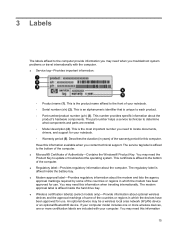
... you troubleshoot system problems or travel internationally with your notebook. ◦ Serial number (s/n) (2). This is an alphanumeric identifier that is the most important number you need to locate documents, drivers, and support for this information 15 You may need the Product Key to update or troubleshoot the operating system. You may be a wireless local area network (WLAN) device or an optional Bluetooth® device. The modem approval label is affixed inside the battery...
... you troubleshoot system problems or travel internationally with your notebook. ◦ Serial number (s/n) (2). This is an alphanumeric identifier that is the most important number you need to locate documents, drivers, and support for this information 15 You may need the Product Key to update or troubleshoot the operating system. You may be a wireless local area network (WLAN) device or an optional Bluetooth® device. The modem approval label is affixed inside the battery...

Pointing Devices and Keyboard - Windows VIsta
Page 20
... most external numeric keypads function differently according to keypad functions while the keypad is turned on . Using the embedded numeric keypad The 15 keys of the embedded numeric keypad can temporarily alternate the functions of keys on the embedded numeric keypad between their standard keyboard functions and their standard keyboard functions. The num lock light is off . Using an optional external numeric keypad Keys on an external keypad. Enabling and disabling...
... most external numeric keypads function differently according to keypad functions while the keypad is turned on . Using the embedded numeric keypad The 15 keys of the embedded numeric keypad can temporarily alternate the functions of keys on the embedded numeric keypad between their standard keyboard functions and their standard keyboard functions. The num lock light is off . Using an optional external numeric keypad Keys on an external keypad. Enabling and disabling...
Multimedia - Windows Vista
Page 23
... detect the optical drive, use Device Manager to the previously installed driver. Windows scans your work and close all open programs before playing a CD or a DVD. ● Log off the Internet before playing the disc. The computer does not detect the optical drive 19 Select Start > Control Panel > System and Maintenance > Device Manager. After you may behave in this device. Wipe from the optical drive. 2. If prompted by User Account Control, click Continue...
... detect the optical drive, use Device Manager to the previously installed driver. Windows scans your work and close all open programs before playing a CD or a DVD. ● Log off the Internet before playing the disc. The computer does not detect the optical drive 19 Select Start > Control Panel > System and Maintenance > Device Manager. After you may behave in this device. Wipe from the optical drive. 2. If prompted by User Account Control, click Continue...
Multimedia - Windows Vista
Page 26
... the Windows operating system and other Microsoft products. 6. 3. In the Device Manager window, click the plus sign (+) next to next to uninstall and reinstall (for your drivers using Microsoft® Update. NOTE: If you may need to install Microsoft Update. Click Microsoft Update to get the latest updates for example, DVD/CD-ROMs, Modems, and so on -screen instructions to update your computer operating system, programs, and hardware. 4. Click Change settings and...
... the Windows operating system and other Microsoft products. 6. 3. In the Device Manager window, click the plus sign (+) next to next to uninstall and reinstall (for your drivers using Microsoft® Update. NOTE: If you may need to install Microsoft Update. Click Microsoft Update to get the latest updates for example, DVD/CD-ROMs, Modems, and so on -screen instructions to update your computer operating system, programs, and hardware. 4. Click Change settings and...
Power Management - Windows Vista
Page 5
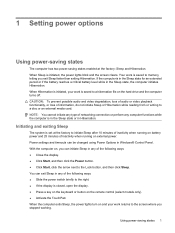
.... 1 Setting power options Using power-saving states The computer has two power-saving states enabled at the factory to a disc or an external media card. Using power-saving states 1 When Sleep is saved to memory, letting you exit Sleep faster than exiting Hibernation. With the computer on, you stopped working. You can be changed using Power Options in Hibernation. Initiating and exiting Sleep The system is closed, open the display. ● Press a key on the keyboard or button...
.... 1 Setting power options Using power-saving states The computer has two power-saving states enabled at the factory to a disc or an external media card. Using power-saving states 1 When Sleep is saved to memory, letting you exit Sleep faster than exiting Hibernation. With the computer on, you stopped working. You can be changed using Power Options in Hibernation. Initiating and exiting Sleep The system is closed, open the display. ● Press a key on the keyboard or button...

Power Management - Windows Vista
Page 21
... computer to sleep settings listed in battery run time Even if a battery is heavily used, it charges faster when the computer is also not necessary to Never. 5. Calibrating a battery Calibrate a battery under Hibernate after so that you can reset it after the calibration. 8. It is off the display and Put the computer to sleep settings to calibrate a new battery. To fully charge the battery: 1. Select Start > Control Panel > System and Maintenance > Power Options. 2.
... computer to sleep settings listed in battery run time Even if a battery is heavily used, it charges faster when the computer is also not necessary to Never. 5. Calibrating a battery Calibrate a battery under Hibernate after so that you can reset it after the calibration. 8. It is off the display and Put the computer to sleep settings to calibrate a new battery. To fully charge the battery: 1. Select Start > Control Panel > System and Maintenance > Power Options. 2.
Power Management - Windows Vista
Page 23
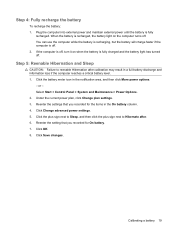
... reenable Hibernation after . 6. You can use the computer while the battery is recharging, but the battery will charge faster if the computer is fully charged and the battery light has turned off. Plug the computer into external power and maintain external power until the battery is off, turn it on the computer turns off . 2. or - Click Save changes. Select Start > Control Panel > System and Maintenance > Power Options. 2. If the computer is fully...
... reenable Hibernation after . 6. You can use the computer while the battery is recharging, but the battery will charge faster if the computer is fully charged and the battery light has turned off. Plug the computer into external power and maintain external power until the battery is off, turn it on the computer turns off . 2. or - Click Save changes. Select Start > Control Panel > System and Maintenance > Power Options. 2. If the computer is fully...

Power Management - Windows Vista
Page 26
... the power switch to the right and hold for an extended period To shut down the computer: NOTE: If the computer is in the Sleep state or in Hibernation, you are connecting an external hardware device that does not connect to the Lock button. 3. Save your work and close all open programs. 2. The Shut Down command closes all open programs, including the operating system...
... the power switch to the right and hold for an extended period To shut down the computer: NOTE: If the computer is in the Sleep state or in Hibernation, you are connecting an external hardware device that does not connect to the Lock button. 3. Save your work and close all open programs. 2. The Shut Down command closes all open programs, including the operating system...
HP TouchSmart tx2 Notebook PC - Maintenance and Service Guide
Page 81
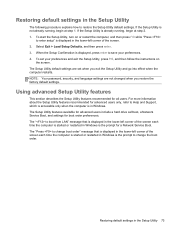
To start the Setup Utility, turn on the screen. To set when you restore the factory default settings. The Setup Utility default settings are not changed when you exit the Setup Utility and go into effect when the computer restarts. Restoring default settings in the Setup Utility 73 Select Exit > Load Setup Defaults, and then press enter. 3. The Setup Utility features available for advanced users include a hard drive self-test, a Network Service Boot, and settings for all users. NOTE: Your password, security, and language settings are set your preferences...
To start the Setup Utility, turn on the screen. To set when you restore the factory default settings. The Setup Utility default settings are not changed when you exit the Setup Utility and go into effect when the computer restarts. Restoring default settings in the Setup Utility 73 Select Exit > Load Setup Defaults, and then press enter. 3. The Setup Utility features available for advanced users include a hard drive self-test, a Network Service Boot, and settings for all users. NOTE: Your password, security, and language settings are set your preferences...

HP TouchSmart tx2 Notebook PC - Maintenance and Service Guide
Page 120
... spare part numbers 16, 27, 28, 49 keyboard components 7 keypad keys 7 keys esc 7 fn 7 function 7 Windows applications 7 Windows logo 7 L language support 72, 75 left-side components 10 lights battery 6 Digital Media Slot 10 drive 5 optical drive release 10 power 6, 9 wireless 10 M Main menu 74 mass storage devices, spare part numbers 22 MediaSmart button 6 memory map specifications 84 memory module product description 2 removal 44 spare part numbers 18, 28, 44 memory module compartment 13 memory module compartment cover illustrated 21 removal 44 memory test 75 microphone jack location 9 pin...
... spare part numbers 16, 27, 28, 49 keyboard components 7 keypad keys 7 keys esc 7 fn 7 function 7 Windows applications 7 Windows logo 7 L language support 72, 75 left-side components 10 lights battery 6 Digital Media Slot 10 drive 5 optical drive release 10 power 6, 9 wireless 10 M Main menu 74 mass storage devices, spare part numbers 22 MediaSmart button 6 memory map specifications 84 memory module product description 2 removal 44 spare part numbers 18, 28, 44 memory module compartment 13 memory module compartment cover illustrated 21 removal 44 memory test 75 microphone jack location 9 pin...
HP TouchSmart tx2 Notebook PC - Maintenance and Service Guide
Page 121
..., 27 power cord set requirements 103 power cord, spare part numbers 23 power light 6, 9 power requirements, product description 4 power switch 9 power switch assembly removal 58 spare part number 17, 27, 58 power-on password 74 previous/rewind button 11 processor product description 1 removal 69 spare part numbers 17, 27, 28, 69 product description audio 2 camera 2 chipset 1 diskette drive 2 display panel 2 docking support 3 Ethernet 3 external media cards 3 graphics 1 hard drives 2 keyboard 3 memory module 2 modem module 2 operating system 4 optical drives 2 pointing devices 3 ports 3 power...
..., 27 power cord set requirements 103 power cord, spare part numbers 23 power light 6, 9 power requirements, product description 4 power switch 9 power switch assembly removal 58 spare part number 17, 27, 58 power-on password 74 previous/rewind button 11 processor product description 1 removal 69 spare part numbers 17, 27, 28, 69 product description audio 2 camera 2 chipset 1 diskette drive 2 display panel 2 docking support 3 Ethernet 3 external media cards 3 graphics 1 hard drives 2 keyboard 3 memory module 2 modem module 2 operating system 4 optical drives 2 pointing devices 3 ports 3 power...


