
Security - Window Vista and Windows 7
Page 8
... discovered by the program. ● Write down your passwords and store them in a secure place away from the computer. ● Do not store passwords in the Setup Utility must be entered at a Setup Utility prompt. Use the following sections list Windows and Setup Utility passwords and describe their functions. For additional information about Windows passwords, such as they are not displayed as screen-saver passwords, select Start > Help and Support. 2 Chapter 2 Using passwords
... discovered by the program. ● Write down your passwords and store them in a secure place away from the computer. ● Do not store passwords in the Setup Utility must be entered at a Setup Utility prompt. Use the following sections list Windows and Setup Utility passwords and describe their functions. For additional information about Windows passwords, such as they are not displayed as screen-saver passwords, select Start > Help and Support. 2 Chapter 2 Using passwords

Setup Utility - Windows Vista and Windows 7
Page 10
...Order―Set the boot order for: ◦ USB Floppy ◦ Internal CD/DVD ROM drive ◦ USB CD/DVD ROM drive ◦ Hard drive ◦ USB Diskette on Key ◦ USB Hard drive ◦ Network adapter Diagnostics menu Select Hard Disk Self Test Secondary Hard Disk Self Test (select models only) Memory Test To do this Change the Setup Utility language. Enable/disable LAN Power Saving. Enable/disable Card Reader/1394 Power Saving. Run a diagnostic test on the system memory. 6 Chapter 3 Setup Utility menus Enable/disable the capacitive button tapping sound. System Configuration...
...Order―Set the boot order for: ◦ USB Floppy ◦ Internal CD/DVD ROM drive ◦ USB CD/DVD ROM drive ◦ Hard drive ◦ USB Diskette on Key ◦ USB Hard drive ◦ Network adapter Diagnostics menu Select Hard Disk Self Test Secondary Hard Disk Self Test (select models only) Memory Test To do this Change the Setup Utility language. Enable/disable LAN Power Saving. Enable/disable Card Reader/1394 Power Saving. Run a diagnostic test on the system memory. 6 Chapter 3 Setup Utility menus Enable/disable the capacitive button tapping sound. System Configuration...
Software Update, Backup and Recovery - Windows Vista
Page 5
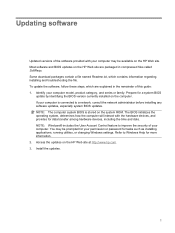
... regarding installing and troubleshooting the file. Access the updates on the system ROM. Updating software Updated versions of the software provided with the hardware devices, and provides for tasks such as installing applications, running utilities, or changing Windows settings. Some download packages contain a file named Readme.txt, which are packaged in the remainder of this guide: 1. If your computer model, product category, and series or family. Install the updates. 1 Most software and BIOS updates on...
... regarding installing and troubleshooting the file. Access the updates on the system ROM. Updating software Updated versions of the software provided with the hardware devices, and provides for tasks such as installing applications, running utilities, or changing Windows settings. Some download packages contain a file named Readme.txt, which are packaged in the remainder of this guide: 1. If your computer model, product category, and series or family. Install the updates. 1 Most software and BIOS updates on...

Software Update, Backup and Recovery - Windows Vista
Page 6
... installed on your hard drive. To exit the Setup Utility, use the arrow keys to select Exit > Exit Discarding Changes, and then press enter. At the download area, follow these steps: a. b. To download a BIOS update: 1. Follow the instructions on or restarting the computer. Access the page on the HP Web site that is displayed. 3. When the Main menu is running on the screen to your computer. Do not download or install a BIOS update...
... installed on your hard drive. To exit the Setup Utility, use the arrow keys to select Exit > Exit Discarding Changes, and then press enter. At the download area, follow these steps: a. b. To download a BIOS update: 1. Follow the instructions on or restarting the computer. Access the page on the HP Web site that is displayed. 3. When the Main menu is running on the screen to your computer. Do not download or install a BIOS update...

Software Update, Backup and Recovery - Windows Vista
Page 8
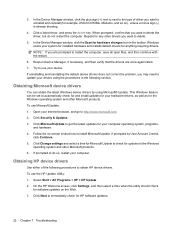
... step 6. 3. When the list of the device. 4 Updating software After the file is displayed, click an updated driver to install. 7. Click the option for software and driver downloads, type your computer model number in the Search box, press enter, and follow these steps: To use the HP Web site: 1. or - Click Install now to your country or region. 2. Updating programs and drivers To download and install software other than a BIOS update, follow the instructions provided. If prompted...
... step 6. 3. When the list of the device. 4 Updating software After the file is displayed, click an updated driver to install. 7. Click the option for software and driver downloads, type your computer model number in the Search box, press enter, and follow these steps: To use the HP Web site: 1. or - Click Install now to your country or region. 2. Updating programs and drivers To download and install software other than a BIOS update, follow the instructions provided. If prompted...
Wireless (Select Models Only) - Windows Vista
Page 24
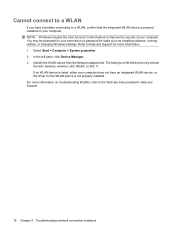
... and Support for the WLAN device is properly installed on troubleshooting WLANs, refer to the Web site links provided in Help and Support. 18 Chapter 5 Troubleshooting wireless connection problems Select Start > Computer > System properties. 2. Identify the WLAN device from the Network adapters list. The listing for tasks such as installing software, running utilities, or changing Windows settings. For more information. 1. If no WLAN device is listed, either your computer does not have a problem connecting to...
... and Support for the WLAN device is properly installed on troubleshooting WLANs, refer to the Web site links provided in Help and Support. 18 Chapter 5 Troubleshooting wireless connection problems Select Start > Computer > System properties. 2. Identify the WLAN device from the Network adapters list. The listing for tasks such as installing software, running utilities, or changing Windows settings. For more information. 1. If no WLAN device is listed, either your computer does not have a problem connecting to...
Drives - Windows Vista and Windows 7
Page 18
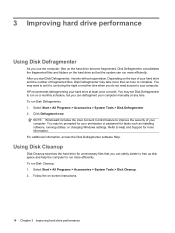
... your hard drive at any time. You may set it works without supervision. You may want to set Disk Defragmenter to Help and Support for tasks such as installing software, running utilities, or changing Windows settings. Click Defragment now. Refer to run on the hard drive become fragmented. Disk Defragmenter consolidates the fragmented files and folders on -screen instructions. 14 Chapter 3 Improving hard drive performance 3 Improving hard drive performance Using Disk Defragmenter As you start Disk...
... your hard drive at any time. You may set it works without supervision. You may want to set Disk Defragmenter to Help and Support for tasks such as installing software, running utilities, or changing Windows settings. Click Defragment now. Refer to run on the hard drive become fragmented. Disk Defragmenter consolidates the fragmented files and folders on -screen instructions. 14 Chapter 3 Improving hard drive performance 3 Improving hard drive performance Using Disk Defragmenter As you start Disk...

Drives - Windows Vista and Windows 7
Page 23
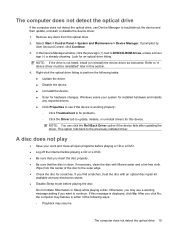
... this device. Windows scans your system for installed hardware and installs any discs from the optical drive. 2. If prompted by User Account Control, click Continue. 3. The computer does not detect the optical drive 19 Right-click the optical drive listing to update, disable, or uninstall drivers for an optical drive listing. Select Start > Control Panel > System and Maintenance > Device Manager. This option rolls back to troubleshoot the device and then update, uninstall, or disable the device driver: 1. Remove any required drivers. ●...
... this device. Windows scans your system for installed hardware and installs any discs from the optical drive. 2. If prompted by User Account Control, click Continue. 3. The computer does not detect the optical drive 19 Right-click the optical drive listing to update, disable, or uninstall drivers for an optical drive listing. Select Start > Control Panel > System and Maintenance > Device Manager. This option rolls back to troubleshoot the device and then update, uninstall, or disable the device driver: 1. Remove any required drivers. ●...
Drives - Windows Vista and Windows 7
Page 29
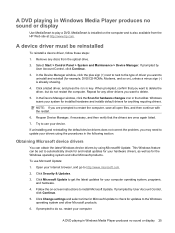
... already showing. 4. A device driver must be set to update your computer. In the Device Manager window, click the Scan for anything requiring drivers. A DVD playing in Windows Media Player produces no sound or display 25 Select Start > Control Panel > System and Maintenance > Device Manager. Obtaining Microsoft device drivers You can be reinstalled To reinstall a device driver, follow these steps: 1. If prompted to the Windows operating system and other Microsoft products. In the Device Manager window, click the plus...
... already showing. 4. A device driver must be set to update your computer. In the Device Manager window, click the Scan for anything requiring drivers. A DVD playing in Windows Media Player produces no sound or display 25 Select Start > Control Panel > System and Maintenance > Device Manager. Obtaining Microsoft device drivers You can be reinstalled To reinstall a device driver, follow these steps: 1. If prompted to the Windows operating system and other Microsoft products. In the Device Manager window, click the plus...
Notebook Tour - Windows Vista
Page 21
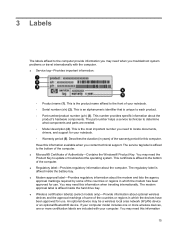
... model includes one or more wireless devices, one or more certification labels are needed. ◦ Model description (4). This is unique to each product. ◦ Part number/product number (p/n) (3). You may need this information 15 This is an alphanumeric identifier that is the most important number you need to locate documents, drivers, and support for use . An optional device may need when you troubleshoot system problems or travel internationally with your notebook. ◦ Serial number...
... model includes one or more wireless devices, one or more certification labels are needed. ◦ Model description (4). This is unique to each product. ◦ Part number/product number (p/n) (3). You may need this information 15 This is an alphanumeric identifier that is the most important number you need to locate documents, drivers, and support for use . An optional device may need when you troubleshoot system problems or travel internationally with your notebook. ◦ Serial number...

Pointing Devices and Keyboard - Windows VIsta
Page 20
... num lock light is turned off at the factory.) For example: ● When num lock is on an external keypad. Using an optional external numeric keypad Keys on most keypad keys function like the keys on , most keypad keys type numbers. ● When num lock is connected to the computer or to type in the upper-right corner of the key. NOTE: The embedded numeric keypad will not function while an external keyboard...
... num lock light is turned off at the factory.) For example: ● When num lock is on an external keypad. Using an optional external numeric keypad Keys on most keypad keys function like the keys on , most keypad keys type numbers. ● When num lock is connected to the computer or to type in the upper-right corner of the key. NOTE: The embedded numeric keypad will not function while an external keyboard...
Multimedia - Windows Vista
Page 23
... (+) next to troubleshoot the device and then update, uninstall, or disable the device driver: 1. Do not initiate Hibernation or Sleep while playing a disc. Otherwise, you may resume. After you want to "A device driver must be reinstalled" later in either of the disc to update, disable, or uninstall drivers for scratches. Wipe from the optical drive. 2. If this section. 4. Refer to continue. Select Start > Control Panel > System and Maintenance > Device Manager. The...
... (+) next to troubleshoot the device and then update, uninstall, or disable the device driver: 1. Do not initiate Hibernation or Sleep while playing a disc. Otherwise, you may resume. After you want to "A device driver must be reinstalled" later in either of the disc to update, disable, or uninstall drivers for scratches. Wipe from the optical drive. 2. If this section. 4. Refer to continue. Select Start > Control Panel > System and Maintenance > Device Manager. The...
Multimedia - Windows Vista
Page 26
... problem, you want to update your device. This Windows feature can obtain the latest Windows device drivers by User Account Control, click Continue. 5. If prompted by using the procedures in the toolbar. To use Microsoft Update: 1. Click a listed driver, and press the delete key. Click Change settings and select a time for Microsoft Update to check for updates to automatically check for and install updates for your hardware drivers, as well as for example, DVD...
... problem, you want to update your device. This Windows feature can obtain the latest Windows device drivers by User Account Control, click Continue. 5. If prompted by using the procedures in the toolbar. To use Microsoft Update: 1. Click a listed driver, and press the delete key. Click Change settings and select a time for Microsoft Update to check for updates to automatically check for and install updates for your hardware drivers, as well as for example, DVD...
Power Management - Windows Vista
Page 5
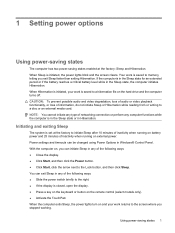
... display. ● Click Start, and then click the Power button. ● Click Start, click the arrow next to the Lock button, and then click Sleep. CAUTION: To prevent possible audio and video degradation, loss of audio or video playback functionality, or loss of information, do not initiate Sleep or Hibernation while reading from or writing to a disc or an external media card. Power settings and timeouts can exit Sleep in Windows® Control Panel. 1 Setting power options Using power...
... display. ● Click Start, and then click the Power button. ● Click Start, click the arrow next to the Lock button, and then click Sleep. CAUTION: To prevent possible audio and video degradation, loss of audio or video playback functionality, or loss of information, do not initiate Sleep or Hibernation while reading from or writing to a disc or an external media card. Power settings and timeouts can exit Sleep in Windows® Control Panel. 1 Setting power options Using power...

Power Management - Windows Vista
Page 21
... Start > Control Panel > System and Maintenance > Power Options. 2. Connect the computer to an AC adapter, optional power adapter, optional expansion product, or optional docking device, and then plug the adapter or device into the computer. 2. Record the Turn off the display and Put the computer to sleep settings to be calibrated more than once a month. Click OK. 10. Calibrating a battery Calibrate a battery under Hibernate after so that you can reset it should not need...
... Start > Control Panel > System and Maintenance > Power Options. 2. Connect the computer to an AC adapter, optional power adapter, optional expansion product, or optional docking device, and then plug the adapter or device into the computer. 2. Record the Turn off the display and Put the computer to sleep settings to be calibrated more than once a month. Click OK. 10. Calibrating a battery Calibrate a battery under Hibernate after so that you can reset it should not need...
Power Management - Windows Vista
Page 23
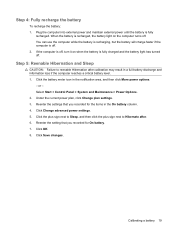
... into external power and maintain external power until the battery is off . Step 4: Fully recharge the battery To recharge the battery: 1. Step 5: Reenable Hibernation and Sleep CAUTION: Failure to Hibernate after calibration may result in a full battery discharge and information loss if the computer reaches a critical battery level. 1. or - Select Start > Control Panel > System and Maintenance > Power Options. 2. Under the current power plan, click Change plan settings. 3. Reenter the settings...
... into external power and maintain external power until the battery is off . Step 4: Fully recharge the battery To recharge the battery: 1. Step 5: Reenable Hibernation and Sleep CAUTION: Failure to Hibernate after calibration may result in a full battery discharge and information loss if the computer reaches a critical battery level. 1. or - Select Start > Control Panel > System and Maintenance > Power Options. 2. Under the current power plan, click Change plan settings. 3. Reenter the settings...

Power Management - Windows Vista
Page 26
... external hardware device that does not connect to a USB port ● When the computer will be unused and disconnected from external power for an extended period To shut down the computer: NOTE: If the computer is in the Sleep state or in the sequence provided: ● Press ctrl+alt+delete, and then click the Power button. ● Slide the power switch to the Lock button...
... external hardware device that does not connect to a USB port ● When the computer will be unused and disconnected from external power for an extended period To shut down the computer: NOTE: If the computer is in the Sleep state or in the sequence provided: ● Press ctrl+alt+delete, and then click the Power button. ● Slide the power switch to the Lock button...
HP TouchSmart tx2 Notebook PC - Maintenance and Service Guide
Page 81
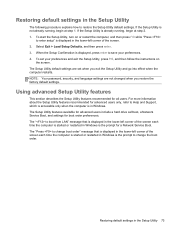
... restore the factory default settings. Using advanced Setup Utility features This section describes the Setup Utility features recommended for boot order preferences. The "Press to Help and Support, which is accessible only when the computer is displayed in Windows. NOTE: Your password, security, and language settings are set your preferences. 4. The " to boot from LAN" message that is displayed in the lower-left corner of the screen each time the computer is started...
... restore the factory default settings. Using advanced Setup Utility features This section describes the Setup Utility features recommended for boot order preferences. The "Press to Help and Support, which is accessible only when the computer is displayed in Windows. NOTE: Your password, security, and language settings are set your preferences. 4. The " to boot from LAN" message that is displayed in the lower-left corner of the screen each time the computer is started...

HP TouchSmart tx2 Notebook PC - Maintenance and Service Guide
Page 120
... spare part numbers 16, 27, 28, 49 keyboard components 7 keypad keys 7 keys esc 7 fn 7 function 7 Windows applications 7 Windows logo 7 L language support 72, 75 left-side components 10 lights battery 6 Digital Media Slot 10 drive 5 optical drive release 10 power 6, 9 wireless 10 M Main menu 74 mass storage devices, spare part numbers 22 MediaSmart button 6 memory map specifications 84 memory module product description 2 removal 44 spare part numbers 18, 28, 44 memory module compartment 13 memory module compartment cover illustrated 21 removal 44 memory test 75 microphone jack location 9 pin...
... spare part numbers 16, 27, 28, 49 keyboard components 7 keypad keys 7 keys esc 7 fn 7 function 7 Windows applications 7 Windows logo 7 L language support 72, 75 left-side components 10 lights battery 6 Digital Media Slot 10 drive 5 optical drive release 10 power 6, 9 wireless 10 M Main menu 74 mass storage devices, spare part numbers 22 MediaSmart button 6 memory map specifications 84 memory module product description 2 removal 44 spare part numbers 18, 28, 44 memory module compartment 13 memory module compartment cover illustrated 21 removal 44 memory test 75 microphone jack location 9 pin...
HP TouchSmart tx2 Notebook PC - Maintenance and Service Guide
Page 121
..., 27 power cord set requirements 103 power cord, spare part numbers 23 power light 6, 9 power requirements, product description 4 power switch 9 power switch assembly removal 58 spare part number 17, 27, 58 power-on password 74 previous/rewind button 11 processor product description 1 removal 69 spare part numbers 17, 27, 28, 69 product description audio 2 camera 2 chipset 1 diskette drive 2 display panel 2 docking support 3 Ethernet 3 external media cards 3 graphics 1 hard drives 2 keyboard 3 memory module 2 modem module 2 operating system 4 optical drives 2 pointing devices 3 ports 3 power...
..., 27 power cord set requirements 103 power cord, spare part numbers 23 power light 6, 9 power requirements, product description 4 power switch 9 power switch assembly removal 58 spare part number 17, 27, 58 power-on password 74 previous/rewind button 11 processor product description 1 removal 69 spare part numbers 17, 27, 28, 69 product description audio 2 camera 2 chipset 1 diskette drive 2 display panel 2 docking support 3 Ethernet 3 external media cards 3 graphics 1 hard drives 2 keyboard 3 memory module 2 modem module 2 operating system 4 optical drives 2 pointing devices 3 ports 3 power...


