
Notebook Essentials - Windows 7
Page 5
... rotating 5 Using the rotate button 6 TouchPad 7 Identifying TouchPad components 7 Turning the TouchPad on and off 8 Navigating 8 Selecting 9 Using TouchPad gestures 9 Touch screen 11 Using touch screen gestures 11 Setting touch screen preferences 14 Digitizer pen 15 Identifying the pen components 15 Holding the pen 15 Storing the pen 15 Sharing optical drives 16...
... rotating 5 Using the rotate button 6 TouchPad 7 Identifying TouchPad components 7 Turning the TouchPad on and off 8 Navigating 8 Selecting 9 Using TouchPad gestures 9 Touch screen 11 Using touch screen gestures 11 Setting touch screen preferences 14 Digitizer pen 15 Identifying the pen components 15 Holding the pen 15 Storing the pen 15 Sharing optical drives 16...

Notebook Essentials - Windows 7
Page 6
Contents Chapter 5: Using software Identifying installed software 25 Using HP TouchSmart software or HP MediaSmart software 26 Installing software from an optical disc 26 Creating or burning a CD or DVD 27 Updating the software installed on the computer 28 ... 34 Appendix A: Troubleshooting Troubleshooting resources 35 Quick troubleshooting 35 The computer is unable to start up 35 The TouchPad is behaving erratically 35 The computer screen is blank 36 Software is functioning abnormally 36 The computer is on but is not responding 36 The computer is unusually warm 36 An external...
Contents Chapter 5: Using software Identifying installed software 25 Using HP TouchSmart software or HP MediaSmart software 26 Installing software from an optical disc 26 Creating or burning a CD or DVD 27 Updating the software installed on the computer 28 ... 34 Appendix A: Troubleshooting Troubleshooting resources 35 Quick troubleshooting 35 The computer is unable to start up 35 The TouchPad is behaving erratically 35 The computer screen is blank 36 Software is functioning abnormally 36 The computer is on but is not responding 36 The computer is unusually warm 36 An external...

Notebook Essentials - Windows 7
Page 10
... and mechanical safety information. To access Help and Support, click Start, and then click Help and Support. The Safety & Comfort Guide is also available on -screen instructions. Å WARNING: To reduce the risk of serious injury, read the Safety & Comfort Guide. For more information In addition to http://www...
... and mechanical safety information. To access Help and Support, click Start, and then click Help and Support. The Safety & Comfort Guide is also available on -screen instructions. Å WARNING: To reduce the risk of serious injury, read the Safety & Comfort Guide. For more information In addition to http://www...

Notebook Essentials - Windows 7
Page 12
When you change the screen orientation, the top of the computer) to change the screen image to 4 different orientations. Chapter 2: What's new? Using the rotate button When the computer is in slate mode, press the rotate button (on the right side of the screen rotates 90 degrees clockwise into the following orientations: landscape secondary 1, portrait primary 2, landscape primary 3, and portrait secondary 4. ✎ Computers with WWAN capabilities only support landscape primary 3 and portrait secondary 4 orientations. 6 Notebook Essentials
When you change the screen orientation, the top of the computer) to change the screen image to 4 different orientations. Chapter 2: What's new? Using the rotate button When the computer is in slate mode, press the rotate button (on the right side of the screen rotates 90 degrees clockwise into the following orientations: landscape secondary 1, portrait primary 2, landscape primary 3, and portrait secondary 4. ✎ Computers with WWAN capabilities only support landscape primary 3 and portrait secondary 4 orientations. 6 Notebook Essentials

Notebook Essentials - Windows 7
Page 13
Component 1 TouchPad off . Notebook Essentials 7 Moves the pointer and selects or activates items on and off, quickly double-tap the TouchPad off indicator. ✎ When the TouchPad zone is active, the light is off indicator 2 Left TouchPad button 3 Right TouchPad button 4 TouchPad zone Description To turn the TouchPad zone on the screen. TouchPad Identifying TouchPad components Chapter 2: What's new? Functions like the left button on an external mouse. Functions like the right button on an external mouse.
Component 1 TouchPad off . Notebook Essentials 7 Moves the pointer and selects or activates items on and off, quickly double-tap the TouchPad off indicator. ✎ When the TouchPad zone is active, the light is off indicator 2 Left TouchPad button 3 Right TouchPad button 4 TouchPad zone Description To turn the TouchPad zone on the screen. TouchPad Identifying TouchPad components Chapter 2: What's new? Functions like the left button on an external mouse. Functions like the right button on an external mouse.

Notebook Essentials - Windows 7
Page 17
...click the Synaptics icon in the notification area, at the factory. Touch screen The computer allows you to use your finger until the operating system draws... as you would with the TouchPad or an external mouse. To access this section are based on the screen as you would click or double-click with the right TouchPad button. ✎ You must tap and ...hold your fingers or the digitizer pen to perform certain actions on the touch screen. ✎ The instructions in all programs. Using touch screen gestures Tapping (or clicking) Tap or double-tap an item on the preferences set ...
...click the Synaptics icon in the notification area, at the factory. Touch screen The computer allows you to use your finger until the operating system draws... as you would with the TouchPad or an external mouse. To access this section are based on the screen as you would click or double-click with the right TouchPad button. ✎ You must tap and ...hold your fingers or the digitizer pen to perform certain actions on the touch screen. ✎ The instructions in all programs. Using touch screen gestures Tapping (or clicking) Tap or double-tap an item on the preferences set ...

Notebook Essentials - Windows 7
Page 18
Chapter 2: What's new? You can also use this motion to slowly scroll through documents. ✎ For the flick movement to work, a scrollbar must be present in a light, quick flicking motion up, down, left, or right to a new location. Flicking Touch the screen in the active window. Dragging Press your finger on an item on the screen, and then move your finger to drag the item to navigate through screens or quickly scroll through documents. 12 Notebook Essentials
Chapter 2: What's new? You can also use this motion to slowly scroll through documents. ✎ For the flick movement to work, a scrollbar must be present in a light, quick flicking motion up, down, left, or right to a new location. Flicking Touch the screen in the active window. Dragging Press your finger on an item on the screen, and then move your finger to drag the item to navigate through screens or quickly scroll through documents. 12 Notebook Essentials

Notebook Essentials - Windows 7
Page 19
To rotate, anchor your thumb on a page or image. Scrolling Scrolling is controlled by finger speed. Notebook Essentials 13 Rotating Rotating allows you to rotate items such as photos and pages. Chapter 2: What's new? To scroll, place two fingers on the screen, and then drag them across the screen in a semicircular motion around your forefinger in an up, down, left, or right motion. ✎ Scrolling speed is useful for moving up or down on the screen, and then move your thumb.
To rotate, anchor your thumb on a page or image. Scrolling Scrolling is controlled by finger speed. Notebook Essentials 13 Rotating Rotating allows you to rotate items such as photos and pages. Chapter 2: What's new? To scroll, place two fingers on the screen, and then drag them across the screen in a semicircular motion around your forefinger in an up, down, left, or right motion. ✎ Scrolling speed is useful for moving up or down on the screen, and then move your thumb.

Notebook Essentials - Windows 7
Page 20
... Sound, click Pen and Touch, and then click the Flicks tab. 2. Click OK. 14 Notebook Essentials Chapter 2: What's new? Setting touch screen preferences ■ To set preferences for left-handed or right-handed users, click Start, click Control Panel, click Hardware and Sound, click Tablet ... Customize. 3. To change or create flick assignments: 1. To change or test click settings: 1. Pinching/Zooming Pinching allows you to the touch screen and the computer. ■ To set preferences for visual feedback, click Start, click Control Panel, click Hardware and Sound, and then click Pen...
... Sound, click Pen and Touch, and then click the Flicks tab. 2. Click OK. 14 Notebook Essentials Chapter 2: What's new? Setting touch screen preferences ■ To set preferences for left-handed or right-handed users, click Start, click Control Panel, click Hardware and Sound, click Tablet ... Customize. 3. To change or create flick assignments: 1. To change or test click settings: 1. Pinching/Zooming Pinching allows you to the touch screen and the computer. ■ To set preferences for visual feedback, click Start, click Control Panel, click Hardware and Sound, and then click Pen...

Notebook Essentials - Windows 7
Page 21
... the pen as Tablet PC Input Panel, in all Microsoft® Office programs, and in pen-specific programs such as if you write on the screen with the pen can write with the pen in most Windows programs. Identifying the pen components The pen interacts with a standard pen or pencil. Storing... holder on the computer. Notebook Essentials 15 The information you were writing with the computer whenever the tip 1 of the pen is pressed against the screen.
... the pen as Tablet PC Input Panel, in all Microsoft® Office programs, and in pen-specific programs such as if you write on the screen with the pen can write with the pen in most Windows programs. Identifying the pen components The pen interacts with a standard pen or pencil. Storing... holder on the computer. Notebook Essentials 15 The information you were writing with the computer whenever the tip 1 of the pen is pressed against the screen.

Notebook Essentials - Windows 7
Page 24
... access this information and store it in a safe place. ■ Internet Services & Offers (available in some locations): These icons may be displayed either individually on -screen instructions. ■ Windows Connect to the Internet Wizard: You can connect to the Internet. Click the network icon in the notification area, at the far...
... access this information and store it in a safe place. ■ Internet Services & Offers (available in some locations): These icons may be displayed either individually on -screen instructions. ■ Windows Connect to the Internet Wizard: You can connect to the Internet. Click the network icon in the notification area, at the far...

Notebook Essentials - Windows 7
Page 26
... the far right of your wireless network, refer to the user guide in Help and Support. 3. Then follow the on the wireless function. Turn on -screen instructions. c. Test the wireless network by using the router manufacturer's instructions and your wireless network for the first time. If you set up your network...
... the far right of your wireless network, refer to the user guide in Help and Support. 3. Then follow the on the wireless function. Turn on -screen instructions. c. Test the wireless network by using the router manufacturer's instructions and your wireless network for the first time. If you set up your network...

Notebook Essentials - Windows 7
Page 32
...if you , streamed from an optical disc, follow the on-screen instructions. 3. For information about using MediaSmart, click Start, click Help and Support, and then type MediaSmart in full-screen mode to computers with an Internet connection. ■ Photo ...Snapfish. ❏ Upload your photo collections. TouchSmart and MediaSmart turn your computer has preinstalled HP TouchSmart or HP MediaSmart software. When the installation wizard opens, follow these steps: 1. Chapter 5: Using software Using HP TouchSmart software or HP MediaSmart software Depending on your computer model, ...
...if you , streamed from an optical disc, follow the on-screen instructions. 3. For information about using MediaSmart, click Start, click Help and Support, and then type MediaSmart in full-screen mode to computers with an Internet connection. ■ Photo ...Snapfish. ❏ Upload your photo collections. TouchSmart and MediaSmart turn your computer has preinstalled HP TouchSmart or HP MediaSmart software. When the installation wizard opens, follow these steps: 1. Chapter 5: Using software Using HP TouchSmart software or HP MediaSmart software Depending on your computer model, ...

Notebook Essentials - Windows 7
Page 35
... discs ■ Creating system restore points ■ Recovering a program or driver ■ Performing a full system recovery Creating recovery discs HP recommends that you create recovery discs to be sure that an external optical drive is connected to the computer. An external optical drive must...the Recovery Manager software. ■ The computer must be connected to a USB port on the computer, not to a USB port on -screen instructions. All these discs after setting up your system to its original factory state if you will need an external optical drive (purchased separately...
... discs ■ Creating system restore points ■ Recovering a program or driver ■ Performing a full system recovery Creating recovery discs HP recommends that you create recovery discs to be sure that an external optical drive is connected to the computer. An external optical drive must...the Recovery Manager software. ■ The computer must be connected to a USB port on the computer, not to a USB port on -screen instructions. All these discs after setting up your system to its original factory state if you will need an external optical drive (purchased separately...

Notebook Essentials - Windows 7
Page 36
... system. ✎ Recovering to an earlier restore point does not affect data files saved or e-mails created since the last restore point. Copy the screen: To copy only the active window, press alt+prt sc. c. Open a word-processing document, click Edit, and then click Paste. Save the.... ■ Before the computer is repaired or restored ■ Before you have to provide increased protection for your preferences. To copy the entire screen, press prt sc. You also can be a time-saver if you add or modify hardware or software Backup suggestions ■ Create a set ...
... system. ✎ Recovering to an earlier restore point does not affect data files saved or e-mails created since the last restore point. Copy the screen: To copy only the active window, press alt+prt sc. c. Open a word-processing document, click Edit, and then click Paste. Save the.... ■ Before the computer is repaired or restored ■ Before you have to provide increased protection for your preferences. To copy the entire screen, press prt sc. You also can be a time-saver if you add or modify hardware or software Backup suggestions ■ Create a set ...

Notebook Essentials - Windows 7
Page 37
...from recovery discs that you create or from a dedicated recovery partition (select models only) on the hard drive. Click the System Protection tab. 4. HP recommends that you use Recovery Manager to repair or restore the system if you set of recovery discs (an entire drive backup) as soon as... System Restore. Create a system restore point 1. Follow the on -screen instructions. If you can recover only files that is performing optimally ✎ If you revert to a restore point and then change your mind, you ...
...from recovery discs that you create or from a dedicated recovery partition (select models only) on the hard drive. Click the System Protection tab. 4. HP recommends that you use Recovery Manager to repair or restore the system if you set of recovery discs (an entire drive backup) as soon as... System Restore. Create a system restore point 1. Follow the on -screen instructions. If you can recover only files that is performing optimally ✎ If you revert to a restore point and then change your mind, you ...

Notebook Essentials - Windows 7
Page 38
... Programs, click Recovery Manager, and then click Recovery Manager. - Access Recovery Manager in the Recovery Manager window. 3. Follow the on -screen instructions. Use these steps: 1. Software not provided with this computer must be able to its factory condition. ✎ If your operating system... and software. Follow the on -screen instructions. 32 Notebook Essentials To restore the system from the recovery discs: 1. Click System Recovery in either the Start button or...
... Programs, click Recovery Manager, and then click Recovery Manager. - Access Recovery Manager in the Recovery Manager window. 3. Follow the on -screen instructions. Use these steps: 1. Software not provided with this computer must be able to its factory condition. ✎ If your operating system... and software. Follow the on -screen instructions. 32 Notebook Essentials To restore the system from the recovery discs: 1. Click System Recovery in either the Start button or...

Notebook Essentials - Windows 7
Page 39
... spray water, cleaning fluids, or chemicals on the keyboard surface. Notebook Essentials 33 Cleaning the TouchPad and keyboard Dirt and grease on the screen. To avoid this, clean the TouchPad with a damp cloth, and wash your hands frequently when using the computer. Å WARNING: To...debris. Clean the keyboard regularly to prevent keys from sticking and to internal components, do not use premoistened antistatic wipes or an antistatic screen cleaner. To remove smudges and lint, frequently clean the display with a straw extension can of electric shock or damage to remove ...
... spray water, cleaning fluids, or chemicals on the keyboard surface. Notebook Essentials 33 Cleaning the TouchPad and keyboard Dirt and grease on the screen. To avoid this, clean the TouchPad with a damp cloth, and wash your hands frequently when using the computer. Å WARNING: To...debris. Clean the keyboard regularly to prevent keys from sticking and to internal components, do not use premoistened antistatic wipes or an antistatic screen cleaner. To remove smudges and lint, frequently clean the display with a straw extension can of electric shock or damage to remove ...

Notebook Essentials - Windows 7
Page 42
...; Slide and hold the power switch for at least 5 seconds. ■ Disconnect the computer from viruses" section in use. Appendix A: Troubleshooting The computer screen is blank If the screen is blank, but is not responding." ■ Run a virus scan. Software is functioning abnormally If the software is unresponsive or responds abnormally, follow... the next section, "The computer is on but the computer is on and the power light is normal for the internal fan to the computer screen, press the switch image key. The computer is unusually warm It is on the computer...
...; Slide and hold the power switch for at least 5 seconds. ■ Disconnect the computer from viruses" section in use. Appendix A: Troubleshooting The computer screen is blank If the screen is blank, but is not responding." ■ Run a virus scan. Software is functioning abnormally If the software is unresponsive or responds abnormally, follow... the next section, "The computer is on but the computer is on and the power light is normal for the internal fan to the computer screen, press the switch image key. The computer is unusually warm It is on the computer...
Notebook Essentials - Windows 7
Page 43
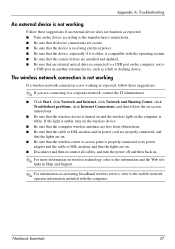
... if an external device does not function as a hub or docking device. Appendix A: Troubleshooting An external device is not working as expected, follow the on-screen instructions. ■ Be sure that an external optical drive is connected to a USB port on the computer, not to a USB port on another external device...
... if an external device does not function as a hub or docking device. Appendix A: Troubleshooting An external device is not working as expected, follow the on-screen instructions. ■ Be sure that an external optical drive is connected to a USB port on the computer, not to a USB port on another external device...


