
Warranty and Support Guide
Page 5
... price or lease payments (less interest) instead of a replacement. HP IS NOT RESPONSIBLE FOR DAMAGE THAT OCCURS AS A RESULT OF YOUR FAILURE TO FOLLOW THE INSTRUCTIONS INTENDED FOR THE HP HARDWARE PRODUCT. YOU SHOULD MAKE PERIODIC BACKUP COPIES OF THE DATA STORED ON YOUR HARD DRIVE OR OTHER STORAGE DEVICES AS A PRECAUTION AGAINST POSSIBLE FAILURES...
... price or lease payments (less interest) instead of a replacement. HP IS NOT RESPONSIBLE FOR DAMAGE THAT OCCURS AS A RESULT OF YOUR FAILURE TO FOLLOW THE INSTRUCTIONS INTENDED FOR THE HP HARDWARE PRODUCT. YOU SHOULD MAKE PERIODIC BACKUP COPIES OF THE DATA STORED ON YOUR HARD DRIVE OR OTHER STORAGE DEVICES AS A PRECAUTION AGAINST POSSIBLE FAILURES...
Warranty and Support Guide
Page 12
...Click the Windows Vista start button. 3 Click the Arrow button next to update or rollback, (for example, DVD/CD-ROM drives). 4 Double-click the specific item (for example, HP DVD Writer 640b). 5 Click the Driver tab. 6 To update a driver, click Update Driver, and follow the onscreen ... 12 Repairing Software Problems Your computer uses the operating system and installed software programs during normal operation. Some software repairs are replacing a hard disk drive, you only need to repair it on again, you force the computer to that can also set restore points manually. Turning...
...Click the Windows Vista start button. 3 Click the Arrow button next to update or rollback, (for example, DVD/CD-ROM drives). 4 Double-click the specific item (for example, HP DVD Writer 640b). 5 Click the Driver tab. 6 To update a driver, click Update Driver, and follow the onscreen ... 12 Repairing Software Problems Your computer uses the operating system and installed software programs during normal operation. Some software repairs are replacing a hard disk drive, you only need to repair it on again, you force the computer to that can also set restore points manually. Turning...
Getting Started Guide
Page 11
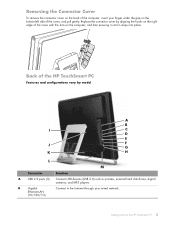
... gap on the bottom-left side of the cover, and pull gently. Replace the connector cover by model A B I C D E J F G K H L M Connector Function A USB 2.0 ports (3) Connect USB devices (USB 2.0) such as printers, external hard disk drives, digital cameras, and MP3 players. Back of the HP TouchSmart PC Features and configurations vary by aligning the hooks on the right edge...
... gap on the bottom-left side of the cover, and pull gently. Replace the connector cover by model A B I C D E J F G K H L M Connector Function A USB 2.0 ports (3) Connect USB devices (USB 2.0) such as printers, external hard disk drives, digital cameras, and MP3 players. Back of the HP TouchSmart PC Features and configurations vary by aligning the hooks on the right edge...
Getting Started Guide
Page 23
Continue pressing the button to turn on removing and replacing the memory and the hard disk drive for updated software and new software features. * Certain Windows Vista product features require advanced or additional hardware. Make sure your ...com/windowsvista/getready/capable.mspx for details. Adding Hardware and Software Some HP TouchSmart PCs feature a Windows Vista 64-bit system, and may not be compatible with your HP TouchSmart PC, refer to Know the HP TouchSmart PC 17 Adjusting the Ambient Light The HP TouchSmart Ambient Light casts a cool white glow from the base of the...
Continue pressing the button to turn on removing and replacing the memory and the hard disk drive for updated software and new software features. * Certain Windows Vista product features require advanced or additional hardware. Make sure your ...com/windowsvista/getready/capable.mspx for details. Adding Hardware and Software Some HP TouchSmart PCs feature a Windows Vista 64-bit system, and may not be compatible with your HP TouchSmart PC, refer to Know the HP TouchSmart PC 17 Adjusting the Ambient Light The HP TouchSmart Ambient Light casts a cool white glow from the base of the...

Upgrade and Service Guide
Page 16
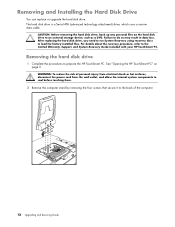
Failure to load the factory-installed files. See "Opening the HP TouchSmart PC" on the hard disk drive to the Limited Warranty, Support, and System Recovery Guide included with your HP TouchSmart PC. CAUTION: Before removing the hard disk drive, back up any personal files on page 3. After replacing the hard disk drive, you need to run System Recovery using recovery discs to do...
Failure to load the factory-installed files. See "Opening the HP TouchSmart PC" on the hard disk drive to the Limited Warranty, Support, and System Recovery Guide included with your HP TouchSmart PC. CAUTION: Before removing the hard disk drive, back up any personal files on page 3. After replacing the hard disk drive, you need to run System Recovery using recovery discs to do...
Upgrade and Service Guide
Page 22
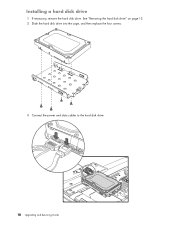
See "Removing the hard disk drive" on page 12. 2 Slide the hard disk drive into the cage, and then replace the four screws. 3 Connect the power and data cables to the hard disk drive. 18 Upgrading and Servicing Guide Installing a hard disk drive 1 If necessary, remove the hard disk drive.
See "Removing the hard disk drive" on page 12. 2 Slide the hard disk drive into the cage, and then replace the four screws. 3 Connect the power and data cables to the hard disk drive. 18 Upgrading and Servicing Guide Installing a hard disk drive 1 If necessary, remove the hard disk drive.

Upgrade and Service Guide
Page 23
4 Lower the hard disk drive cage straight down, align the four hooks on the cage with the four holes on the back of the chassis, and then slide the cage toward the bottom of the computer until it rests against the bracket on the chassis. 5 Replace the screw that secures the hard disk drive cage to the chassis. Upgrading and Servicing Guide 19
4 Lower the hard disk drive cage straight down, align the four hooks on the cage with the four holes on the back of the chassis, and then slide the cage toward the bottom of the computer until it rests against the bracket on the chassis. 5 Replace the screw that secures the hard disk drive cage to the chassis. Upgrading and Servicing Guide 19
Limited Warranty, Support, and System Recovery Guide
Page 7
... FOR PERSONAL INJURY. Limitation of end-user-replaceable HP or HP-approved parts if available for damage that the operation of HP. INCLUDING REPRESENTATIONS MADE IN HP SALES LITERATURE OR ADVICE GIVEN TO YOU BY HP OR AN AGENT OR EMPLOYEE OF HP-THAT MAY HAVE BEEN MADE IN CONNECTION WITH...TO COUNTRY/REGION. YOU SHOULD MAKE PERIODIC BACKUP COPIES OF THE DATA STORED ON YOUR HARD DRIVE OR OTHER STORAGE DEVICES AS A PRECAUTION AGAINST POSSIBLE FAILURES, ALTERATION, OR LOSS OF THE DATA. HP IS NOT RESPONSIBLE FOR THE RESTORATION OR REINSTALLATION OF ANY PROGRAMS OR DATA OTHER THAN...
... FOR PERSONAL INJURY. Limitation of end-user-replaceable HP or HP-approved parts if available for damage that the operation of HP. INCLUDING REPRESENTATIONS MADE IN HP SALES LITERATURE OR ADVICE GIVEN TO YOU BY HP OR AN AGENT OR EMPLOYEE OF HP-THAT MAY HAVE BEEN MADE IN CONNECTION WITH...TO COUNTRY/REGION. YOU SHOULD MAKE PERIODIC BACKUP COPIES OF THE DATA STORED ON YOUR HARD DRIVE OR OTHER STORAGE DEVICES AS A PRECAUTION AGAINST POSSIBLE FAILURES, ALTERATION, OR LOSS OF THE DATA. HP IS NOT RESPONSIBLE FOR THE RESTORATION OR REINSTALLATION OF ANY PROGRAMS OR DATA OTHER THAN...
Limited Warranty, Support, and System Recovery Guide
Page 13
... described in this System Restore procedure before it . Turning Off Your Computer When you turn it on your computer if you are replacing a hard disk drive, you are experiencing software problems. The sections that time and date. Complete the following procedure to update a driver, or to ...does not solve your computer. Or To revert to an earlier version of a driver, click Rollback Driver, and follow provide detailed instructions for example, HP DVD Writer 640b). 5 Click the Driver tab. 6 To update a driver, click Update Driver, and follow the onscreen instructions. NOTE: Always use...
... described in this System Restore procedure before it . Turning Off Your Computer When you turn it on your computer if you are replacing a hard disk drive, you are experiencing software problems. The sections that time and date. Complete the following procedure to update a driver, or to ...does not solve your computer. Or To revert to an earlier version of a driver, click Rollback Driver, and follow provide detailed instructions for example, HP DVD Writer 640b). 5 Click the Driver tab. 6 To update a driver, click Update Driver, and follow the onscreen instructions. NOTE: Always use...
Upgrading and Servicing Guide
Page 18
... Recovery Guide included with your HP TouchSmart PC. See "Opening the HP TouchSmart PC" on the hard disk drive to do so may result in data loss. For details about the recovery procedure, refer to prepare the HP TouchSmart PC. The hard disk drive is a Serial ATA (advanced technology attachment) drive, which uses a narrow data cable. After replacing the hard disk drive, you need to run System...
... Recovery Guide included with your HP TouchSmart PC. See "Opening the HP TouchSmart PC" on the hard disk drive to do so may result in data loss. For details about the recovery procedure, refer to prepare the HP TouchSmart PC. The hard disk drive is a Serial ATA (advanced technology attachment) drive, which uses a narrow data cable. After replacing the hard disk drive, you need to run System...

Upgrading and Servicing Guide
Page 24
Installing a hard disk drive 1 If necessary, remove the hard disk drive. See "Removing the hard disk drive" on page 12. 2 Slide the hard disk drive into the cage, and then replace the four screws. 3 Connect the power and data cables to the hard disk drive. 18 Upgrading and Servicing Guide
Installing a hard disk drive 1 If necessary, remove the hard disk drive. See "Removing the hard disk drive" on page 12. 2 Slide the hard disk drive into the cage, and then replace the four screws. 3 Connect the power and data cables to the hard disk drive. 18 Upgrading and Servicing Guide

Upgrading and Servicing Guide
Page 25
4 Lower the hard disk drive cage straight down, align the four hooks on the cage with the four holes on the back of the chassis, and then slide the cage toward the bottom of the computer until it rests against the bracket on the chassis. 5 Replace the screw that secures the hard disk drive cage to the chassis. Upgrading and Servicing Guide 19
4 Lower the hard disk drive cage straight down, align the four hooks on the cage with the four holes on the back of the chassis, and then slide the cage toward the bottom of the computer until it rests against the bracket on the chassis. 5 Replace the screw that secures the hard disk drive cage to the chassis. Upgrading and Servicing Guide 19


