
Getting Started
Page 17
For help with getting started using your computer, see the Windows 7 desktop, the initial setup is complete. Preparing to Use Your Computer After you have completed the steps on the setup poster, you will be reminded to ...
For help with getting started using your computer, see the Windows 7 desktop, the initial setup is complete. Preparing to Use Your Computer After you have completed the steps on the setup poster, you will be reminded to ...
Getting Started
Page 19
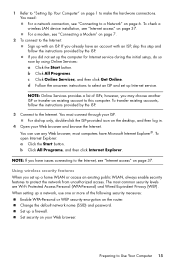
... for Internet service during the initial setup, do so now by the ISP. When setting up only, double-click the ISP-provided icon on the desktop, and then log in. 4 Open your Web browser and browse the Internet. Preparing to this step and follow the instructions provided by the ISP. 3 Connect...
... for Internet service during the initial setup, do so now by the ISP. When setting up only, double-click the ISP-provided icon on the desktop, and then log in. 4 Open your Web browser and browse the Internet. Preparing to this step and follow the instructions provided by the ISP. 3 Connect...
Getting Started
Page 30
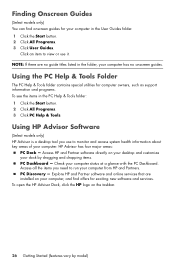
... by dragging and dropping items. PC Dashboard - Access HP and Partner software directly on your computer, and find onscreen guides for your computer has no onscreen guides. Using HP Advisor Software (Select models only) HP Advisor is a desktop tool you need to monitor and access system health information... about key areas of your computer from HP and Partners. Click an item to view or use to ...
... by dragging and dropping items. PC Dashboard - Access HP and Partner software directly on your computer, and find onscreen guides for your computer has no onscreen guides. Using HP Advisor Software (Select models only) HP Advisor is a desktop tool you need to monitor and access system health information... about key areas of your computer from HP and Partners. Click an item to view or use to ...
Getting Started
Page 56
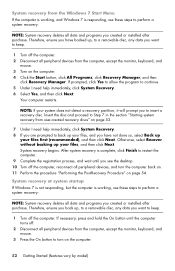
... without backing up , to a removable disc, any data you have backed up your system does not detect a recovery partition, it will prompt you see the desktop. 10 Turn off the computer. After system recovery is complete, click Finish to restart the computer. 9 Complete the registration process, and wait until the computer...
... without backing up , to a removable disc, any data you have backed up your system does not detect a recovery partition, it will prompt you see the desktop. 10 Turn off the computer. After system recovery is complete, click Finish to restart the computer. 9 Complete the registration process, and wait until the computer...
Getting Started
Page 57
... computer. To perform a system recovery using recovery discs: 1 If the computer is not backed up your files, and then click Next. 8 If you see the desktop. 8 Turn off . 4 Disconnect all peripheral devices, and turn on page 51. Otherwise, select Recover without backing up . 2 Insert recovery disc #1 into the DVD drive tray...
... computer. To perform a system recovery using recovery discs: 1 If the computer is not backed up your files, and then click Next. 8 If you see the desktop. 8 Turn off . 4 Disconnect all peripheral devices, and turn on page 51. Otherwise, select Recover without backing up . 2 Insert recovery disc #1 into the DVD drive tray...
Getting Started Guide
Page 25
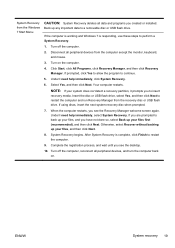
... to insert recovery media. Under I need help immediately, select System Recovery. NOTE: If your system does not detect a recovery partition, it prompts you see the desktop. 10. When the computer restarts, you to continue. 5. If you see the Recovery Manager welcome screen again. Complete the registration process, and wait until you...
... to insert recovery media. Under I need help immediately, select System Recovery. NOTE: If your system does not detect a recovery partition, it prompts you see the desktop. 10. When the computer restarts, you to continue. 5. If you see the Recovery Manager welcome screen again. Complete the registration process, and wait until you...
Getting Started Guide
Page 26
... up your files first (recommended), and then click Next. Otherwise, select Recover without backing up your files, and then click Next. 7. If you see the desktop. 9. System Recovery begins. As soon as you are prompted to a removable disc or USB flash drive. Complete the registration process, and wait until the Windows...
... up your files first (recommended), and then click Next. Otherwise, select Recover without backing up your files, and then click Next. 7. If you see the desktop. 9. System Recovery begins. As soon as you are prompted to a removable disc or USB flash drive. Complete the registration process, and wait until the Windows...
Getting Started Guide
Page 30
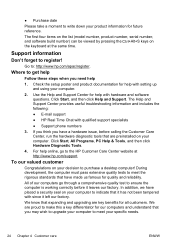
... upgrade your computer to indicate that are key benefits for help 1. Go to register! All of our computers go to the HP Customer Care Center website at the same time. The Help and Support Center provides useful troubleshooting information and includes the following: ●... specialists ● Support phone numbers 3. Support information Don't forget to : http://www.hp.com/apac/register. ● Purchase date Please take a moment to write down your decision to purchase a desktop computer! Use the Help and Support Center for quality and reliability. During development, the...
... upgrade your computer to indicate that are key benefits for help 1. Go to register! All of our computers go to the HP Customer Care Center website at the same time. The Help and Support Center provides useful troubleshooting information and includes the following: ●... specialists ● Support phone numbers 3. Support information Don't forget to : http://www.hp.com/apac/register. ● Purchase date Please take a moment to write down your decision to purchase a desktop computer! Use the Help and Support Center for quality and reliability. During development, the...
Getting Started Guide
Page 31
... earlier in the Hardware Limited Warranty section of the computer, you are sent to your computer, HP is ready to help , you can do There's lots of helpful information included with it on your Windows desktop (to access it is built to fix the problem. Next, try a little surfing! Customer support Easy...thirty (30) days from time to the Support website listed earlier in your ENWW Support information 25 Be sure to also check the updates from HP that happens to your desktop from the time you attempted to upgrade your system. Go to time. Phone assistance to come.
... earlier in the Hardware Limited Warranty section of the computer, you are sent to your computer, HP is ready to help , you can do There's lots of helpful information included with it on your Windows desktop (to access it is built to fix the problem. Next, try a little surfing! Customer support Easy...thirty (30) days from time to the Support website listed earlier in your ENWW Support information 25 Be sure to also check the updates from HP that happens to your desktop from the time you attempted to upgrade your system. Go to time. Phone assistance to come.

Troubleshooting & Maintenance Guide
Page 15
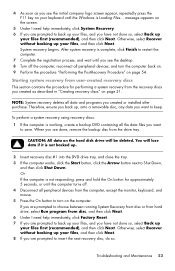
... detect a recovery partition, it prompts you have not done so, select Back up your files, and then click Next. 8. As soon as you see the desktop. 10. Otherwise, select Recover without backing up your files first (recommended), and then click Next. Disconnect all peripheral devices from the computer except the monitor...
... detect a recovery partition, it prompts you have not done so, select Back up your files, and then click Next. 8. As soon as you see the desktop. 10. Otherwise, select Recover without backing up your files first (recommended), and then click Next. Disconnect all peripheral devices from the computer except the monitor...

Troubleshooting & Maintenance Guide
Page 16
To create recovery media, see the desktop. 9. Disconnect all data and programs you have not done so, select Back up any important data to a removable disc or USB flash drive. If you ...
To create recovery media, see the desktop. 9. Disconnect all data and programs you have not done so, select Back up any important data to a removable disc or USB flash drive. If you ...

Getting Started (For Select TouchSmart Models Only)
Page 8
...with Applications ◦ All active applications are no longer confined to the left and right. HP TouchSmart 5.0 provides a unique, touch-based computer experience. Magic Canvas provides an interactive desktop that appear on your screen. ◦ Customize the appearance of your Magic Canvas with your...Audio™ devices (sold separately), and high quality speakers. To launch the software, tap the HP TouchSmart icon on the desktop, or tap the Start button and then tap HP TouchSmart. ● The Magic Canvas The Magic Canvas is a touch-enabled high-performance computer built ...
...with Applications ◦ All active applications are no longer confined to the left and right. HP TouchSmart 5.0 provides a unique, touch-based computer experience. Magic Canvas provides an interactive desktop that appear on your screen. ◦ Customize the appearance of your Magic Canvas with your...Audio™ devices (sold separately), and high quality speakers. To launch the software, tap the HP TouchSmart icon on the desktop, or tap the Start button and then tap HP TouchSmart. ● The Magic Canvas The Magic Canvas is a touch-enabled high-performance computer built ...

Getting Started (For Select TouchSmart Models Only)
Page 16
... as well, when changed in gaming mode, the following options: ● Tap the full screen to return to desktop ● Press ESC key to return to desktop ● Left click mouse to return to desktop ● Press the Ctrl+Alt+Del buttons simultaneously on the keyboard ● Press the Power/Sleep button on...
... as well, when changed in gaming mode, the following options: ● Tap the full screen to return to desktop ● Press ESC key to return to desktop ● Left click mouse to return to desktop ● Press the Ctrl+Alt+Del buttons simultaneously on the keyboard ● Press the Power/Sleep button on...
Getting Started (For Select TouchSmart Models Only)
Page 17
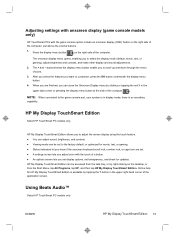
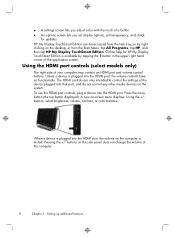
...color with the game console option include an onscreen display (OSD) button on the right side of the computer. HP My Display TouchSmart Edition Select HP TouchSmart PC models only HP My Display TouchSmart Edition allows you to select the display mode (default, movie, text, or gaming), adjust brightness and contrast, ...in the upper right corner or pressing the display menu button at the side of the computer . there is available by right-clicking on the desktop, or from the task tray, or by tapping the ? The + and ‒ buttons below the display menu button enable you to the...
...color with the game console option include an onscreen display (OSD) button on the right side of the computer. HP My Display TouchSmart Edition Select HP TouchSmart PC models only HP My Display TouchSmart Edition allows you to select the display mode (default, movie, text, or gaming), adjust brightness and contrast, ...in the upper right corner or pressing the display menu button at the side of the computer . there is available by right-clicking on the desktop, or from the task tray, or by tapping the ? The + and ‒ buttons below the display menu button enable you to the...
Getting Started (For Select TouchSmart Models Only)
Page 34
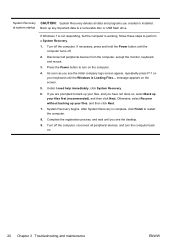
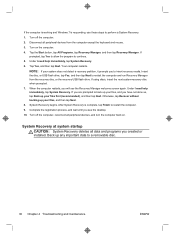
..., insert the next system-recovery disc when prompted. 7. System Recovery at system startup CAUTION: System Recovery deletes all data and programs you will see the desktop. 10. If prompted, tap Yes to allow the program to restart the computer. 9. Otherwise, tap Recover without backing up any important data to restart the...
..., insert the next system-recovery disc when prompted. 7. System Recovery at system startup CAUTION: System Recovery deletes all data and programs you will see the desktop. 10. If prompted, tap Yes to allow the program to restart the computer. 9. Otherwise, tap Recover without backing up any important data to restart the...
Getting Started (For Select TouchSmart Models Only)
Page 35
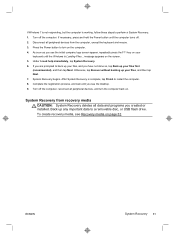
Under I need help immediately, tap System Recovery. 6. Turn off the computer, reconnect all data and programs you see the desktop. 9. As soon as you have not done so, tap Back up your files, and you see Recovery media on . ENWW System Recovery 31 Disconnect all ...
Under I need help immediately, tap System Recovery. 6. Turn off the computer, reconnect all data and programs you see the desktop. 9. As soon as you have not done so, tap Back up your files, and you see Recovery media on . ENWW System Recovery 31 Disconnect all ...

Quick Setup Guide
Page 10
... and right sliding motion with stationary and moving objects. ◦ Place playlists, slide shows, music, graffiti, videos, and photos on the desktop, or tap the Start button and then tap HP TouchSmart. ● The Magic Canvas The Magic Canvas is a touch-enabled high-performance computer built into a high-definition widescreen display. You can...
... and right sliding motion with stationary and moving objects. ◦ Place playlists, slide shows, music, graffiti, videos, and photos on the desktop, or tap the Start button and then tap HP TouchSmart. ● The Magic Canvas The Magic Canvas is a touch-enabled high-performance computer built into a high-definition widescreen display. You can...
Quick Setup Guide
Page 12
... a device into the HDMI port, the volume controls have no functionality. Online help for updates. buttons on the desktop, or from the Start Menu, tap All Programs, tap HP, and then tap HP My Display TouchSmart Edition. Using the +/buttons, select brightness, volume, contrast, or color balance. ● A settings screen lets you adjust color...
... a device into the HDMI port, the volume controls have no functionality. Online help for updates. buttons on the desktop, or from the Start Menu, tap All Programs, tap HP, and then tap HP My Display TouchSmart Edition. Using the +/buttons, select brightness, volume, contrast, or color balance. ● A settings screen lets you adjust color...
Wall Mounting Guide (For Select Models Only)
Page 5
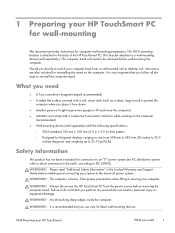
...from the power source before wall-mounting the computer. The computer is attached to the back of the HP TouchSmart PC. Always disconnect the HP TouchSmart PC from 508 mm to 582 mm (20 inches to 22.9 inches) diagonal, and weighing up to...desktop unit, instructions are also included for connection to an "IT" power system (an AC distribution system with the following specifications: ◦ VESA standard 100 mm x 100 mm (3.9 in x 3.9 in) hole pattern ◦ Designed for flat-panel displays ranging in the Limited Warranty and Support Guide before installing and connecting your HP TouchSmart...
...from the power source before wall-mounting the computer. The computer is attached to the back of the HP TouchSmart PC. Always disconnect the HP TouchSmart PC from 508 mm to 582 mm (20 inches to 22.9 inches) diagonal, and weighing up to...desktop unit, instructions are also included for connection to an "IT" power system (an AC distribution system with the following specifications: ◦ VESA standard 100 mm x 100 mm (3.9 in x 3.9 in) hole pattern ◦ Designed for flat-panel displays ranging in the Limited Warranty and Support Guide before installing and connecting your HP TouchSmart...

Wall Mounting Guide (For Select Models Only)
Page 10
Snap the rings into place on page 8. 6 Chapter 1 Preparing your HP TouchSmart PC for wall-mounting Wall-Mounting your HP TouchSmart PC back to the computer. Replace the back cover on the computer and install the three screws securing the cover to a desktop unit in Reinstalling the stand on your HP TouchSmart PC on the lower corners of the computer. 9. To reinstall the stand, follow all the steps in the future. NOTE: Save the computer stand and the eight screws, so that you can convert your HP TouchSmart 8.
Snap the rings into place on page 8. 6 Chapter 1 Preparing your HP TouchSmart PC for wall-mounting Wall-Mounting your HP TouchSmart PC back to the computer. Replace the back cover on the computer and install the three screws securing the cover to a desktop unit in Reinstalling the stand on your HP TouchSmart PC on the lower corners of the computer. 9. To reinstall the stand, follow all the steps in the future. NOTE: Save the computer stand and the eight screws, so that you can convert your HP TouchSmart 8.

