
Getting Started
Page 17
... while the computer makes preparations. (When you select an alternate language, it may take up for updates, and get online. 5 When you see the Windows 7 desktop, the initial setup is complete. Preparing to Use Your Computer After you have completed the steps on the setup poster, you are ready to turn...
... while the computer makes preparations. (When you select an alternate language, it may take up for updates, and get online. 5 When you see the Windows 7 desktop, the initial setup is complete. Preparing to Use Your Computer After you have completed the steps on the setup poster, you are ready to turn...
Getting Started
Page 19
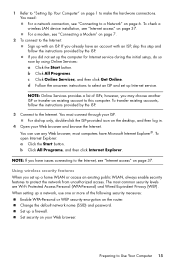
... Internet: Sign up with an ISP, skip this computer. d Follow the onscreen instructions to make the hardware connections. For a modem, see "Internet access" on the desktop, and then log in. 4 Open your Web browser and browse the Internet. For dial-up only, double-click the ISP-provided icon on page 37...
... Internet: Sign up with an ISP, skip this computer. d Follow the onscreen instructions to make the hardware connections. For a modem, see "Internet access" on the desktop, and then log in. 4 Open your Web browser and browse the Internet. For dial-up only, double-click the ISP-provided icon on page 37...
Getting Started
Page 30
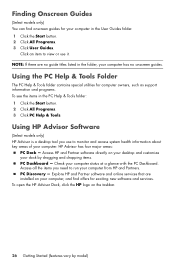
... services. Access all the items you use it. To open the HP Advisor Dock, click the HP logo on your dock by model) PC Discovery - Using HP Advisor Software (Select models only) HP Advisor is a desktop tool you need to monitor and access system health information about key ...If there are installed on the taskbar. 26 Getting Started (features vary by dragging and dropping items. PC Dashboard - Access HP and Partner software directly on your desktop and customize your computer, and find onscreen guides for computer owners, such as support information and programs. To see the ...
... services. Access all the items you use it. To open the HP Advisor Dock, click the HP logo on your dock by model) PC Discovery - Using HP Advisor Software (Select models only) HP Advisor is a desktop tool you need to monitor and access system health information about key ...If there are installed on the taskbar. 26 Getting Started (features vary by dragging and dropping items. PC Dashboard - Access HP and Partner software directly on your desktop and customize your computer, and find onscreen guides for computer owners, such as support information and programs. To see the ...
Getting Started
Page 56
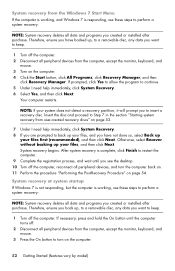
... is working , and Windows 7 is responding, use these steps to perform a system recovery. Otherwise, select Recover without backing up your files, and you see the desktop. 10 Turn off . 2 Disconnect all peripheral devices from the computer, except the monitor, keyboard, and mouse. 3 Turn on page 54. NOTE: If your files, and...
... is working , and Windows 7 is responding, use these steps to perform a system recovery. Otherwise, select Recover without backing up your files, and you see the desktop. 10 Turn off . 2 Disconnect all peripheral devices from the computer, except the monitor, keyboard, and mouse. 3 Turn on page 54. NOTE: If your files, and...
Getting Started
Page 57
... the screen. 5 Under I need help immediately, click Factory Reset. 7 If you are prompted to back up your files, and you created as you see the desktop. 8 Turn off . 4 Disconnect all peripheral devices, and turn on your files, and you want to save. After system recovery is not responding, press and hold...
... the screen. 5 Under I need help immediately, click Factory Reset. 7 If you are prompted to back up your files, and you created as you see the desktop. 8 Turn off . 4 Disconnect all peripheral devices, and turn on your files, and you want to save. After system recovery is not responding, press and hold...
Getting Started Guide
Page 25
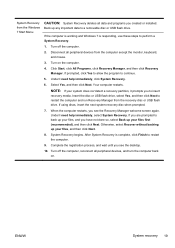
... these steps to back up your files, and you are prompted to perform a System Recovery. 1. Complete the registration process, and wait until you see the desktop. 10. When the computer restarts, you see the Recovery Manager welcome screen again. Disconnect all peripheral devices from the Windows 7 Start Menu CAUTION: System Recovery...
... these steps to back up your files, and you are prompted to perform a System Recovery. 1. Complete the registration process, and wait until you see the desktop. 10. When the computer restarts, you see the Recovery Manager welcome screen again. Disconnect all peripheral devices from the Windows 7 Start Menu CAUTION: System Recovery...
Getting Started Guide
Page 26
... Recovery. 6. Otherwise, select Recover without backing up your files first (recommended), and then click Next. Complete the registration process, and wait until you see the desktop. 9. at system startup Back up your files, and then click Next. 7. Disconnect all peripheral devices, and turn on . 20 Chapter 3 Troubleshooting and maintenance ENWW As...
... Recovery. 6. Otherwise, select Recover without backing up your files first (recommended), and then click Next. Complete the registration process, and wait until you see the desktop. 9. at system startup Back up your files, and then click Next. 7. Disconnect all peripheral devices, and turn on . 20 Chapter 3 Troubleshooting and maintenance ENWW As...
Getting Started Guide
Page 30
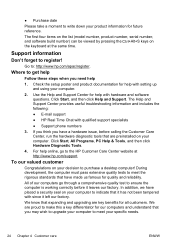
...left our factory. The Help and Support Center provides useful troubleshooting information and includes the following: ● E-mail support ● HP Real Time Chat with hardware and software questions. Use the Help and Support Center for quality and reliability. Click Start, All ... our valued customer Congratulations on your specific needs. 24 Chapter 4 Customer care ENWW Support information Don't forget to purchase a desktop computer! We are proud to indicate that are key benefits for help with qualified support specialists ● Support phone numbers 3....
...left our factory. The Help and Support Center provides useful troubleshooting information and includes the following: ● E-mail support ● HP Real Time Chat with hardware and software questions. Use the Help and Support Center for quality and reliability. Click Start, All ... our valued customer Congratulations on your specific needs. 24 Chapter 4 Customer care ENWW Support information Don't forget to purchase a desktop computer! We are proud to indicate that are key benefits for help with qualified support specialists ● Support phone numbers 3....
Getting Started Guide
Page 31
... Support Guide. Once the security seal has been broken, your computer is then, to help you get the latest news from HP about your desktop from your computer. Award-winning HP Customer Support is built to upgrade your new computer. See what you need. It contains more detailed help Your new computer is...
... Support Guide. Once the security seal has been broken, your computer is then, to help you get the latest news from HP about your desktop from your computer. Award-winning HP Customer Support is built to upgrade your new computer. See what you need. It contains more detailed help Your new computer is...

Troubleshooting & Maintenance Guide
Page 15
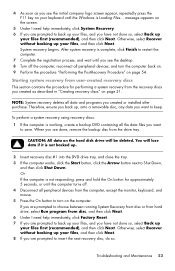
... to turn the computer back on the computer. 4. As soon as you have not done so, select Back up your keyboard until you see the desktop. 10. Your computer restarts. If using discs, insert the next system-recovery disc when prompted. 7. If you are prompted to back up your files, and...
... to turn the computer back on the computer. 4. As soon as you have not done so, select Back up your keyboard until you see the desktop. 10. Your computer restarts. If using discs, insert the next system-recovery disc when prompted. 7. If you are prompted to back up your files, and...

Troubleshooting & Maintenance Guide
Page 16
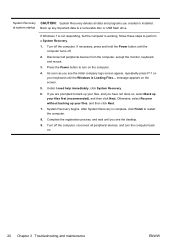
... turns off the computer, reconnect all peripheral devices, and turn on your files first (recommended), and then click Next. To create recovery media, see the desktop. 9. If using recovery media: 1. If the computer works, click Start, click the Arrow button next to step 7. 6. Press the Power button to save, and then...
... turns off the computer, reconnect all peripheral devices, and turn on your files first (recommended), and then click Next. To create recovery media, see the desktop. 9. If using recovery media: 1. If the computer works, click Start, click the Arrow button next to step 7. 6. Press the Power button to save, and then...

Getting Started (For Select TouchSmart Models Only)
Page 8
...display. Use the Carousel to place shortcuts to the left and right, allowing you can be mounted on the desktop, or tap the Start button and then tap HP TouchSmart. ● The Magic Canvas The Magic Canvas is a touch-enabled high-performance computer built into view by tapping... you to the left and right. Magic Canvas provides an interactive desktop that vary by model. The slim computer offers select features, that expands to spread out your favorite applications, folders, files, and Web pages. Select HP TouchSmart PC models can place on your Magic Canvas. ◦ A ...
...display. Use the Carousel to place shortcuts to the left and right, allowing you can be mounted on the desktop, or tap the Start button and then tap HP TouchSmart. ● The Magic Canvas The Magic Canvas is a touch-enabled high-performance computer built into view by tapping... you to the left and right. Magic Canvas provides an interactive desktop that vary by model. The slim computer offers select features, that expands to spread out your favorite applications, folders, files, and Web pages. Select HP TouchSmart PC models can place on your Magic Canvas. ◦ A ...

Getting Started (For Select TouchSmart Models Only)
Page 16
... as well, when changed in gaming mode, the following options: ● Tap the full screen to return to desktop ● Press ESC key to return to desktop ● Left click mouse to return to desktop ● Press the Ctrl+Alt+Del buttons simultaneously on the keyboard ● Press the Power/Sleep button on...
... as well, when changed in gaming mode, the following options: ● Tap the full screen to return to desktop ● Press ESC key to return to desktop ● Left click mouse to return to desktop ● Press the Ctrl+Alt+Del buttons simultaneously on the keyboard ● Press the Power/Sleep button on...
Getting Started (For Select TouchSmart Models Only)
Page 17
...lets you set display options, set to the game console port, your system is no recording capability. HP My Display TouchSmart Edition Select HP TouchSmart PC models only HP My Display TouchSmart Edition allows you to scroll up and down through the menu choices. 3. After you select the features...You can adjust sound, brightness, and contrast. ● Viewing mode can be set transparency, and check for HP My Display TouchSmart Edition is available by right-clicking on the desktop, or from the task tray, or by tapping the ? The onscreen display menu opens, enabling you to ...
...lets you set display options, set to the game console port, your system is no recording capability. HP My Display TouchSmart Edition Select HP TouchSmart PC models only HP My Display TouchSmart Edition allows you to scroll up and down through the menu choices. 3. After you select the features...You can adjust sound, brightness, and contrast. ● Viewing mode can be set transparency, and check for HP My Display TouchSmart Edition is available by right-clicking on the desktop, or from the task tray, or by tapping the ? The onscreen display menu opens, enabling you to ...
Getting Started (For Select TouchSmart Models Only)
Page 34
... Manager, and then tap Recovery Manager. If you are prompted to perform a System Recovery. 1. Complete the registration process, and wait until you will see the desktop. 10. Under I need help immediately, tap System Recovery. If using discs, insert the next system-recovery disc when prompted. 7. When the computer restarts, you see...
... Manager, and then tap Recovery Manager. If you are prompted to perform a System Recovery. 1. Complete the registration process, and wait until you will see the desktop. 10. Under I need help immediately, tap System Recovery. If using discs, insert the next system-recovery disc when prompted. 7. When the computer restarts, you see...
Getting Started (For Select TouchSmart Models Only)
Page 35
.... 4. Turn off the computer, reconnect all data and programs you are prompted to a removable disc, or USB flash drive. To create recovery media, see the desktop. 9. As soon as you see Recovery media on the screen. 5. If you created or installed. Otherwise, tap Recover without backing up your keyboard until the...
.... 4. Turn off the computer, reconnect all data and programs you are prompted to a removable disc, or USB flash drive. To create recovery media, see the desktop. 9. As soon as you see Recovery media on the screen. 5. If you created or installed. Otherwise, tap Recover without backing up your keyboard until the...

Quick Setup Guide
Page 10
...music, playlists, notes, calendars) onto the Magic Canvas. ◦ Create shortcuts to content. 6 Chapter 3 Setting up additional features HP TouchSmart Magic Canvas The HP TouchSmart PC is an interactive background that grows as you scroll to the left and right of the screen. ◦ Access a submenu... stationary and moving objects. ◦ Place playlists, slide shows, music, graffiti, videos, and photos on the desktop, or tap the Start button and then tap HP TouchSmart. ● The Magic Canvas The Magic Canvas is a touch-enabled high-performance computer built into a high-definition...
...music, playlists, notes, calendars) onto the Magic Canvas. ◦ Create shortcuts to content. 6 Chapter 3 Setting up additional features HP TouchSmart Magic Canvas The HP TouchSmart PC is an interactive background that grows as you scroll to the left and right of the screen. ◦ Access a submenu... stationary and moving objects. ◦ Place playlists, slide shows, music, graffiti, videos, and photos on the desktop, or tap the Start button and then tap HP TouchSmart. ● The Magic Canvas The Magic Canvas is a touch-enabled high-performance computer built into a high-definition...
Quick Setup Guide
Page 12
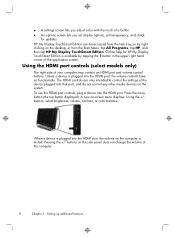
...screen lets you set display options, set transparency, and check for HP My Display TouchSmart Edition is available by rightclicking on the desktop, or from the Start Menu, tap All Programs, tap HP, and then tap HP My Display TouchSmart Edition. Online help for updates. The HDMI controls are only intended... computer may contain an HDMI port and volume control buttons. Using the +/buttons, select brightness, volume, contrast, or color balance. HP My Display TouchSmart Edition can be accessed from the task tray, or by tapping the ? Using the HDMI port controls (select models only) The ...
...screen lets you set display options, set transparency, and check for HP My Display TouchSmart Edition is available by rightclicking on the desktop, or from the Start Menu, tap All Programs, tap HP, and then tap HP My Display TouchSmart Edition. Online help for updates. The HDMI controls are only intended... computer may contain an HDMI port and volume control buttons. Using the +/buttons, select brightness, volume, contrast, or color balance. HP My Display TouchSmart Edition can be accessed from the task tray, or by tapping the ? Using the HDMI port controls (select models only) The ...
Wall Mounting Guide (For Select Models Only)
Page 5
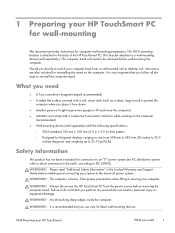
... and connecting your system to the electrical power system. Take proper precautions when lifting or moving your HP TouchSmart What you perform any procedures can result in the Limited Warranty and Support Guide before wall-mounting the computer. 1 Preparing ... wall-mounting devices. Please read "Additional Safety Information" in personal injury or equipment damage. WARNING! Always disconnect the HP TouchSmart PC from a wall-mounted unit to desktop unit, instructions are also included for reinstalling the stand on the computer (recommended) ● Wall-mounting device (sold...
... and connecting your system to the electrical power system. Take proper precautions when lifting or moving your HP TouchSmart What you perform any procedures can result in the Limited Warranty and Support Guide before wall-mounting the computer. 1 Preparing ... wall-mounting devices. Please read "Additional Safety Information" in personal injury or equipment damage. WARNING! Always disconnect the HP TouchSmart PC from a wall-mounted unit to desktop unit, instructions are also included for reinstalling the stand on the computer (recommended) ● Wall-mounting device (sold...

Wall Mounting Guide (For Select Models Only)
Page 10
NOTE: Save the computer stand and the eight screws, so that you can convert your HP TouchSmart To reinstall the stand, follow all the steps in Reinstalling the stand on your HP TouchSmart PC on page 8. 6 Chapter 1 Preparing your HP TouchSmart PC for wall-mounting Wall-Mounting your HP TouchSmart PC back to the computer. Snap the rings into place on the computer and install the three screws securing the cover to a desktop unit in the future. 8. Replace the back cover on the lower corners of the computer. 9.
NOTE: Save the computer stand and the eight screws, so that you can convert your HP TouchSmart To reinstall the stand, follow all the steps in Reinstalling the stand on your HP TouchSmart PC on page 8. 6 Chapter 1 Preparing your HP TouchSmart PC for wall-mounting Wall-Mounting your HP TouchSmart PC back to the computer. Snap the rings into place on the computer and install the three screws securing the cover to a desktop unit in the future. 8. Replace the back cover on the lower corners of the computer. 9.

