
Limited Warranty and Support Guide
Page 12
...GB) is equal to your equipment: • Do not disable the power cord grounding plug. The storage capacity of the different measuring systems, you ... The grounding plug is an important safety feature. • Plug the power cord in the documentation, or on the box. To prevent direct exposure to... Hard disk drives are described and advertised by unplugging the power cord from the equipment by manufacturers in the Computer window because it ... partition on the Web at all times. • Disconnect power from the electrical outlet. Microsoft Windows reports smaller capacity in...
...GB) is equal to your equipment: • Do not disable the power cord grounding plug. The storage capacity of the different measuring systems, you ... The grounding plug is an important safety feature. • Plug the power cord in the documentation, or on the box. To prevent direct exposure to... Hard disk drives are described and advertised by unplugging the power cord from the equipment by manufacturers in the Computer window because it ... partition on the Web at all times. • Disconnect power from the electrical outlet. Microsoft Windows reports smaller capacity in...

Limited Warranty and Support Guide - Refurbished
Page 13
... DVD drives. The grounding plug is an important safety feature. • Plug the power cord in the User Guides folder. be heavy; WARNING: The computer may be sure to...open the enclosure of electrical shock or damage to your equipment: • Do not disable the power cord grounding plug. WARNING: To reduce the risk of serious injury read the Safety & Comfort Guide....Guides. The guide is located on the Web at all times. • Disconnect power from the equipment by unplugging the power cord from the electrical outlet. Safety Information For more information, refer to the Regulatory ...
... DVD drives. The grounding plug is an important safety feature. • Plug the power cord in the User Guides folder. be heavy; WARNING: The computer may be sure to...open the enclosure of electrical shock or damage to your equipment: • Do not disable the power cord grounding plug. WARNING: To reduce the risk of serious injury read the Safety & Comfort Guide....Guides. The guide is located on the Web at all times. • Disconnect power from the equipment by unplugging the power cord from the electrical outlet. Safety Information For more information, refer to the Regulatory ...

Upgrading and Servicing Guide
Page 8
... down on the soft surface. 6 584963-001 - Tools Needed z Torx or flat screwdriver - WARNING: z Never open the cover with the power cord attached or power applied. Discharge static electricity by disconnecting the power cord from the back of the computer. 4 Unplug all attached cables from scratches or other damage. Computer Preparation 1 Remove any internal parts...
... down on the soft surface. 6 584963-001 - Tools Needed z Torx or flat screwdriver - WARNING: z Never open the cover with the power cord attached or power applied. Discharge static electricity by disconnecting the power cord from the back of the computer. 4 Unplug all attached cables from scratches or other damage. Computer Preparation 1 Remove any internal parts...
Upgrading and Servicing Guide
Page 11
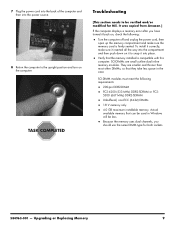
... with this computer. z Verify that can be used in the case. SO-DIMM modules must meet the following : z Turn the computer off and unplug the power cord, then open up the memory compartment and make sure it inserted all the way into the compartment and then push down on it to snap.... 8 Return the computer to be less. Actual available memory that the memory installed is firmly seated. 7 Plug the power cord into the back of the computer and then into place. SO-DIMMs are smaller and thinner than most other DIMMs, so that they take less ...
... with this computer. z Verify that can be used in the case. SO-DIMM modules must meet the following : z Turn the computer off and unplug the power cord, then open up the memory compartment and make sure it inserted all the way into the compartment and then push down on it to snap.... 8 Return the computer to be less. Actual available memory that the memory installed is firmly seated. 7 Plug the power cord into the back of the computer and then into place. SO-DIMMs are smaller and thinner than most other DIMMs, so that they take less ...
Upgrading and Servicing Guide
Page 14
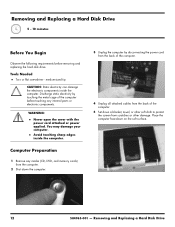
... Removing and Replacing a Hard Disk Drive Tools Needed z Torx or flat screwdriver - WARNING: z Never open the cover with the power cord attached or power applied. Removing and Replacing a Hard Disk Drive 5 - 10 minutes Before You Begin Observe the following requirements before touching any media ...damage the electronic components inside the computer. z Avoid touching sharp edges inside the computer. Discharge static electricity by disconnecting the power cord from the back of the computer. 4 Unplug all attached cables from the back of the computer before removing and replacing ...
... Removing and Replacing a Hard Disk Drive Tools Needed z Torx or flat screwdriver - WARNING: z Never open the cover with the power cord attached or power applied. Removing and Replacing a Hard Disk Drive 5 - 10 minutes Before You Begin Observe the following requirements before touching any media ...damage the electronic components inside the computer. z Avoid touching sharp edges inside the computer. Discharge static electricity by disconnecting the power cord from the back of the computer. 4 Unplug all attached cables from the back of the computer before removing and replacing ...

Upgrading and Servicing Guide
Page 17
4 Align the wheels on each side of the top of the hard disk drive cage with the slots in the hard disk drive bay, and insert the hard disk drive. 7 Slide the left cover into place. 5 Press down on the hard disk cage handle to snap it into place. 8 Replace the left cover screw. 6 Tighten the captive screw on the hard disk drive cage. 9 Reconnect any cables that were disconnected for this procedure. 10 Plug the power cord into the back of the computer and then into the power source. 584963-001 - Removing and Replacing a Hard Disk Drive 15
4 Align the wheels on each side of the top of the hard disk drive cage with the slots in the hard disk drive bay, and insert the hard disk drive. 7 Slide the left cover into place. 5 Press down on the hard disk cage handle to snap it into place. 8 Replace the left cover screw. 6 Tighten the captive screw on the hard disk drive cage. 9 Reconnect any cables that were disconnected for this procedure. 10 Plug the power cord into the back of the computer and then into the power source. 584963-001 - Removing and Replacing a Hard Disk Drive 15
Upgrading and Servicing Guide
Page 20
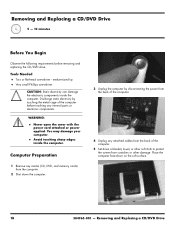
... any attached cables from the back of the computer before removing and replacing the CD/DVD drive. WARNING: z Never open the cover with the power cord attached or power applied. Place the computer face-down the computer. 3 Unplug the computer by touching the metal cage of the computer. 5 Set down a blanket, towel, or...
... any attached cables from the back of the computer before removing and replacing the CD/DVD drive. WARNING: z Never open the cover with the power cord attached or power applied. Place the computer face-down the computer. 3 Unplug the computer by touching the metal cage of the computer. 5 Set down a blanket, towel, or...

Upgrading and Servicing Guide
Page 24
Removing and Replacing a CD/DVD Drive 6 Slide the left cover into place. 8 Reconnect any cables that were disconnected for this procedure. 9 Plug the power cord into the back of the computer and then into the power source. 7 Replace the left cover screw. 10 Return the computer to the upright position and turn on the computer. 22 584963-001 -
Removing and Replacing a CD/DVD Drive 6 Slide the left cover into place. 8 Reconnect any cables that were disconnected for this procedure. 9 Plug the power cord into the back of the computer and then into the power source. 7 Replace the left cover screw. 10 Return the computer to the upright position and turn on the computer. 22 584963-001 -
HP VESA Adapter Assembly Installation Guide
Page 1
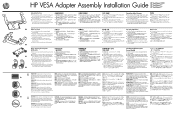
...recommended) !! WARNING! Failure to cool before removing the memory cover or back cover. CAUTION: The TouchSmart PC is designed to be sure to disconnect the power cord from the wall outlet, and allow the internal system components to do so before you open the ... facedown !! Shut down the computer using the operating system. 3. WARNING! When lifting, take proper precautions. HP VESA Adapter Assembly Installation Guide Included in personal injury or equipment damage. Always disconnect the TouchSmart computer from scratches or other soft cloth to lift and move the computer) !!
...recommended) !! WARNING! Failure to cool before removing the memory cover or back cover. CAUTION: The TouchSmart PC is designed to be sure to disconnect the power cord from the wall outlet, and allow the internal system components to do so before you open the ... facedown !! Shut down the computer using the operating system. 3. WARNING! When lifting, take proper precautions. HP VESA Adapter Assembly Installation Guide Included in personal injury or equipment damage. Always disconnect the TouchSmart computer from scratches or other soft cloth to lift and move the computer) !!

User Guide
Page 8
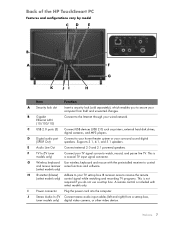
Use to control some features of the touch screen. Use to power source. Use with Windows Media Center and some functions and software, instead of the computer to clean the touch screen. Cables and accessories What's in ... Guide (Features may vary by model) Use to connect computer to control a set up your computer and navigate its features. Also included in the box Power cord Keyboard and mouse (wireless option shown with receiver) Cleaning cloth Setup poster and documentation Computers with TV tuners Infrared (IR) emitter cable Remote control Computers...
Use to control some features of the touch screen. Use to power source. Use with Windows Media Center and some functions and software, instead of the computer to clean the touch screen. Cables and accessories What's in ... Guide (Features may vary by model) Use to connect computer to control a set up your computer and navigate its features. Also included in the box Power cord Keyboard and mouse (wireless option shown with receiver) Cleaning cloth Setup poster and documentation Computers with TV tuners Infrared (IR) emitter cable Remote control Computers...

User Guide
Page 13
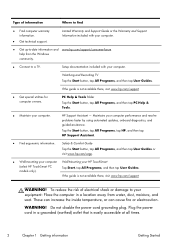
...such as printers, external hard disk drives, digital cameras, and MP3 players. E Audio Line Out Connect external 2.0 and 2.1 powered speakers. I Power connector Plug the power cord into the computer. J Stereo Audio In (TV Connect stereo audio input cables (left and right) from theft and unwanted changes.... This is a coaxial TV input signal connector. G Wireless keyboard Use wireless keyboard and mouse with select models only. Back of the HP TouchSmart PC Features and configurations vary by model CD E B A F G K JI H Item Function A Security lock slot Insert a security...
...such as printers, external hard disk drives, digital cameras, and MP3 players. E Audio Line Out Connect external 2.0 and 2.1 powered speakers. I Power connector Plug the power cord into the computer. J Stereo Audio In (TV Connect stereo audio input cables (left and right) from theft and unwanted changes.... This is a coaxial TV input signal connector. G Wireless keyboard Use wireless keyboard and mouse with select models only. Back of the HP TouchSmart PC Features and configurations vary by model CD E B A F G K JI H Item Function A Security lock slot Insert a security...

User Guide
Page 15
Welcome 9 Plug the power cord into the back of the computer are routed through a surge protector/uninterruptible power supply (UPS). Cable Management The HP TouchSmart PC includes an easy-to-use cable-management feature; all cables connected at the back of the computer. Connecting the Power Source Route the power cord through the opening in the computer stand and plug the power cord directly into an AC power source through the opening in the computer stand.
Welcome 9 Plug the power cord into the back of the computer are routed through a surge protector/uninterruptible power supply (UPS). Cable Management The HP TouchSmart PC includes an easy-to-use cable-management feature; all cables connected at the back of the computer. Connecting the Power Source Route the power cord through the opening in the computer stand and plug the power cord directly into an AC power source through the opening in the computer stand.

User Guide
Page 31
...balanced comfortably over your work habits for important ergonomic information: visit www.hp.com/ergo on the screen; If you feel discomfort in your HP TouchSmart PC. Tap the Start button, and then tap Shut Down. 2 Disconnect the power cord from the wall. 3 Spray a small amount of ways to ...clean the touch screen. Using the HP TouchSmart with your shoulders relaxed while you touch the screen...
...balanced comfortably over your work habits for important ergonomic information: visit www.hp.com/ergo on the screen; If you feel discomfort in your HP TouchSmart PC. Tap the Start button, and then tap Shut Down. 2 Disconnect the power cord from the wall. 3 Spray a small amount of ways to ...clean the touch screen. Using the HP TouchSmart with your shoulders relaxed while you touch the screen...

User Guide
Page 66
HP TouchSmart cleaning the touch screen 25 finding information vi navigating 27 opening 27 start button 5 updating the computer software 44 using the software 27 what is ... photos 34 slideshows 33 playlists creating 36 video 39 power adapter connector 7 power cord 9 power settings 14 Power, LED 8 Power/Sleep button 5 powered speakers, connecting 20 R receiver, wireless keyboard and mouse 8 Recipe Box tile 43 Recovery Manager 52 reinstall a software program 52 remote control IR receiver LED 8 using with HP TouchSmart 47 repairing software 51 repetitive strain injury (RSI...
HP TouchSmart cleaning the touch screen 25 finding information vi navigating 27 opening 27 start button 5 updating the computer software 44 using the software 27 what is ... photos 34 slideshows 33 playlists creating 36 video 39 power adapter connector 7 power cord 9 power settings 14 Power, LED 8 Power/Sleep button 5 powered speakers, connecting 20 R receiver, wireless keyboard and mouse 8 Recipe Box tile 43 Recovery Manager 52 reinstall a software program 52 remote control IR receiver LED 8 using with HP TouchSmart 47 repairing software 51 repetitive strain injury (RSI...

User Guide (European English Only)
Page 8
Use to adapt the computer for separate wall-mounting hardware (not included). Also included in the box Power cord Keyboard and mouse (wireless option shown with receiver) Cleaning cloth Setup poster and documentation Computers with TV tuners Infrared (IR) emitter cable Remote control Computers ... navigate its features. Use to clean the touch screen. Use with Windows Media Center and some functions and software, instead of using touch. Use to power source. Cables and accessories What's in select models without TV tuners.
Use to adapt the computer for separate wall-mounting hardware (not included). Also included in the box Power cord Keyboard and mouse (wireless option shown with receiver) Cleaning cloth Setup poster and documentation Computers with TV tuners Infrared (IR) emitter cable Remote control Computers ... navigate its features. Use to clean the touch screen. Use with Windows Media Center and some functions and software, instead of using touch. Use to power source. Cables and accessories What's in select models without TV tuners.
User Guide (European English Only)
Page 13
...IR emitter (blaster) Adhere to your TV set-top box IR receiver area to secure your computer from a set -top box. I Power connector Plug the power cord into the computer. J Stereo Audio In (TV Connect stereo audio input cables (left and right) from theft and unwanted changes. C ... only) Connect your TV signal source to your home theater system or your wired network. Welcome 7 Supports 3.1, 4.1, and 5.1 speakers. Back of the HP TouchSmart PC Features and configurations vary by model CD E B A F G K JI H Item Function A Security lock slot Insert a security lock (sold ...
...IR emitter (blaster) Adhere to your TV set-top box IR receiver area to secure your computer from a set -top box. I Power connector Plug the power cord into the computer. J Stereo Audio In (TV Connect stereo audio input cables (left and right) from theft and unwanted changes. C ... only) Connect your TV signal source to your home theater system or your wired network. Welcome 7 Supports 3.1, 4.1, and 5.1 speakers. Back of the HP TouchSmart PC Features and configurations vary by model CD E B A F G K JI H Item Function A Security lock slot Insert a security lock (sold ...

User Guide (European English Only)
Page 15
Connecting the Power Source Route the power cord through the opening in the computer stand and plug the power cord directly into an AC power source through the opening in the computer stand. all cables connected at the back of the computer. Welcome 9 Cable Management The HP TouchSmart PC includes an easy-to-use cable-management feature; Plug the power cord into the back of the computer are routed through a surge protector/uninterruptible power supply (UPS).
Connecting the Power Source Route the power cord through the opening in the computer stand and plug the power cord directly into an AC power source through the opening in the computer stand. all cables connected at the back of the computer. Welcome 9 Cable Management The HP TouchSmart PC includes an easy-to-use cable-management feature; Plug the power cord into the back of the computer are routed through a surge protector/uninterruptible power supply (UPS).

User Guide (European English Only)
Page 31
... Before you could hinder the touch recognition of the touch screen. Tap the Start button, and then tap Shut Down. 2 Disconnect the power cord from the screen. therefore, the monitor should be used for computer users. You can be placed so that came with a typical household ... a mild glass cleaner onto the cleaning cloth that could lose data while cleaning it by tilting the monitor. For optimal touch performance, the HP TouchSmart PC screen requires periodic cleaning to minimize glare from the wall. 3 Spray a small amount of the screen, because this is not turned...
... Before you could hinder the touch recognition of the touch screen. Tap the Start button, and then tap Shut Down. 2 Disconnect the power cord from the screen. therefore, the monitor should be used for computer users. You can be placed so that came with a typical household ... a mild glass cleaner onto the cleaning cloth that could lose data while cleaning it by tilting the monitor. For optimal touch performance, the HP TouchSmart PC screen requires periodic cleaning to minimize glare from the wall. 3 Spray a small amount of the screen, because this is not turned...

User Guide (European English Only)
Page 66
HP TouchSmart cleaning the touch screen 25 finding information vi navigating 27 opening 27 start button 5 updating the computer software 44 using the software 27 what is ... photos 34 slideshows 33 playlists creating 36 video 39 power adapter connector 7 power cord 9 power settings 14 Power, LED 8 Power/Sleep button 5 powered speakers, connecting 20 R receiver, wireless keyboard and mouse 8 Recipe Box tile 43 Recovery Manager 52 reinstall a software program 52 remote control IR receiver LED 8 using with HP TouchSmart 47 repairing software 51 repetitive strain injury (RSI...
HP TouchSmart cleaning the touch screen 25 finding information vi navigating 27 opening 27 start button 5 updating the computer software 44 using the software 27 what is ... photos 34 slideshows 33 playlists creating 36 video 39 power adapter connector 7 power cord 9 power settings 14 Power, LED 8 Power/Sleep button 5 powered speakers, connecting 20 R receiver, wireless keyboard and mouse 8 Recipe Box tile 43 Recovery Manager 52 reinstall a software program 52 remote control IR receiver LED 8 using with HP TouchSmart 47 repairing software 51 repetitive strain injury (RSI...
Getting Started Guide
Page 6
... at all times. 2 Chapter 1 Getting information Getting Started These can increase the inside temperature, or can cause fire or electrocution. Maintains your HP TouchSmart (select HP TouchSmart PC models only). Plug the power cord in a location away from the Windows community. ● Connect to find ● Find computer warranty information. ● Get technical support. Tap the...
... at all times. 2 Chapter 1 Getting information Getting Started These can increase the inside temperature, or can cause fire or electrocution. Maintains your HP TouchSmart (select HP TouchSmart PC models only). Plug the power cord in a location away from the Windows community. ● Connect to find ● Find computer warranty information. ● Get technical support. Tap the...


