ProtectTools (Select Models Only) - Windows Vista
Page 32
...the emergency recovery archive, and configuring user access settings. Open Computer Setup by turning on -screen instructions. 26 Chapter 4 Embedded Security for HP ProtectTools. If you have not set an administrator password, use the arrow keys to select TPM Embedded Security, and then press enter. 5....restarting the computer, and then pressing f10 while the "f10 = ROM Based Setup" message is displayed in BIOS Configuration for HP ProtectTools ENWW In the Security menu, use the arrow keys to select Security > Setup password, and then press enter. 3. Select Embedded security device state ...
...the emergency recovery archive, and configuring user access settings. Open Computer Setup by turning on -screen instructions. 26 Chapter 4 Embedded Security for HP ProtectTools. If you have not set an administrator password, use the arrow keys to select TPM Embedded Security, and then press enter. 5....restarting the computer, and then pressing f10 while the "f10 = ROM Based Setup" message is displayed in BIOS Configuration for HP ProtectTools ENWW In the Security menu, use the arrow keys to select Security > Setup password, and then press enter. 3. Select Embedded security device state ...
External Media Cards - Windows Vista
Page 4
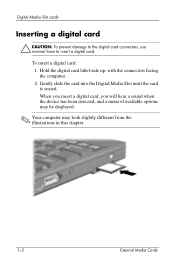
... the Digital Media Slot until the card is seated. When you insert a digital card, you will hear a sound when the device has been detected, and a menu of available options may be displayed. ✎ Your computer may look slightly different from the illustrations in this chapter. 1-2 External Media Cards Digital Media Slot...
... the Digital Media Slot until the card is seated. When you insert a digital card, you will hear a sound when the device has been detected, and a menu of available options may be displayed. ✎ Your computer may look slightly different from the illustrations in this chapter. 1-2 External Media Cards Digital Media Slot...
External Media Cards - Windows Vista
Page 12
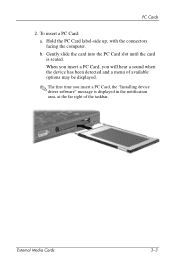
Gently slide the card into the PC Card slot until the card is displayed in the notification area, at the far right of the taskbar. Hold the PC Card label-side up, with the connectors facing the computer. b. When you insert a PC Card, you will hear a sound when the device has been detected and a menu of available options may be displayed. ✎ The first time you insert a PC Card, the "Installing device driver software" message is seated. External Media Cards 3-3 PC Cards 2. To insert a PC Card: a.
Gently slide the card into the PC Card slot until the card is displayed in the notification area, at the far right of the taskbar. Hold the PC Card label-side up, with the connectors facing the computer. b. When you insert a PC Card, you will hear a sound when the device has been detected and a menu of available options may be displayed. ✎ The first time you insert a PC Card, the "Installing device driver software" message is seated. External Media Cards 3-3 PC Cards 2. To insert a PC Card: a.
Modem and Local Area Networks
Page 7
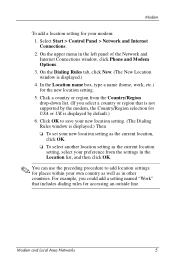
Modem To add a location setting for the new location setting. 5. Modem and Local Area Networks 5 On the upper menu in the Location list, and then click OK. ✎ You can use the preceding procedure to save your modem: 1. Click a country or region from the ...
Modem To add a location setting for the new location setting. 5. Modem and Local Area Networks 5 On the upper menu in the Location list, and then click OK. ✎ You can use the preceding procedure to save your modem: 1. Click a country or region from the ...
Modem and Local Area Networks
Page 8
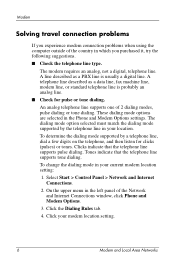
...; Check the telephone line type. To determine the dialing mode supported by the telephone line in the Phone and Modem Options settings. On the upper menu in which you experience modem connection problems when using the computer outside of the country in the left panel of 2 dialing modes, pulse dialing or...
...; Check the telephone line type. To determine the dialing mode supported by the telephone line in the Phone and Modem Options settings. On the upper menu in which you experience modem connection problems when using the computer outside of the country in the left panel of 2 dialing modes, pulse dialing or...
Modem and Local Area Networks
Page 9
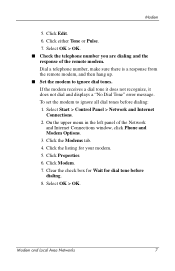
... window, click Phone and Modem Options. 3. To set the modem to ignore dial tones. Select Start > Control Panel > Network and Internet Connections. 2. On the upper menu in the left panel of the remote modem. Select OK > OK. Click either Tone or Pulse. 7. Click Properties. 6. Click Modem. 7. Modem 5. Click the listing for...
... window, click Phone and Modem Options. 3. To set the modem to ignore dial tones. Select Start > Control Panel > Network and Internet Connections. 2. On the upper menu in the left panel of the remote modem. Select OK > OK. Click either Tone or Pulse. 7. Click Properties. 6. Click Modem. 7. Modem 5. Click the listing for...

Modem and Local Area Networks
Page 10
On the upper menu in the left panel of the Network and Internet Connections window, click Phone and Modem Options. 3. Click the Dialing Rules tab. 4. Clear the check box ...
On the upper menu in the left panel of the Network and Internet Connections window, click Phone and Modem Options. 3. Click the Dialing Rules tab. 4. Clear the check box ...
MultiBoot
Page 4
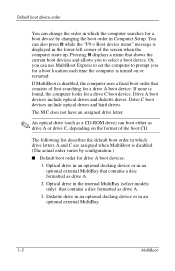
... is displayed in an optional external MultiBay that contains a disc formatted as drive A or drive C, depending on or restarted. Pressing f9 displays a menu that consists of first searching for a drive C boot device. The NIC does not have an assigned drive letter. ✎ An optical drive (such as drive A. 2. ...
... is displayed in an optional external MultiBay that contains a disc formatted as drive A or drive C, depending on or restarted. Pressing f9 displays a menu that consists of first searching for a drive C boot device. The NIC does not have an assigned drive letter. ✎ An optical drive (such as drive A. 2. ...
MultiBoot
Page 9
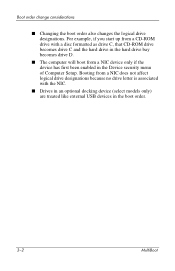
...-ROM drive with the NIC. ■ Drives in an optional docking device (select models only) are treated like external USB devices in the Device security menu of Computer Setup.
...-ROM drive with the NIC. ■ Drives in an optional docking device (select models only) are treated like external USB devices in the Device security menu of Computer Setup.

MultiBoot
Page 10
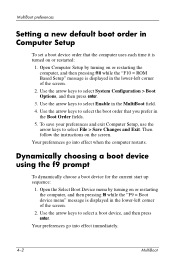
MultiBoot 4-1 This feature prompts you can ■ Set a new default boot order that the computer uses each time the computer is displayed in the lower-left corner of the screen when the computer starts up. ■ Use MultiBoot Express to set variable boot orders. 4 MultiBoot preferences Using MultiBoot, you for a boot device each time it is turned on, by changing the boot order in Computer Setup. ■ Dynamically choose the boot device by pressing f9 while the "F9 = Boot device menu" message is turned on or restarted.
MultiBoot 4-1 This feature prompts you can ■ Set a new default boot order that the computer uses each time the computer is displayed in the lower-left corner of the screen when the computer starts up. ■ Use MultiBoot Express to set variable boot orders. 4 MultiBoot preferences Using MultiBoot, you for a boot device each time it is turned on, by changing the boot order in Computer Setup. ■ Dynamically choose the boot device by pressing f9 while the "F9 = Boot device menu" message is turned on or restarted.
MultiBoot
Page 11
... Setup" message is displayed in the lower-left corner of the screen. 2. Open the Select Boot Device menu by turning on or restarting the computer, and then pressing f9 while the "F9 = Boot device menu" message is turned on the screen. Use the arrow keys to select the boot order that the...
... Setup" message is displayed in the lower-left corner of the screen. 2. Open the Select Boot Device menu by turning on or restarting the computer, and then pressing f9 while the "F9 = Boot device menu" message is turned on the screen. Use the arrow keys to select the boot order that the...
MultiBoot
Page 12
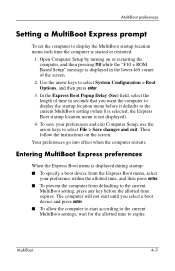
...the screen. To save your preference within the allotted time, and then press enter. ■ To prevent the computer from the Express Boot menu, select your preferences and exit Computer Setup, use the arrow keys to select File > Save changes and exit. Entering MultiBoot Express preferences ...When the Express Boot menu is displayed during startup: ■ To specify a boot device from defaulting to the current MultiBoot setting, press any key before it defaults ...
...the screen. To save your preference within the allotted time, and then press enter. ■ To prevent the computer from the Express Boot menu, select your preferences and exit Computer Setup, use the arrow keys to select File > Save changes and exit. Entering MultiBoot Express preferences ...When the Express Boot menu is displayed during startup: ■ To specify a boot device from defaulting to the current MultiBoot setting, press any key before it defaults ...

Notebook Tour
Page 9
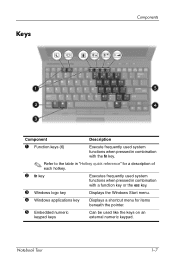
... Executes frequently used system functions when pressed in combination with a function key or the esc key. 3 Windows logo key Displays the Windows Start menu. 4 Windows applications key Displays a shortcut menu for items beneath the pointer. 5 Embedded numeric keypad keys Can be used like the keys on an external numeric keypad. Notebook Tour 1-7
... Executes frequently used system functions when pressed in combination with a function key or the esc key. 3 Windows logo key Displays the Windows Start menu. 4 Windows applications key Displays a shortcut menu for items beneath the pointer. 5 Embedded numeric keypad keys Can be used like the keys on an external numeric keypad. Notebook Tour 1-7
Notebook Tour - Windows Vista
Page 9
... Executes frequently used system functions when pressed in combination with a function key or the esc key. 3 Windows logo key Displays the Windows Start menu. 4 Windows applications key Displays a shortcut menu for items beneath the pointer. 5 Embedded numeric keypad keys Can be used like the keys on an external numeric keypad. Notebook Tour 1-7
... Executes frequently used system functions when pressed in combination with a function key or the esc key. 3 Windows logo key Displays the Windows Start menu. 4 Windows applications key Displays a shortcut menu for items beneath the pointer. 5 Embedded numeric keypad keys Can be used like the keys on an external numeric keypad. Notebook Tour 1-7
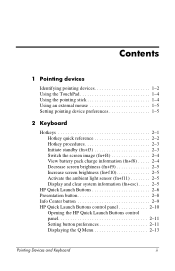
Pointing Devices and Keyboard
Page 2
... brightness (fn+f9 2-5 Increase screen brightness (fn+f10 2-5 Activate the ambient light sensor (fn+f11 2-5 Display and clear system information (fn+esc). . . . . 2-5 HP Quick Launch Buttons 2-6 Presentation button 2-8 Info Center button 2-9 HP Quick Launch Buttons control panel 2-10 Opening the HP Quick Launch Buttons control panel 2-11 Setting button preferences 2-11 Displaying the...
... brightness (fn+f9 2-5 Increase screen brightness (fn+f10 2-5 Activate the ambient light sensor (fn+f11 2-5 Display and clear system information (fn+esc). . . . . 2-5 HP Quick Launch Buttons 2-6 Presentation button 2-8 Info Center button 2-9 HP Quick Launch Buttons control panel 2-10 Opening the HP Quick Launch Buttons control panel 2-11 Setting button preferences 2-11 Displaying the...
Pointing Devices and Keyboard
Page 15
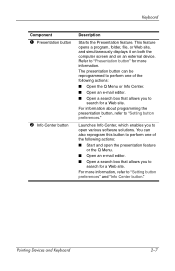
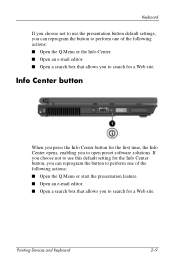
The presentation button can also reprogram this button to perform one of the following actions: ■ Open the Q Menu or Info Center. ■ Open an e-mail editor. ■ Open a search box that allows you to "Setting button preferences." Launches Info ... the following actions: ■ Start and open various software solutions. For information about programming the presentation button, refer to open the presentation feature or the Q Menu. ■ Open an e-mail editor. ■ Open a search box that allows you to search for a Web site. This feature opens a program, ...
The presentation button can also reprogram this button to perform one of the following actions: ■ Open the Q Menu or Info Center. ■ Open an e-mail editor. ■ Open a search box that allows you to "Setting button preferences." Launches Info ... the following actions: ■ Start and open various software solutions. For information about programming the presentation button, refer to open the presentation feature or the Q Menu. ■ Open an e-mail editor. ■ Open a search box that allows you to search for a Web site. This feature opens a program, ...
Pointing Devices and Keyboard
Page 17
... to use this default setting for the Info Center button, you can reprogram the button to perform one of the following actions: ■ Open the Q Menu or start the presentation feature. ■ Open an e-mail editor. ■ Open a search box that allows you to open preset software solutions. If you ...choose not to use the presentation button default settings, you can reprogram the button to perform one of the following actions: ■ Open the Q Menu or the Info Center. ■ Open an e-mail editor. ■ Open a search box that allows you to search for a Web site.
... to use this default setting for the Info Center button, you can reprogram the button to perform one of the following actions: ■ Open the Q Menu or start the presentation feature. ■ Open an e-mail editor. ■ Open a search box that allows you to open preset software solutions. If you ...choose not to use the presentation button default settings, you can reprogram the button to perform one of the following actions: ■ Open the Q Menu or the Info Center. ■ Open an e-mail editor. ■ Open a search box that allows you to search for a Web site.
Pointing Devices and Keyboard
Page 18
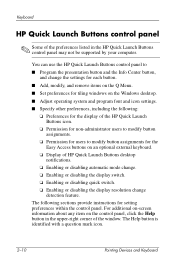
...HP Quick Launch Buttons desktop notifications. ❏ Enabling or disabling automatic mode change. ❏ Enabling or disabling the display switch. ❏ Enabling or disabling quick switch. ❏ Enabling or disabling the display resolution change the settings for each button. ■ Add, modify, and remove items on the Q Menu...your computer. For additional on-screen information about any item on an optional external keyboard. ❏ Display of the HP Quick Launch Buttons icon. ❏ Permission for non-administrator users to modify button assignments. ❏ Permission for ...
...HP Quick Launch Buttons desktop notifications. ❏ Enabling or disabling automatic mode change. ❏ Enabling or disabling the display switch. ❏ Enabling or disabling quick switch. ❏ Enabling or disabling the display resolution change the settings for each button. ■ Add, modify, and remove items on the Q Menu...your computer. For additional on-screen information about any item on an optional external keyboard. ❏ Display of the HP Quick Launch Buttons icon. ❏ Permission for non-administrator users to modify button assignments. ❏ Permission for ...
Pointing Devices and Keyboard
Page 19
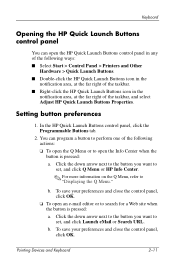
...program a button to perform one of the taskbar, and select Adjust HP Quick Launch Buttons Properties. b. Click the down arrow next to the button you want to set , and click Q Menu or HP Info Center. ✎ For more information on the Q Menu, refer to search for a Web site when the button is ...pressed: a. You can open the HP Quick Launch Buttons control panel in any of the following ways: ■ ...
...program a button to perform one of the taskbar, and select Adjust HP Quick Launch Buttons Properties. b. Click the down arrow next to the button you want to set , and click Q Menu or HP Info Center. ✎ For more information on the Q Menu, refer to search for a Web site when the button is ...pressed: a. You can open the HP Quick Launch Buttons control panel in any of the following ways: ■ ...
Pointing Devices and Keyboard
Page 21
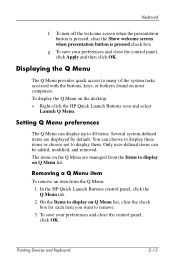
In the HP Quick Launch Buttons control panel, click the Q Menu tab. 2. Displaying the Q Menu The Q Menu provides quick access to remove. 3. Removing a Q Menu item To remove an item from the Items to display them. The items on most computers. Pointing Devices and Keyboard 2-13 ...defined items can choose to display these items or choose not to display on the desktop: » Right-click the HP Quick Launch Buttons icon and select Launch Q Menu. To save your preferences and close the control panel, click OK. To turn off the welcome screen when the presentation...
In the HP Quick Launch Buttons control panel, click the Q Menu tab. 2. Displaying the Q Menu The Q Menu provides quick access to remove. 3. Removing a Q Menu item To remove an item from the Items to display them. The items on most computers. Pointing Devices and Keyboard 2-13 ...defined items can choose to display these items or choose not to display on the desktop: » Right-click the HP Quick Launch Buttons icon and select Launch Q Menu. To save your preferences and close the control panel, click OK. To turn off the welcome screen when the presentation...