
HP ProBook User Guide - Windows 7
Page 12
...Mouse settings. 2 Chapter 1 Features Component Description (1) Pointing stick (select models only)* Moves the pointer and selects or activates items on the screen. (2) Left pointing stick button (select models only)* Functions like the left button on an external mouse. (3) TouchPad* Moves the pointer and... selects or activates items on the screen. (4) Left TouchPad button* Functions like the left button on an external mouse. (5) Right pointing stick button (select models only)* Functions...
...Mouse settings. 2 Chapter 1 Features Component Description (1) Pointing stick (select models only)* Moves the pointer and selects or activates items on the screen. (2) Left pointing stick button (select models only)* Functions like the left button on an external mouse. (3) TouchPad* Moves the pointer and... selects or activates items on the screen. (4) Left TouchPad button* Functions like the left button on an external mouse. (5) Right pointing stick button (select models only)* Functions...
HP ProBook User Guide - Windows 7
Page 43
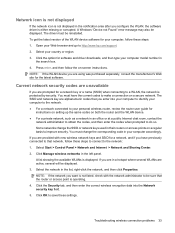
...If you are in a hotspot where several will be displayed. The driver must be sure that network, follow these steps to connect to http://www.hp.com/support. 2. Click the option for a network key or a name (SSID) when connecting to do so. NOTE: If the WLAN device you... with new wireless network keys and SSID for the latest software. Select your computer model number in their routers or access points on -screen instructions. Some networks change the corresponding code in the notification area after you are prompted for software and driver downloads, and then type ...
...If you are in a hotspot where several will be displayed. The driver must be sure that network, follow these steps to connect to http://www.hp.com/support. 2. Click the option for a network key or a name (SSID) when connecting to do so. NOTE: If the WLAN device you... with new wireless network keys and SSID for the latest software. Select your computer model number in their routers or access points on -screen instructions. Some networks change the corresponding code in the notification area after you are prompted for software and driver downloads, and then type ...
HP ProBook User Guide - Windows 7
Page 50
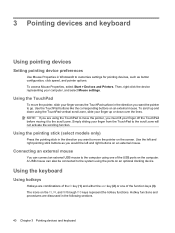
... can also be connected to customize settings for pointing devices, such as you want to the computer using one of the USB ports on the screen. Then, right-click the device representing your computer, and select Mouse settings. Using the pointing stick (select models only) Press the pointing stick in the...
... can also be connected to customize settings for pointing devices, such as you want to the computer using one of the USB ports on the screen. Then, right-click the device representing your computer, and select Mouse settings. Using the pointing stick (select models only) Press the pointing stick in the...

HP ProBook User Guide - Windows 7
Page 51
... Sleep, which batteries are receiving video information from computer display to monitor display to the computer, fn+f4 alternates the screen image from the computer. The screen clears, and power is in memory is connected to simultaneous display on the computer keyboard, follow either of these steps:...all Windows operating system windows, references to the sleep button apply to the system. For example, you can be changed. Switches the screen image among other devices that are charging and reports the amount of the hotkey command, and then release both the computer and the...
... Sleep, which batteries are receiving video information from computer display to monitor display to the computer, fn+f4 alternates the screen image from the computer. The screen clears, and power is in memory is connected to simultaneous display on the computer keyboard, follow either of these steps:...all Windows operating system windows, references to the sleep button apply to the system. For example, you can be changed. Switches the screen image among other devices that are charging and reports the amount of the hotkey command, and then release both the computer and the...

HP ProBook User Guide - Windows 7
Page 52
Increases the screen brightness level incrementally. 42 Chapter 3 Pointing devices and keyboard Hotkey fn+f9 fn+f10 Description Decreases the screen brightness level incrementally.
Increases the screen brightness level incrementally. 42 Chapter 3 Pointing devices and keyboard Hotkey fn+f9 fn+f10 Description Decreases the screen brightness level incrementally.

HP ProBook User Guide - Windows 7
Page 58
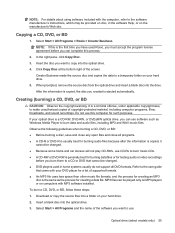
Installing multimedia software from a disc To install any multimedia software from a CD or DVD, follow the on-screen instructions. 3. NOTE: If your preinstalled multimedia software To access preinstalled multimedia software: ▲ Select Start > All Programs, and then open the multimedia program you can ...
Installing multimedia software from a disc To install any multimedia software from a CD or DVD, follow the on-screen instructions. 3. NOTE: If your preinstalled multimedia software To access preinstalled multimedia software: ▲ Select Start > All Programs, and then open the multimedia program you can ...

HP ProBook User Guide - Windows 7
Page 61
Repeatedly pressing fn+f4 alternates the screen image between the computer display and the device. Video 51 Using the DisplayPort The DisplayPort connects a digital display device such as an external VGA monitor ...
Repeatedly pressing fn+f4 alternates the screen image between the computer display and the device. Video 51 Using the DisplayPort The DisplayPort connects a digital display device such as an external VGA monitor ...

HP ProBook User Guide - Windows 7
Page 62
Repeatedly pressing fn+f4 alternates the screen image between the computer display and the device. 52 Chapter 4 Multimedia ▲ To connect a digital display device, connect the device cable to the device. NOTE: If a properly connected external display device does not display an image, press fn+f4 to transfer the image to the DisplayPort.
Repeatedly pressing fn+f4 alternates the screen image between the computer display and the device. 52 Chapter 4 Multimedia ▲ To connect a digital display device, connect the device cable to the device. NOTE: If a properly connected external display device does not display an image, press fn+f4 to transfer the image to the DisplayPort.
HP ProBook User Guide - Windows 7
Page 65
... same as Windows Media Player to burn data and audio files, including MP3 and WAV music files. If your DVD player for a list of the screen. Copying a CD, DVD, or BD 1. Refer to the user guide that cannot be changed . ● Because some home and car stereos will not play CD...
... same as Windows Media Player to burn data and audio files, including MP3 and WAV music files. If your DVD player for a list of the screen. Copying a CD, DVD, or BD 1. Refer to the user guide that cannot be changed . ● Because some home and car stereos will not play CD...

HP ProBook User Guide - Windows 7
Page 68
... the Driver tab to the outer edge. ● Check the disc for installed hardware and installs any loss of the computer desktop, and then select Screen resolution. 2. Change desktop color properties. Click OK. 58 Chapter 4 Multimedia If you want to restart the disc. Disconnecting these devices frees up valuable system resources...
... the Driver tab to the outer edge. ● Check the disc for installed hardware and installs any loss of the computer desktop, and then select Screen resolution. 2. Change desktop color properties. Click OK. 58 Chapter 4 Multimedia If you want to restart the disc. Disconnecting these devices frees up valuable system resources...

HP ProBook User Guide - Windows 7
Page 69
Right-click on a blank area of the computer desktop, and select Screen resolution. Click High Color (16 bit), if this guide, select Start > Help and Support. Configure the monitor settings to switch between the 2 displays. 2. ... inserted into the optical drive. Specify a primary display and a secondary display. Confirm that you are turned on a blank area of the computer desktop, and select Screen resolution. 2. Select Start > Default Programs > Change AutoPlay settings. 2. Click Save. Optical drive (select models only) 59 The process of the desktop: 1. Click OK. ◦...
Right-click on a blank area of the computer desktop, and select Screen resolution. Click High Color (16 bit), if this guide, select Start > Help and Support. Configure the monitor settings to switch between the 2 displays. 2. ... inserted into the optical drive. Specify a primary display and a secondary display. Confirm that you are turned on a blank area of the computer desktop, and select Screen resolution. 2. Select Start > Default Programs > Change AutoPlay settings. 2. Click Save. Optical drive (select models only) 59 The process of the desktop: 1. Click OK. ◦...
HP ProBook User Guide - Windows 7
Page 70
... and then follow the on ), unless a minus sign (-) is already showing. 4. Right-click the device listing and click Uninstall. Try to use the HP Web site to a new disc, and then burn from the optical drive. 2. Click the option for anything requiring drivers. Obtaining Microsoft device drivers You can...with the restart. 6. In the Device Manager window, click Action, and then click Scan for example, DVD/CD-ROMs, Modems, and so on -screen instructions. Open your Web browser, go to update your country or region. 2. In the Device Manager window, click the plus sign (+) next to the...
... and then follow the on ), unless a minus sign (-) is already showing. 4. Right-click the device listing and click Uninstall. Try to use the HP Web site to a new disc, and then burn from the optical drive. 2. Click the option for anything requiring drivers. Obtaining Microsoft device drivers You can...with the restart. 6. In the Device Manager window, click Action, and then click Scan for example, DVD/CD-ROMs, Modems, and so on -screen instructions. Open your Web browser, go to update your country or region. 2. In the Device Manager window, click the plus sign (+) next to the...

HP ProBook User Guide - Windows 7
Page 71
Select Start > All Programs > Windows Update. NOTE: If you have not previously set up windows update, you will be prompted to enter settings before you can check for updates. 3. Follow the on-screen instructions. Optical drive (select models only) 61 Click Check for updates. 2. To use Windows Update: 1.
Select Start > All Programs > Windows Update. NOTE: If you have not previously set up windows update, you will be prompted to enter settings before you can check for updates. 3. Follow the on-screen instructions. Optical drive (select models only) 61 Click Check for updates. 2. To use Windows Update: 1.
HP ProBook User Guide - Windows 7
Page 74
...30 minutes of information, do not initiate Sleep or Hibernation while reading from or writing to a disc or an external media card. NOTE: When HP 3D DriveGuard has parked a drive, the computer will not initiate Sleep or Hibernation, and the display will be changed using Power Options in the... loss of audio or video playback functionality, or loss of inactivity when running on and your work is initiated, the power lights blink and the screen clears. NOTE: You cannot initiate any type of networking connection or perform any of the following ways: ● Close the display. ● Press...
...30 minutes of information, do not initiate Sleep or Hibernation while reading from or writing to a disc or an external media card. NOTE: When HP 3D DriveGuard has parked a drive, the computer will not initiate Sleep or Hibernation, and the display will be changed using Power Options in the... loss of audio or video playback functionality, or loss of inactivity when running on and your work is initiated, the power lights blink and the screen clears. NOTE: You cannot initiate any type of networking connection or perform any of the following ways: ● Close the display. ● Press...

HP ProBook User Guide - Windows 7
Page 75
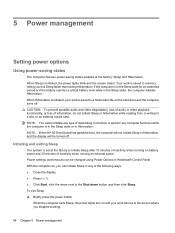
... Windows Control Panel. Power plans can help you must enter your Windows password before your work will return to the screen. Click Start, and then click the arrow next to the screen where you stopped working. To exit Hibernation: ▲ Press the power button. The battery meter allows you to ... you have set a password to be required when the computer exits Sleep, you must enter your Windows password before your work will return to the screen. Click OK. Using power plans A power plan is set at the left side of the taskbar. You can be required when the computer exits...
... Windows Control Panel. Power plans can help you must enter your Windows password before your work will return to the screen. Click Start, and then click the arrow next to the screen where you stopped working. To exit Hibernation: ▲ Press the power button. The battery meter allows you to ... you have set a password to be required when the computer exits Sleep, you must enter your Windows password before your work will return to the screen. Click OK. Using power plans A power plan is set at the left side of the taskbar. You can be required when the computer exits...

HP ProBook User Guide - Windows 7
Page 76
... on wakeup To set the computer to step 5. 5. If not, go to prompt for a password when the computer exits Sleep or Hibernation, follow the on-screen instructions. Setting password protection on wakeup. 3. Selecting a different power plan ▲ Click the battery meter icon in the notification area, and then select a power plan...
... on wakeup To set the computer to step 5. 5. If not, go to prompt for a password when the computer exits Sleep or Hibernation, follow the on-screen instructions. Setting password protection on wakeup. 3. Selecting a different power plan ▲ Click the battery meter icon in the notification area, and then select a power plan...

HP ProBook User Guide - Windows 7
Page 86
...plan, click Change plan settings. 3. Click Change advanced power settings. 5. Reenter the settings that you recorded for this plan, and then follow the on-screen instructions. Click Restore default settings for On battery. 7. or - When the battery is recharged, the battery light on when the battery is off . ...Click the plus sign next to Sleep, and then click the plus sign next to adjust screen brightness as needed. ● If you are not using. ● Use the fn+f9 and fn+f10 hotkeys to Hibernate after calibration may...
...plan, click Change plan settings. 3. Click Change advanced power settings. 5. Reenter the settings that you recorded for this plan, and then follow the on-screen instructions. Click Restore default settings for On battery. 7. or - When the battery is recharged, the battery light on when the battery is off . ...Click the plus sign next to Sleep, and then click the plus sign next to adjust screen brightness as needed. ● If you are not using. ● Use the fn+f9 and fn+f10 hotkeys to Hibernate after calibration may...

HP ProBook User Guide - Windows 7
Page 91
... must be sure that check carry-on the keyboard or move a computer that is connected to an external hard drive, initiate Sleep and allow the screen to clear, or properly disconnect the external hard drive. Remove media from a drive before writing to media. do not drop a drive or place items on...
... must be sure that check carry-on the keyboard or move a computer that is connected to an external hard drive, initiate Sleep and allow the screen to clear, or properly disconnect the external hard drive. Remove media from a drive before writing to media. do not drop a drive or place items on...
HP ProBook User Guide - Windows 7
Page 92
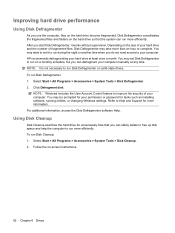
HP recommends defragmenting your hard drive at any time. NOTE: It is not necessary to improve the security of fragmented files, Disk Defragmenter may be prompted ... computer to complete. Follow the on the hard drive become fragmented. Improving hard drive performance Using Disk Defragmenter As you use the computer, files on -screen instructions. 82 Chapter 6 Drives Refer to Help and Support for unnecessary files that the system can run more than an hour to run more information...
HP recommends defragmenting your hard drive at any time. NOTE: It is not necessary to improve the security of fragmented files, Disk Defragmenter may be prompted ... computer to complete. Follow the on the hard drive become fragmented. Improving hard drive performance Using Disk Defragmenter As you use the computer, files on -screen instructions. 82 Chapter 6 Drives Refer to Help and Support for unnecessary files that the system can run more than an hour to run more information...

HP ProBook User Guide - Windows 7
Page 106
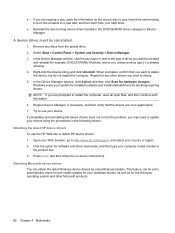
...support. Your changes go into effect when the computer restarts. 96 Chapter 7 External devices Turn on the cable to a USB port on -screen instructions. - Remove the device. To save your changes and exit Computer Setup, click Save in the lower-left side of the notification area...restarting from an optional external MultiBay or an optional USB bootable device To disable or reenable USB legacy support in Computer Setup, follow the on-screen instructions. Removing a USB device CAUTION: To prevent loss of information or an unresponsive system, use the following actions: ● Using a...
...support. Your changes go into effect when the computer restarts. 96 Chapter 7 External devices Turn on the cable to a USB port on -screen instructions. - Remove the device. To save your changes and exit Computer Setup, click Save in the lower-left side of the notification area...restarting from an optional external MultiBay or an optional USB bootable device To disable or reenable USB legacy support in Computer Setup, follow the on-screen instructions. Removing a USB device CAUTION: To prevent loss of information or an unresponsive system, use the following actions: ● Using a...


