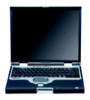
Compaq Notebook Series, Evo N1000 and Presario 1500 Maintenance and Service Guide
Page 20
... slot with support for both 32-bit CardBus and 16-bit PC Cards ■ External 65 W AC adapter with power cord ■ 8-cell Li ion battery pack ■ 40-, 30-, or 20-GB high-capacity hard drive, varying by computer model ■ 1.44-...
Compaq Notebook Series, Evo N1000 and Presario 1500 Maintenance and Service Guide
Page 25
Figure 1-3. Connects any one of the following: ■ AC adapter ■ Optional automobile power adapter/charger ■ Optional aircraft power adapter 1-20 Maintenance and Service Guide Connects stereo speakers, headphones, headset, or television audio. Rear Panel and Left Side Components Table 1-5 Rear Panel and Left Side ...
Compaq Notebook Series, Evo N1000 and Presario 1500 Maintenance and Service Guide
Page 26
... Function Vents Allow airflow to cool internal components. External keyboard/mouse connector Connects an optional full-sized keyboard or mouse. An optional splitter/adapter allows both an external keyboard and mouse to the computer. RJ-45 network jack Connects the network cable. A network cable is included ... Guide 1-21 Do not block the cooling vent. RJ-11 modem jack Connects the modem cable to an internal modem. PC Card eject button Ejects a PC Card from the PC Card slot. Avoid placing the computer on a blanket, rug, or other flexible surface that may cover the vent area....
Compaq Notebook Series, Evo N1000 and Presario 1500 Maintenance and Service Guide
Page 47
N Reseat AC adapter in computer and at power source. Y Replace power cord. External Internal or external AC adapter? Internal Go to Flowchart 2.5, No Power, Part 4. Plug directly into AC outlet. Y Power on ? Y Power LED on ? N Done Done Try different outlet. N N Power outlet active? Replace external AC adapter. Y Done Done 2-14 Maintenance and Service Guide Y Power on ? No Power, Part 3 Continued from Flowchart 2.3, No Power, Part 2. N Power on ? Troubleshooting Flowchart 2.4 -
Compaq Notebook Series, Evo N1000 and Presario 1500 Maintenance and Service Guide
Page 48
N Reseat loose components and boards and replace damaged items. Close computer and retest. Internal AC adapter 3. System board* *Replace these items as a set to prevent shorting out among components. Internal DC-DC converter* 2. N Power on? Y Done Replace the following items (if applicable). Maintenance and Service Guide 2-15 Y Loose or damaged parts? Check computer operation after each replacement: 1. Flowchart 2.5 - No Power, Part 4 Continued from Flowchart 2.4, No Power, Part 3. Processor board* 4. Troubleshooting Open computer.
Compaq Notebook Series, Evo N1000 and Presario 1500 Maintenance and Service Guide
Page 85
....0 shoulder screw ■ Phillips Metric 3.0 × 3.0 ■ Phillips Metric 2.5 × 4.0 ■ Phillips Metric 2.0 × 4.5 Common Port Replicator 285289-001 Advanced Port Replicator 288502-001 AC adapter (90 W, 3 wire, slim line) 286755-001 Power cords, 3 wire Danish International Italian 170513-081 170513-002 170513-061 Swiss U.K. English 170513-115 170513-031 170513...
Compaq Notebook Series, Evo N1000 and Presario 1500 Maintenance and Service Guide
Page 96
Removal and Replacement Procedures Section 5.16 5.17 5.18 5.19 5.20 5.21 5.22 5.23 Disassembly Sequence Chart (Continued) Description TouchPad and TouchButton Display release assembly Charger board Speaker assembly Top cover Fan System board Modem cable # of Screws Removed 4 on TouchPad models 5 on Dual Stick models 2 3 0 5 0 7 1 5.3 Preparing the Computer for Disassembly Perform the following steps before disassembling the computer: 1. Disconnect the AC adapter and all external devices. 5-4 Maintenance and Service Guide Turn off the computer. 2.
Compaq Notebook Series, Evo N1000 and Presario 1500 Maintenance and Service Guide
Page 166
Specifications Table 6-11 External AC Adapter Weight Power supply Operating watts Operating voltage Operating current Operating frequency range .85 lb .39 kg 90 W 110 to 240 VAC RMS 1.5 A RMS 50 to ...
Compaq Notebook Series, Evo N1000 and Presario 1500 Maintenance and Service Guide
Page 198
1394 jack 1-19 A AC adapter spare part numbers 3-22 specifications 6-14 Advanced Port Replicator, spare part number 3-22 audio troubleshooting 2-25 B base enclosure, spare part number 3-13 battery components bay 1-...
Compaq Notebook Series, Evo N1000 and Presario 1500 Maintenance and Service Guide
Page 203
... service considerations 4-2 speaker assembly removal 5-47 spare part number 3-13, 5-47 speaker jack location 1-20 pin assignments A-6 speakers 1-18 specifications AC adapter 6-14 battery 6-14 CD-ROM drive 6-12 CD-RW drive 6-13 diskette drive 6-9 display 6-4, 6-5, 6-6 DMA 6-15 DVD-ROM drive 6-10..., 6-11 hard drive 6-7 I/O addresses 6-17 interrupts 6-16 memory map 6-20 notebook 6-1 static shielding materials 4-7 stereo speaker jack location 1-20 pin assignments A-6 S-Video connector location 1-21 pin assignments A-3 system board removal 5-55 ...
Maintenance and Service Guide
Page 32
...or 1.4-GHz processor with 256-KB integrated L2 cache. ❏ The Presario 1500 features an Intel Mobile Pentium 4 2.4-, 2.2-, 2.0-, 1.9-, 1.8-, 1.6-, or 1.5-GHz processor with 512-KB integrated L2 cache, or an Intel Celeron 1.5- Evo Notebook N1020v and N1000v models only) ■ Network interface card (NIC) integrated...9632; Support for one Type I or II PC Card slot with support for both 32-bit CardBus and 16-bit PC Cards ■ External 65 W AC adapter with : ❏ TouchPad pointing device (Evo Notebook N1020v and N1000v and Presario 1500 models) ❏ Dual Stick (TouchPad and ...
Maintenance and Service Guide
Page 37
... Description The computer rear panel and left side components are shown in Figure 1-3 and described in microphone. Connects any one of the following: ■ AC adapter ■ Optional automobile power adapter/charger ■ Optional aircraft power adapter 1-32 Maintenance and Service Guide
Maintenance and Service Guide
Page 38
... blanket, rug, or other flexible surface that may cover the vent area. USB connectors (2) Connect USB devices. An optional splitter/adapter allows both an external keyboard and mouse to cool internal components. A network cable is included with the computer. External monitor connector ...-45 network jack Connects the network cable. Do not block the cooling vent. PC Card eject button Ejects a PC Card from the PC Card slot. PC Card slot Supports a 32-bit (CardBus) or 16-bit PC Card. Maintenance and Service Guide 1-33 S-Video connector Connects a television, VCR...
Maintenance and Service Guide
Page 59
Troubleshooting Flowchart 2.4 - Y Power LED on ? Y Power on ? Y Power on ? N Done Done Try different outlet. External Internal or external AC adapter? N Power on ? Y Done Done 2-14 Maintenance and Service Guide Y Replace power cord. N Reseat AC adapter in computer and at power source. Internal Go to Flowchart 2.5, No Power, Part 4. No Power, Part 3 Continued from Flowchart 2.3, No Power, Part 2. Plug directly into AC outlet. N N Power outlet active? Replace external AC adapter.
Maintenance and Service Guide
Page 60
N Power on? System board* *Replace these items as a set to prevent shorting out among components. Y Loose or damaged parts? Flowchart 2.5 - Troubleshooting Open computer. Internal AC adapter 3. Maintenance and Service Guide 2-15 N Reseat loose components and boards and replace damaged items. Close computer and retest. Internal DC-DC converter* 2. Y Done Replace the following items (if applicable). Processor board* 4. No Power, Part 4 Continued from Flowchart 2.4, No Power, Part 3. Check computer operation after each replacement: 1.
Maintenance and Service Guide
Page 99
....0 shoulder screw ■ Phillips Metric 3.0 × 3.0 ■ Phillips Metric 2.5 × 4.0 ■ Phillips Metric 2.0 × 4.5 Common Port Replicator 285289-001 Advanced Port Replicator 288502-001 AC adapter (90 W, 3 wire, slim line) 286755-001 Power cords, 3 wire Australian Danish International Italian Japan Korea 170513-011 170513-081 170513-002 170513-061 170513-291...
Maintenance and Service Guide
Page 110
Disconnect the AC adapter and all external devices. 5-4 Maintenance and Service Guide Removal and Replacement Procedures Section 5.16 5.17 5.18 5.19 5.20 5.21 5.22 5.23 Disassembly Sequence Chart (Continued) Description TouchPad and TouchButton Display release assembly Charger board Speaker assembly Top cover Fan System board Modem cable # of Screws Removed 4 on TouchPad models 5 on Dual Stick models 2 3 0 5 0 7 1 5.3 Preparing the Computer for Disassembly Perform the following steps before disassembling the computer: 1. Turn off the computer. 2.
Maintenance and Service Guide
Page 181
Specifications Table 6-11 External AC Adapter Weight Power supply Operating watts Operating voltage Operating current Operating frequency range .85 lb .39 kg 90 W 110 to 240 VAC RMS 1.5 A RMS 50 to ...
Maintenance and Service Guide
Page 213
1394 jack 1-32 A AC adapter spare part numbers 3-24 specifications 6-14 Advanced Port Replicator, spare part number 3-24 audio troubleshooting 2-25 B base enclosure, spare part number 3-15 battery components bay 1-...
Maintenance and Service Guide
Page 218
...5-2 service considerations 4-2 speaker assembly removal 5-48 spare part number 3-13, 5-48 speaker jack location 1-33 pin assignments A-6 speakers 1-31 specifications AC adapter 6-14 battery 6-14 CD-ROM drive 6-12 CD-RW drive 6-13 diskette drive 6-9 display 6-4, 6-5, 6-6 DMA 6-15 DVD-ROM drive 6-10..., 6-11 hard drive 6-7 I/O addresses 6-17 interrupts 6-16 memory map 6-20 notebook 6-1 static shielding materials 4-7 stereo speaker jack location 1-33 pin assignments A-6 S-Video connector location 1-34 pin assignments A-3 system board removal 5-56...