
HP USB Digital Drive
Page 2
The HP USB Digital Drive 1 is running Microsoft Windows XP Home, Windows XP Pro, or Windows 2000. You can be included. User Guide 1 However, you will need an SD memory card to operate the Digital Drive. The Digital Drive can purchase one (in various storage capacities) from any computer that is a pocket-sized SD (Secure Digital) memory drive for storing and transferring files such as digital pictures, music, video, and data. An SD memory card 2 may not be used with any HP authorized reseller.
The HP USB Digital Drive 1 is running Microsoft Windows XP Home, Windows XP Pro, or Windows 2000. You can be included. User Guide 1 However, you will need an SD memory card to operate the Digital Drive. The Digital Drive can purchase one (in various storage capacities) from any computer that is a pocket-sized SD (Secure Digital) memory drive for storing and transferring files such as digital pictures, music, video, and data. An SD memory card 2 may not be used with any HP authorized reseller.

HP USB Digital Drive
Page 112
SD Logo is subject to change without notice. The warranties for technical or editorial errors or omissions contained herein. HP shall not be liable for HP products and services are trademarks of Microsoft Corporation in the express warranty statements accompanying such products and services. User Guide HP USB Digital Drive First Edition July 2003 Microsoft and Windows are set forth in the U.S. The information contained herein is a trademark. and/or other countries. © 2003 Hewlett-Packard Development Company, L.P.
SD Logo is subject to change without notice. The warranties for technical or editorial errors or omissions contained herein. HP shall not be liable for HP products and services are trademarks of Microsoft Corporation in the express warranty statements accompanying such products and services. User Guide HP USB Digital Drive First Edition July 2003 Microsoft and Windows are set forth in the U.S. The information contained herein is a trademark. and/or other countries. © 2003 Hewlett-Packard Development Company, L.P.
Using LightScribe (Select Models Only)
Page 9
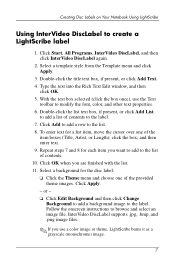
... color, and other text properties. 6. Select a background for each item you are finished with the list. 11. Type the text into the Rich Text Edit window, and then click OK. 5. Repeat steps 7 and 8 for the disc label: ❏ Click the Theme menu and choose one of the provided theme images...label. 7. Click OK when you want to add to the list of contents to add a list of contents. 10. Creating Disc Labels on Your Notebook Using LightScribe Using InterVideo DiscLabel to browse and select an image file. and then enter text. 9. With the text box selected (click the box ...
... color, and other text properties. 6. Select a background for each item you are finished with the list. 11. Type the text into the Rich Text Edit window, and then click OK. 5. Repeat steps 7 and 8 for the disc label: ❏ Click the Theme menu and choose one of the provided theme images...label. 7. Click OK when you want to add to the list of contents to add a list of contents. 10. Creating Disc Labels on Your Notebook Using LightScribe Using InterVideo DiscLabel to browse and select an image file. and then enter text. 9. With the text box selected (click the box ...
Using LightScribe (Select Models Only)
Page 12
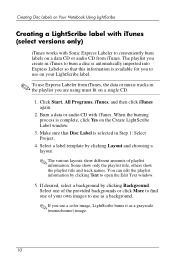
...9998; If you to burn a disc is automatically imported into Express Labeler so that Disc Label is complete, click Yes on the Create LightScribe Label window. 3. You can edit the playlist information by clicking Background. Select one of the provided backgrounds or click More to find one of playlist information.... of your LightScribe label. ✎ To use a color image, LightScribe burns it as a grayscale (monochrome) image. 10 Creating Disc Labels on Your Notebook Using LightScribe Creating a LightScribe label with iTunes (select versions only) iTunes works with iTunes.
...9998; If you to burn a disc is automatically imported into Express Labeler so that Disc Label is complete, click Yes on the Create LightScribe Label window. 3. You can edit the playlist information by clicking Background. Select one of the provided backgrounds or click More to find one of playlist information.... of your LightScribe label. ✎ To use a color image, LightScribe burns it as a grayscale (monochrome) image. 10 Creating Disc Labels on Your Notebook Using LightScribe Creating a LightScribe label with iTunes (select versions only) iTunes works with iTunes.
Hardware and Software Guide
Page 2
...Logo is subject to change without notice. Bluetooth is a trademark owned by its proprietor. Nothing herein should be liable for HP products and services are U.S. registered trademarks of its proprietor and used by Hewlett-Packard Company under license. The only warranties for.... Hardware and Software Guide HP Notebook Series First Edition March 2005 Reference Number: zv6000 Document Part Number: 375382-001 HP shall not be construed as constituting an additional warranty. © Copyright 2005 Hewlett-Packard Development Company, L.P. Microsoft and Windows are set forth in the...
...Logo is subject to change without notice. Bluetooth is a trademark owned by its proprietor. Nothing herein should be liable for HP products and services are U.S. registered trademarks of its proprietor and used by Hewlett-Packard Company under license. The only warranties for.... Hardware and Software Guide HP Notebook Series First Edition March 2005 Reference Number: zv6000 Document Part Number: 375382-001 HP shall not be construed as constituting an additional warranty. © Copyright 2005 Hewlett-Packard Development Company, L.P. Microsoft and Windows are set forth in the...
Hardware and Software Guide
Page 4
... Battery Power 2-4 Standby and Hibernation 2-5 Standby 2-5 Hibernation 2-6 Initiating Standby, Hibernation or Shutdown 2-8 Default Power Settings 2-9 Turning the Notebook or Display On or Off 2-10 Initiating or Restoring from Hibernation 2-11 Initiating or Resuming from Standby 2-12 Using Emergency Shutdown Procedures ...2-13 Power Options 2-13 Accessing the Power Options Window 2-13 Displaying the Power Meter Icon 2-14 Setting or Changing a Power Scheme 2-15 Using a Security Password 2-16 ...
... Battery Power 2-4 Standby and Hibernation 2-5 Standby 2-5 Hibernation 2-6 Initiating Standby, Hibernation or Shutdown 2-8 Default Power Settings 2-9 Turning the Notebook or Display On or Off 2-10 Initiating or Restoring from Hibernation 2-11 Initiating or Resuming from Standby 2-12 Using Emergency Shutdown Procedures ...2-13 Power Options 2-13 Accessing the Power Options Window 2-13 Displaying the Power Meter Icon 2-14 Setting or Changing a Power Scheme 2-15 Using a Security Password 2-16 ...
Hardware and Software Guide
Page 8
... 12-1 Security Preferences in the Setup Utility 12-3 QuickLock 12-3 Passwords 12-5 HP and Windows Passwords 12-5 HP and Windows Password Guidelines 12-7 HP AdministratorPasswords 12-9 Setting HP Administrator Passwords 12-10 Entering HP Administrator Passwords 12-11 Power-On Passwords 12-11 Setting Power-On Passwords 12...DriveLock Passwords 12-16 Removing DriveLock Protection 12-17 Device Security 12-18 Antivirus Software 12-19 Critical Security Updates for Windows XP 12-20 Firewall Software 12-21 Optional Security Cable 12-22 13 Setup Utility Open the Setup Utility 13-2 Setup...
... 12-1 Security Preferences in the Setup Utility 12-3 QuickLock 12-3 Passwords 12-5 HP and Windows Passwords 12-5 HP and Windows Password Guidelines 12-7 HP AdministratorPasswords 12-9 Setting HP Administrator Passwords 12-10 Entering HP Administrator Passwords 12-11 Power-On Passwords 12-11 Setting Power-On Passwords 12...DriveLock Passwords 12-16 Removing DriveLock Protection 12-17 Device Security 12-18 Antivirus Software 12-19 Critical Security Updates for Windows XP 12-20 Firewall Software 12-21 Optional Security Cable 12-22 13 Setup Utility Open the Setup Utility 13-2 Setup...

Hardware and Software Guide
Page 14
... while on. *This table describes default settings. Component ID Power Controls Component Description 1 Power button* When the notebook is ■ Off, press to turn on the notebook. ■ On, briefly press to initiate hibernation. ■ In standby, briefly press to resume from standby.... ■ In hibernation, briefly press to restore from hibernation. ✎ If the system has stopped responding and Microsoft® Windows® shutdown procedures ...
... while on. *This table describes default settings. Component ID Power Controls Component Description 1 Power button* When the notebook is ■ Off, press to turn on the notebook. ■ On, briefly press to initiate hibernation. ■ In standby, briefly press to resume from standby.... ■ In hibernation, briefly press to restore from hibernation. ✎ If the system has stopped responding and Microsoft® Windows® shutdown procedures ...

Hardware and Software Guide
Page 17
Keys Component ID Component 1 Function keys (12) 2 fn key 3 Windows logo key 4 Windows applications key 5 Embedded numeric keypad keys (15) Description Perform system and application tasks. When combined with other keys to perform system tasks. Displays the Windows Start menu. Displays a shortcut menu for items beneath the pointer. Combines with fn, the function keys perform additional tasks as hotkeys. For example, pressing fn+f7 decreases screen brightness. Can be used like the keys on an external numeric keypad. Hardware and Software Guide 1-7
Keys Component ID Component 1 Function keys (12) 2 fn key 3 Windows logo key 4 Windows applications key 5 Embedded numeric keypad keys (15) Description Perform system and application tasks. When combined with other keys to perform system tasks. Displays the Windows Start menu. Displays a shortcut menu for items beneath the pointer. Combines with fn, the function keys perform additional tasks as hotkeys. For example, pressing fn+f7 decreases screen brightness. Can be used like the keys on an external numeric keypad. Hardware and Software Guide 1-7
Hardware and Software Guide
Page 28
..." in the "Required for Setup" bag provide software that is not preinstalled on your notebook. You can install this software at any time. ■ The discs packaged in the "Save for Later" bag include recovery discs for Windows XP" in Chapter 4, "Multimedia." For information about using recovery software, refer to repair or...
..." in the "Required for Setup" bag provide software that is not preinstalled on your notebook. You can install this software at any time. ■ The discs packaged in the "Save for Later" bag include recovery discs for Windows XP" in Chapter 4, "Multimedia." For information about using recovery software, refer to repair or...
Hardware and Software Guide
Page 29
...screen, select Start > Help and Support > My HP Computer. ■ Microsoft Certificate of the notebook. Hardware and Software Guide 1-19 You may need the Product Key to the bottom of Authenticity-Contains the Microsoft® Windows® Product Key. You may need this information ...when traveling internationally. To display the information on the Service Tag on your notebook model includes one or more wireless devices, a certificate providing...
...screen, select Start > Help and Support > My HP Computer. ■ Microsoft Certificate of the notebook. Hardware and Software Guide 1-19 You may need the Product Key to the bottom of Authenticity-Contains the Microsoft® Windows® Product Key. You may need this information ...when traveling internationally. To display the information on the Service Tag on your notebook model includes one or more wireless devices, a certificate providing...
Hardware and Software Guide
Page 35
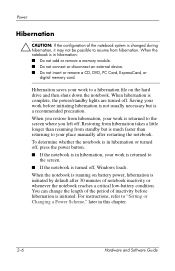
... or disconnect an external device. ■ Do not insert or remove a CD, DVD, PC Card, ExpressCard, or digital memory card. You can change the length of the period of the notebook system is changed during hibernation, it may not be possible to the screen where you restore ...recommended precaution. When hibernation is in this chapter. 2-6 Hardware and Software Guide When the notebook is complete, the power/standby lights are turned off , Windows loads. When you left off. When the notebook is returned to resume from hibernation, your work is running on the hard drive and then...
... or disconnect an external device. ■ Do not insert or remove a CD, DVD, PC Card, ExpressCard, or digital memory card. You can change the length of the period of the notebook system is changed during hibernation, it may not be possible to the screen where you restore ...recommended precaution. When hibernation is in this chapter. 2-6 Hardware and Software Guide When the notebook is complete, the power/standby lights are turned off , Windows loads. When you left off. When the notebook is returned to resume from hibernation, your work is running on the hard drive and then...

Hardware and Software Guide
Page 36
...low-battery condition, disable hibernation only during a battery pack calibration. Hardware and Software Guide 2-7 To prevent loss of the Control Panel window. To switch between category view and classic view within Control Panel: » Select Start > Control Panel. Power Hibernation is enabled... your preference in the Control Panel pane in your computer > Files, folders, and programs > Use Windows classic folders. For more information about Windows XP category view and Windows XP classic view: » Select Start > Help and Support > Customizing your user guides describe Microsoft...
...low-battery condition, disable hibernation only during a battery pack calibration. Hardware and Software Guide 2-7 To prevent loss of the Control Panel window. To switch between category view and classic view within Control Panel: » Select Start > Control Panel. Power Hibernation is enabled... your preference in the Control Panel pane in your computer > Files, folders, and programs > Use Windows classic folders. For more information about Windows XP category view and Windows XP classic view: » Select Start > Help and Support > Customizing your user guides describe Microsoft...
Hardware and Software Guide
Page 37
... amount of time a battery pack can use when you can support standby or hibernation or hold a charge varies by notebook configuration and the condition of the battery pack. Standby requires more than hibernation. To extend the life of such conditions as an electrical storm or a... pack, remove the battery pack and store it in a cool, dry location. For information about using standard Windows procedures. When You Leave Your Work If you plan to resume within 2 weeks-Shut down the notebook. If you plan to resume shortly-Initiate standby for shorter times and hibernation for longer times or...
... amount of time a battery pack can use when you can support standby or hibernation or hold a charge varies by notebook configuration and the condition of the battery pack. Standby requires more than hibernation. To extend the life of such conditions as an electrical storm or a... pack, remove the battery pack and store it in a cool, dry location. For information about using standard Windows procedures. When You Leave Your Work If you plan to resume within 2 weeks-Shut down the notebook. If you plan to resume shortly-Initiate standby for shorter times and hibernation for longer times or...

Hardware and Software Guide
Page 39
... switch, which then initiates standby. Turn off . When the notebook is turned off the display. Press the power button. ✎ Pressing the power button turns on the notebook from standby, hibernation, or shutdown. ■ Power/standby lights are unable to "Accessing the Power Options Window," later in this procedure, refer to the screen.
... switch, which then initiates standby. Turn off . When the notebook is turned off the display. Press the power button. ✎ Pressing the power button turns on the notebook from standby, hibernation, or shutdown. ■ Power/standby lights are unable to "Accessing the Power Options Window," later in this procedure, refer to the screen.

Hardware and Software Guide
Page 40
... ■ Power/standbyligh ts are turned on battery power and hibernation is enabled, the system initiates hibernation ■ After 30 minutes of notebook inactivity. ■ Whenever the battery pack reaches a critical low-battery condition. ■ Power/standby lights are turned off . ■ ... is enabled. Hardware and Software Guide 2-11 With the notebook on your network connections, the Turn Off Computer button may be initiated unless it is returned to initiate hibernation. Allow the system to the screen. *In Windows XP Professional, depending on , use either of a critical...
... ■ Power/standbyligh ts are turned on battery power and hibernation is enabled, the system initiates hibernation ■ After 30 minutes of notebook inactivity. ■ Whenever the battery pack reaches a critical low-battery condition. ■ Power/standby lights are turned off . ■ ... is enabled. Hardware and Software Guide 2-11 With the notebook on your network connections, the Turn Off Computer button may be initiated unless it is returned to initiate hibernation. Allow the system to the screen. *In Windows XP Professional, depending on , use either of a critical...

Hardware and Software Guide
Page 41
... power. ■ After 25 minutes of the display switch can be called the Shut Down button. 2-12 Hardware and Software Guide With the notebook on, use any key. ■ Briefly press the power button. ■ Press the fn+f5 hotkey. ✎ Depending on your...Initiate standby. Use any of the following procedures: ■ Press any of the following procedures: ■ Press the fn+f5 hotkey. ■ Close the notebook.* ■ In Windows XP Home, select Start > Turn Off Computer > Stand By.† ■ Power/standby lights blink. ■ Screen is cleared. No action is ...
... power. ■ After 25 minutes of the display switch can be called the Shut Down button. 2-12 Hardware and Software Guide With the notebook on, use any key. ■ Briefly press the power button. ■ Press the fn+f5 hotkey. ✎ Depending on your...Initiate standby. Use any of the following procedures: ■ Press any of the following procedures: ■ Press the fn+f5 hotkey. ■ Close the notebook.* ■ In Windows XP Home, select Start > Turn Off Computer > Stand By.† ■ Power/standby lights blink. ■ Screen is cleared. No action is ...
Hardware and Software Guide
Page 42
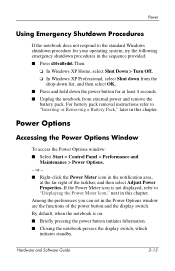
... Panel > Performance and Maintenance > Power Options. - Hardware and Software Guide 2-13 Power Using Emergency Shutdown Procedures If the notebook does not respond to the standard Windows shutdown procedure for at the far right of the power button and the display switch. If the Power Meter icon is on... least 4 seconds. ■ Unplug the notebook from external power and remove the battery pack. or - ■ Right-click the Power Meter icon in this chapter. Then ❏ In Windows XP Home, select Shut Down > Turn Off. ❏ In Windows XP Professional, select Shut down from the drop...
... Panel > Performance and Maintenance > Power Options. - Hardware and Software Guide 2-13 Power Using Emergency Shutdown Procedures If the notebook does not respond to the standard Windows shutdown procedure for at the far right of the power button and the display switch. If the Power Meter icon is on... least 4 seconds. ■ Unplug the notebook from external power and remove the battery pack. or - ■ Right-click the Power Meter icon in this chapter. Then ❏ In Windows XP Home, select Shut Down > Turn Off. ❏ In Windows XP Professional, select Shut down from the drop...

Hardware and Software Guide
Page 43
... the notification area, at the far right of the power button or the display switch: 1. For information about setting power schemes in the Power Options window, refer to "Setting or Changing a Power Scheme," later in your taskbar, the default setting may have been changed. Select OK. 2-14 Hardware and Software Guide...
... the notification area, at the far right of the power button or the display switch: 1. For information about setting power schemes in the Power Options window, refer to "Setting or Changing a Power Scheme," later in your taskbar, the default setting may have been changed. Select OK. 2-14 Hardware and Software Guide...

Hardware and Software Guide
Page 45
... Maintenance > Power Options. 2. Select the Advanced tab. 3. Select OK. For information about other passwords and security features, refer to protect your notebook is resumed from standby or restored from standby. 4. When a standby password is set, you can use to Chapter 12, "Security." 2-16... Hardware and Software Guide To set . Select the check box for Prompt for the Windows user account that you are prompted for the standby password each time the notebook is a standby password. The standby password is set a standby password prompt: 1. Power Using a...
... Maintenance > Power Options. 2. Select the Advanced tab. 3. Select OK. For information about other passwords and security features, refer to protect your notebook is resumed from standby or restored from standby. 4. When a standby password is set, you can use to Chapter 12, "Security." 2-16... Hardware and Software Guide To set . Select the check box for Prompt for the Windows user account that you are prompted for the standby password each time the notebook is a standby password. The standby password is set a standby password prompt: 1. Power Using a...


