Using LightScribe (Select Models Only)
Page 10
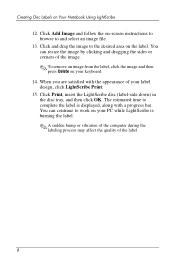
... or corners of your keyboard. 14. Click Add Image and follow the on-screen instructions to browse to work on your PC while LightScribe is displayed, along with the appearance of the image. ✎ To remove an image from the label, click the image and then press Delete on Your Notebook Using LightScribe 12.
... or corners of your keyboard. 14. Click Add Image and follow the on-screen instructions to browse to work on your PC while LightScribe is displayed, along with the appearance of the image. ✎ To remove an image from the label, click the image and then press Delete on Your Notebook Using LightScribe 12.

Hardware and Software Guide
Page 69
...f12) The following 4 media activity hotkeys can remove it from the optical drive. Stopping an Audio CD or a DVD (fn+f10) The fn+f10 hotkey stops the play of an audio CD or a DVD. The longer you can control the play of the notebook screen. Playing, Pausing, or Resuming an ...audio CD or a DVD. The longer you hold down the fn+f8 hotkey, the more information about inserting or removing a CD or DVD, refer to pause the play of the notebook screen. Keyboard Decreasing Screen Brightness (fn+f7) The fn+f7 hotkey decreases the brightness of a video CD, use the media activity...
...f12) The following 4 media activity hotkeys can remove it from the optical drive. Stopping an Audio CD or a DVD (fn+f10) The fn+f10 hotkey stops the play of an audio CD or a DVD. The longer you can control the play of the notebook screen. Playing, Pausing, or Resuming an ...audio CD or a DVD. The longer you hold down the fn+f8 hotkey, the more information about inserting or removing a CD or DVD, refer to pause the play of the notebook screen. Keyboard Decreasing Screen Brightness (fn+f7) The fn+f7 hotkey decreases the brightness of a video CD, use the media activity...

Hardware and Software Guide
Page 74
...of the music button in the Name field. To display information about the hotkey functions available on your notebook and to the music button on the remote control. 1. For example, the remote control also has... Type or copy a name or URL into the Assignment field, and then press OK. - Keyboard The button settings you select on the Quick Launch Buttons control panel are also applied to the ...❏ To remove an item from a drop-down list, use the down arrow to display the item, select Remove, and then select OK. (Default applications on a drop-down list cannot be removed.) ❏...
...of the music button in the Name field. To display information about the hotkey functions available on your notebook and to the music button on the remote control. 1. For example, the remote control also has... Type or copy a name or URL into the Assignment field, and then press OK. - Keyboard The button settings you select on the Quick Launch Buttons control panel are also applied to the ...❏ To remove an item from a drop-down list, use the down arrow to display the item, select Remove, and then select OK. (Default applications on a drop-down list cannot be removed.) ❏...

Hardware and Software Guide
Page 76
Select Auto Arrange to the notebook. Keypads The notebook has an embedded numeric keypad and supports an optional external numeric keypad or an optional external keyboard that includes a numeric keypad. Hardware and Software Guide 3-17 Right-click an open area on your Windows desktop. 2. Select Arrange... Icons By. 3. Depending on your configuration, the embedded keypad may overlap. To clear the Auto Arrange setting: 1. Keyboard If you select a very large icon display and have set your operating system to Auto Arrange the icons on your Windows desktop, the ...
Select Auto Arrange to the notebook. Keypads The notebook has an embedded numeric keypad and supports an optional external numeric keypad or an optional external keyboard that includes a numeric keypad. Hardware and Software Guide 3-17 Right-click an open area on your Windows desktop. 2. Select Arrange... Icons By. 3. Depending on your configuration, the embedded keypad may overlap. To clear the Auto Arrange setting: 1. Keyboard If you select a very large icon display and have set your operating system to Auto Arrange the icons on your Windows desktop, the ...

Hardware and Software Guide
Page 89
... Windows Media Player Microsoft Windows Media Player can be used to "Setting AutoPlay Preferences," later in Chapter 3, "Keyboard." For information about changing the way the notebook responds when you access the files on an optical disc or other than the default application, open a default ...Music Button Preferences" in this chapter. Using Windows MovieMaker Windows MovieMaker can be used to play a disc with an application other removable storage device, refer to create and edit home movies using basic drag-and-drop procedures. 4-10 Hardware and Software Guide For information...
... Windows Media Player Microsoft Windows Media Player can be used to "Setting AutoPlay Preferences," later in Chapter 3, "Keyboard." For information about changing the way the notebook responds when you access the files on an optical disc or other than the default application, open a default ...Music Button Preferences" in this chapter. Using Windows MovieMaker Windows MovieMaker can be used to play a disc with an application other removable storage device, refer to create and edit home movies using basic drag-and-drop procedures. 4-10 Hardware and Software Guide For information...

Hardware and Software Guide
Page 203
... ■ Protect your notebook, especially the display and keyboard, from external power for extended periods of time. ■ Use your notebook only on a solid, flat surface. To help maintain the performance and appearance of the notebook even when the notebook is in a carrying ...notebook will be durable. Notebook Care Ä CAUTION: To prevent possible damage to be disconnected from liquids and excessive moisture. ■ Avoid exposing your notebook to direct sunlight, extreme temperatures, or ultraviolet light for more than 2 weeks: ❏ Shut down the notebook. ❏ Remove...
... ■ Protect your notebook, especially the display and keyboard, from external power for extended periods of time. ■ Use your notebook only on a solid, flat surface. To help maintain the performance and appearance of the notebook even when the notebook is in a carrying ...notebook will be durable. Notebook Care Ä CAUTION: To prevent possible damage to be disconnected from liquids and excessive moisture. ■ Avoid exposing your notebook to direct sunlight, extreme temperatures, or ultraviolet light for more than 2 weeks: ❏ Shut down the notebook. ❏ Remove...

Hardware and Software Guide
Page 204
... vacuum cleaner. Hardware and Software Guide 15-3 Clean the keyboard regularly to prevent keys from sticking and to remove dust, lint, and particles that can permanently damage the finish of your notebook. Ä CAUTION: To prevent the deposit of your keyboard and to your notebook. Any liquid could cause permanent damage to the internal components...
... vacuum cleaner. Hardware and Software Guide 15-3 Clean the keyboard regularly to prevent keys from sticking and to remove dust, lint, and particles that can permanently damage the finish of your notebook. Ä CAUTION: To prevent the deposit of your keyboard and to your notebook. Any liquid could cause permanent damage to the internal components...
Hardware and Software Guide
Page 218
Index hibernation avoiding when using with external keyboard 3-11 HP administrator password. See passwords hub, USB 9-1 humidity specifications 17-1 I icons hotkey 3-4 multimedia 4-9 on the screen 3-15 identifying 1-7, 3-4 procedures 3-5 Quick ...open print options window 3-6 Quick Reference 3-4 switch image 3-7 hotkeys displaying functions on function keys 3-4 Power Meter 2-4, 2-14 Quick Launch Buttons 3-13 Safely Remove Hardware 6-4, 6-8 IDE drive light 1-2, 5-2 identifying components additional included hardware 1-17 bottom 1-14, 1-19 front 1-8 left-side 1-12 rear 1-9 right-side...
Index hibernation avoiding when using with external keyboard 3-11 HP administrator password. See passwords hub, USB 9-1 humidity specifications 17-1 I icons hotkey 3-4 multimedia 4-9 on the screen 3-15 identifying 1-7, 3-4 procedures 3-5 Quick ...open print options window 3-6 Quick Reference 3-4 switch image 3-7 hotkeys displaying functions on function keys 3-4 Power Meter 2-4, 2-14 Quick Launch Buttons 3-13 Safely Remove Hardware 6-4, 6-8 IDE drive light 1-2, 5-2 identifying components additional included hardware 1-17 bottom 1-14, 1-19 front 1-8 left-side 1-12 rear 1-9 right-side...


