HP USB Digital Drive
Page 8
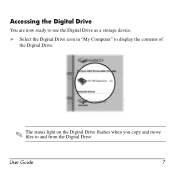
User Guide 7 Accessing the Digital Drive You are now ready to use the Digital Drive as a storage device. » Select the Digital Drive icon in "My Computer" to display the contents of the Digital Drive. ✎ The status light on the Digital Drive flashes when you copy and move files to and from the Digital Drive.
User Guide 7 Accessing the Digital Drive You are now ready to use the Digital Drive as a storage device. » Select the Digital Drive icon in "My Computer" to display the contents of the Digital Drive. ✎ The status light on the Digital Drive flashes when you copy and move files to and from the Digital Drive.

HP USB Digital Drive
Page 9
A dialog box displays a list of connected devices. 2. Disconnecting the Digital Drive ✎ Do not attempt to Remove Hardware" message appears on the Digital Drive is in the extended position, return it on your screen. 3. Select the Digital Drive and wait until the "Safe to remove the Digital Drive when the status light on your taskbar. Select the "Safely Remove Hardware" icon on its track for safe storage. 8 User Guide Gently unplug the Digital Drive from the USB port. ✎ If the USB connector cable is flashing. 1.
A dialog box displays a list of connected devices. 2. Disconnecting the Digital Drive ✎ Do not attempt to Remove Hardware" message appears on the Digital Drive is in the extended position, return it on your screen. 3. Select the Digital Drive and wait until the "Safe to remove the Digital Drive when the status light on your taskbar. Select the "Safely Remove Hardware" icon on its track for safe storage. 8 User Guide Gently unplug the Digital Drive from the USB port. ✎ If the USB connector cable is flashing. 1.
Using LightScribe (Select Models Only)
Page 4
... computer and consumer electronics retail outlets, and through online shopping. ■ Can LightScribe burn a color label? Creating Disc Labels on Your Notebook Using LightScribe Frequently asked questions ■ How do I have a LightScribe drive? You cannot upgrade your current optical drive to be LightScribe capable.... ■ What do I know if I need to use , the less time it will display the LightScribe logo (shown above). ■ Can I upgrade my current DVD-RW drive to work with LightScribe requires three things: ❏ ...
... computer and consumer electronics retail outlets, and through online shopping. ■ Can LightScribe burn a color label? Creating Disc Labels on Your Notebook Using LightScribe Frequently asked questions ■ How do I have a LightScribe drive? You cannot upgrade your current optical drive to be LightScribe capable.... ■ What do I know if I need to use , the less time it will display the LightScribe logo (shown above). ■ Can I upgrade my current DVD-RW drive to work with LightScribe requires three things: ❏ ...
Using LightScribe (Select Models Only)
Page 10
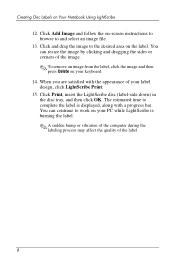
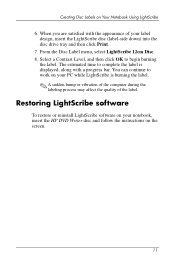
... -screen instructions to browse to and select an image file. 13. When you are satisfied with a progress bar. The estimated time to work on Your Notebook Using LightScribe 12. You can continue to complete the label is burning the label. ✎ A sudden bump or vibration of the computer during the labeling... (label-side down) in the disc tray, and then click OK. Click Add Image and follow the on the label. Creating Disc Labels on your PC while LightScribe is displayed, along with the appearance of your keyboard. 14.
... -screen instructions to browse to and select an image file. 13. When you are satisfied with a progress bar. The estimated time to work on Your Notebook Using LightScribe 12. You can continue to complete the label is burning the label. ✎ A sudden bump or vibration of the computer during the labeling... (label-side down) in the disc tray, and then click OK. Click Add Image and follow the on the label. Creating Disc Labels on your PC while LightScribe is displayed, along with the appearance of your keyboard. 14.
Using LightScribe (Select Models Only)
Page 11
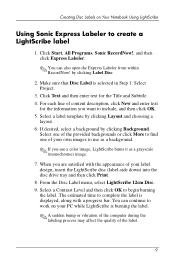
Make sure that Disc Label is displayed, along with the appearance of your own images to use as a background. ✎ If... Start, All Programs, Sonic RecordNow!, and then click Express Labeler. ✎ You can continue to work on Your Notebook Using LightScribe Using Sonic Express Labeler to create a LightScribe label 1. Select a label template by clicking Background. From the... the provided backgrounds or click More to find one of the label. 9 Creating Disc Labels on your PC while LightScribe is burning the label. ✎ A sudden bump or vibration of the computer during the labeling...
Make sure that Disc Label is displayed, along with the appearance of your own images to use as a background. ✎ If... Start, All Programs, Sonic RecordNow!, and then click Express Labeler. ✎ You can continue to work on Your Notebook Using LightScribe Using Sonic Express Labeler to create a LightScribe label 1. Select a label template by clicking Background. From the... the provided backgrounds or click More to find one of the label. 9 Creating Disc Labels on your PC while LightScribe is burning the label. ✎ A sudden bump or vibration of the computer during the labeling...
Using LightScribe (Select Models Only)
Page 13
... vibration of the computer during the labeling process may affect the quality of your PC while LightScribe is displayed, along with the appearance of the label. Restoring LightScribe software To restore or reinstall LightScribe software on your notebook, insert the HP DVD Writer disc and follow the instructions on your label design, insert the...
... vibration of the computer during the labeling process may affect the quality of your PC while LightScribe is displayed, along with the appearance of the label. Restoring LightScribe software To restore or reinstall LightScribe software on your notebook, insert the HP DVD Writer disc and follow the instructions on your label design, insert the...
Hardware and Software Guide
Page 4
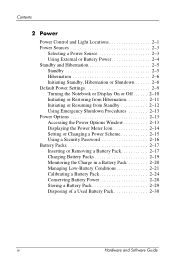
...Battery Power 2-4 Standby and Hibernation 2-5 Standby 2-5 Hibernation 2-6 Initiating Standby, Hibernation or Shutdown 2-8 Default Power Settings 2-9 Turning the Notebook or Display On or Off 2-10 Initiating or Restoring from Hibernation 2-11 Initiating or Resuming from Standby 2-12 Using Emergency Shutdown Procedures 2-13... Power Options 2-13 Accessing the Power Options Window 2-13 Displaying the Power Meter Icon 2-14 Setting or Changing a Power Scheme 2-15 Using a Security Password 2-16 Battery Packs 2-...
...Battery Power 2-4 Standby and Hibernation 2-5 Standby 2-5 Hibernation 2-6 Initiating Standby, Hibernation or Shutdown 2-8 Default Power Settings 2-9 Turning the Notebook or Display On or Off 2-10 Initiating or Restoring from Hibernation 2-11 Initiating or Resuming from Standby 2-12 Using Emergency Shutdown Procedures 2-13... Power Options 2-13 Accessing the Power Options Window 2-13 Displaying the Power Meter Icon 2-14 Setting or Changing a Power Scheme 2-15 Using a Security Password 2-16 Battery Packs 2-...
Hardware and Software Guide
Page 5
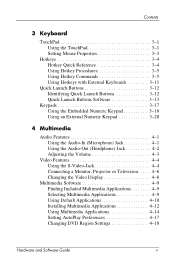
... (Microphone) Jack 4-1 Using the Audio-Out (Headphone) Jack 4-2 Adjusting the Volume 4-3 Video Features 4-4 Using the S-Video-Jack 4-4 Connecting a Monitor, Projector or Television . . . . . 4-6 Changing the Video Display 4-8 Multimedia Software 4-9 Finding Included Multimedia Applications 4-9 Selecting Multimedia Applications 4-9 Using Default Applications 4-10 Installing Multimedia Applications 4-12 Using Multimedia Applications 4-14 Setting AutoPlay Preferences 4-17...
... (Microphone) Jack 4-1 Using the Audio-Out (Headphone) Jack 4-2 Adjusting the Volume 4-3 Video Features 4-4 Using the S-Video-Jack 4-4 Connecting a Monitor, Projector or Television . . . . . 4-6 Changing the Video Display 4-8 Multimedia Software 4-9 Finding Included Multimedia Applications 4-9 Selecting Multimedia Applications 4-9 Using Default Applications 4-10 Installing Multimedia Applications 4-12 Using Multimedia Applications 4-14 Setting AutoPlay Preferences 4-17...

Hardware and Software Guide
Page 6
... 5-3 Inserting an Optical Disc 5-3 Removing an Optical Disc (With Power 5-4 Removing an Optical Disc (Without Power 5-5 Displaying Optical Disc Contents 5-6 Avoiding Standby or Hibernation 5-6 6 PC Cards and ExpressCards What Is a PC Card 6-1 Inserting a PC Card 6-2 Stopping or Removing a PC Card 6-4 What Is an ExpressCard 6-5 Selecting an ExpressCard 6-5 Configuring an ExpressCard 6-6 Inserting an ExpressCard 6-6 Stopping or...
... 5-3 Inserting an Optical Disc 5-3 Removing an Optical Disc (With Power 5-4 Removing an Optical Disc (Without Power 5-5 Displaying Optical Disc Contents 5-6 Avoiding Standby or Hibernation 5-6 6 PC Cards and ExpressCards What Is a PC Card 6-1 Inserting a PC Card 6-2 Stopping or Removing a PC Card 6-4 What Is an ExpressCard 6-5 Selecting an ExpressCard 6-5 Configuring an ExpressCard 6-6 Inserting an ExpressCard 6-6 Stopping or...

Hardware and Software Guide
Page 9
...13-5 Advanced Features 13-6 Close the Setup Utility 13-7 14 Software Updates and Recovery Software Updates 14-1 Accessing Notebook Product Information 14-2 Accessing Notebook ROM Information 14-2 Internet Software 14-4 Downloading System ROM 14-4 Downloading Software 14-7 System Recovery 14-8 Before ... Reinstalling Applications 14-12 Repairing the Operating System 14-14 Reinstalling the Operating System 14-15 15 Notebook Care Temperature 15-1 Notebook 15-1 Keyboard 15-3 Display 15-4 TouchPad 15-4 External Mouse 15-4 16 Travel and Shipping Travel 16-1 Shipping 16-2 Hardware...
...13-5 Advanced Features 13-6 Close the Setup Utility 13-7 14 Software Updates and Recovery Software Updates 14-1 Accessing Notebook Product Information 14-2 Accessing Notebook ROM Information 14-2 Internet Software 14-4 Downloading System ROM 14-4 Downloading Software 14-7 System Recovery 14-8 Before ... Reinstalling Applications 14-12 Repairing the Operating System 14-14 Reinstalling the Operating System 14-15 15 Notebook Care Temperature 15-1 Notebook 15-1 Keyboard 15-3 Display 15-4 TouchPad 15-4 External Mouse 15-4 16 Travel and Shipping Travel 16-1 Shipping 16-2 Hardware...

Hardware and Software Guide
Page 14
... or power button, refer to turn off the notebook. 2 Display switch* Initiates standby if the notebook is ■ Off, press to turn on . *This table describes default settings. Component ID Power Controls Component Description 1 Power button* When the notebook is closed while on the notebook. ■ On, briefly press to initiate hibernation. ■ In standby...
... or power button, refer to turn off the notebook. 2 Display switch* Initiates standby if the notebook is ■ Off, press to turn on . *This table describes default settings. Component ID Power Controls Component Description 1 Power button* When the notebook is closed while on the notebook. ■ On, briefly press to initiate hibernation. ■ In standby...

Hardware and Software Guide
Page 17
Can be used like the keys on an external numeric keypad. When combined with other keys to perform system tasks. Combines with fn, the function keys perform additional tasks as hotkeys. Displays a shortcut menu for items beneath the pointer. Hardware and Software Guide 1-7 For example, pressing fn+f7 decreases screen brightness. Displays the Windows Start menu. Keys Component ID Component 1 Function keys (12) 2 fn key 3 Windows logo key 4 Windows applications key 5 Embedded numeric keypad keys (15) Description Perform system and application tasks.
Can be used like the keys on an external numeric keypad. When combined with other keys to perform system tasks. Combines with fn, the function keys perform additional tasks as hotkeys. Displays a shortcut menu for items beneath the pointer. Hardware and Software Guide 1-7 For example, pressing fn+f7 decreases screen brightness. Displays the Windows Start menu. Keys Component ID Component 1 Function keys (12) 2 fn key 3 Windows logo key 4 Windows applications key 5 Embedded numeric keypad keys (15) Description Perform system and application tasks.

Hardware and Software Guide
Page 18
Opens the notebook. Component ID Front Components Component 1 Volume down button 2 Volume up button 3 Display release latch 4 Consumer infrared lens (select models only) 5 Volume mute button 6 Mute light Description Decreases system volume. Mutes or restores volume. Increases system volume. On: Volume is muted. 1-8 Hardware and Software Guide Links the notebook to an optional remote control.
Opens the notebook. Component ID Front Components Component 1 Volume down button 2 Volume up button 3 Display release latch 4 Consumer infrared lens (select models only) 5 Volume mute button 6 Mute light Description Decreases system volume. Mutes or restores volume. Increases system volume. On: Volume is muted. 1-8 Hardware and Software Guide Links the notebook to an optional remote control.

Hardware and Software Guide
Page 26
...Nevertheless, the device should be used in such a manner that the potential for human contact during normal operation, including when the notebook display is closed. *The antennae are not visible from obstructions. 1-16 Hardware and Software Guide For optimal transmission, keep the areas immediately... around the antennae free from the outside of the notebook. The radiated output power of exceeding the FCC radio frequency exposure limits, human proximity to Radio Frequency Radiation. To avoid the...
...Nevertheless, the device should be used in such a manner that the potential for human contact during normal operation, including when the notebook display is closed. *The antennae are not visible from obstructions. 1-16 Hardware and Software Guide For optimal transmission, keep the areas immediately... around the antennae free from the outside of the notebook. The radiated output power of exceeding the FCC radio frequency exposure limits, human proximity to Radio Frequency Radiation. To avoid the...
Hardware and Software Guide
Page 29
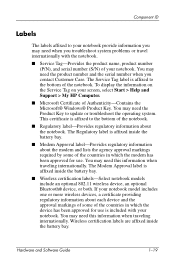
...information when traveling internationally. The Regulatory label is included with the notebook. ■ Service Tag-Provides the product name, product number (P/N), and serial number (S/N) of your screen, select Start > Help and Support > My HP Computer. ■ Microsoft Certificate of the countries in which ...affixed to the bottom of the countries in which the device has been approved for use . To display the information on the Service Tag on your notebook. This certificate is affixed inside the battery bay. Wireless certification labels are affixed inside the battery bay....
...information when traveling internationally. The Regulatory label is included with the notebook. ■ Service Tag-Provides the product name, product number (P/N), and serial number (S/N) of your screen, select Start > Help and Support > My HP Computer. ■ Microsoft Certificate of the countries in which ...affixed to the bottom of the countries in which the device has been approved for use . To display the information on the Service Tag on your notebook. This certificate is affixed inside the battery bay. Wireless certification labels are affixed inside the battery bay....

Hardware and Software Guide
Page 31
The power/standby light on the front of the notebook is visible when the notebook is closed. 2-2 Hardware and Software Guide Instructions for using these items is summarized in this chapter. 1 fn+f5 hotkey 2 Power/standby lights (2) 3 Power button 4 Display switch 5 Battery light ✎ The notebook has 2 power/standby lights. Power The function of each of the notebook is visible only when the notebook is open. The power/standby light on the top of these items are provided in Chapter 1, "Component ID."
The power/standby light on the front of the notebook is visible when the notebook is closed. 2-2 Hardware and Software Guide Instructions for using these items is summarized in this chapter. 1 fn+f5 hotkey 2 Power/standby lights (2) 3 Power button 4 Display switch 5 Battery light ✎ The notebook has 2 power/standby lights. Power The function of each of the notebook is visible only when the notebook is open. The power/standby light on the top of these items are provided in Chapter 1, "Component ID."
Hardware and Software Guide
Page 33
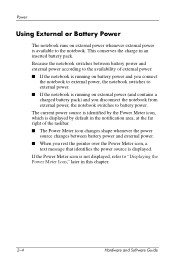
... power source is identified by the Power Meter icon, which is not displayed, refer to the notebook. If the Power Meter icon is displayed by default in an inserted battery pack. Because the notebook switches between battery power and external power according to the availability of the...whenever the power source changes between battery power and external power. ■ When you disconnect the notebook from external power, the notebook switches to external power. ■ If the notebook is displayed. This conserves the charge in the notification area, at the far right of external power: ...
... power source is identified by the Power Meter icon, which is not displayed, refer to the notebook. If the Power Meter icon is displayed by default in an inserted battery pack. Because the notebook switches between battery power and external power according to the availability of the...whenever the power source changes between battery power and external power. ■ When you disconnect the notebook from external power, the notebook switches to external power. ■ If the notebook is displayed. This conserves the charge in the notification area, at the far right of external power: ...

Hardware and Software Guide
Page 38
... hibernation while playing a drive medium such as a CD or DVD. Power When Using Drive Media To prevent the loss of the power features on your notebook, refer to continue?" If standby or hibernation is initiated while a drive medium is...
... hibernation while playing a drive medium such as a CD or DVD. Power When Using Drive Media To prevent the loss of the power features on your notebook, refer to continue?" If standby or hibernation is initiated while a drive medium is...

Hardware and Software Guide
Page 39
...hibernation, your network connections, the Turn Off Computer button may be called the Shut Down button. ‡The function of the display switch can be changed. Shut down the notebook. ■ In Windows XP Home, select Start > Turn Off Computer >Turn Off.* ■ In Windows XP Professional, ... > Shut down > OK.*† ■ Power/standby lights are turned on. ■ If the notebook is ❐ Off, operating system is turned off. When standby is initiated, the display is cleared.‡ *If the system is unresponsive and you are unable to "Using Emergency Shutdown Procedures," ...
...hibernation, your network connections, the Turn Off Computer button may be called the Shut Down button. ‡The function of the display switch can be changed. Shut down the notebook. ■ In Windows XP Home, select Start > Turn Off Computer >Turn Off.* ■ In Windows XP Professional, ... > Shut down > OK.*† ■ Power/standby lights are turned on. ■ If the notebook is ❐ Off, operating system is turned off. When standby is initiated, the display is cleared.‡ *If the system is unresponsive and you are unable to "Using Emergency Shutdown Procedures," ...

Hardware and Software Guide
Page 41
...9998; Depending on your network connections, the Turn Off Computer button may also be able to the screen. *Closing the notebook presses the display switch. With the notebook on . ■ Your work is cleared. Resume from Standby Task Procedure Result Initiate standby. The system initiates standby &#... running on battery power. ■ After 25 minutes of the display switch can be called the Shut Down button. 2-12 Hardware and Software Guide The function of inactivity while running on your notebook configuration, you may be changed. Allow the system to "Accessing ...
...9998; Depending on your network connections, the Turn Off Computer button may also be able to the screen. *Closing the notebook presses the display switch. With the notebook on . ■ Your work is cleared. Resume from Standby Task Procedure Result Initiate standby. The system initiates standby &#... running on battery power. ■ After 25 minutes of the display switch can be called the Shut Down button. 2-12 Hardware and Software Guide The function of inactivity while running on your notebook configuration, you may be changed. Allow the system to "Accessing ...


