HP Notebook Series - Maintenance, Shipping and Travel Guide
Page 5
... causes. To do a partial backup of selected files or folders, use backup devices such as diskettes. To do a complete hard drive backup, use the notebook for e-mail or to diskettes or other high-capacity backup devices. 1-2 Maintenance, Shipping and Travel You can protect the... notebook from infection by installing antivirus software. Several products available on your notebook and retrieve lost or damaged files, you should back up your files regularly to access the World ...
... causes. To do a partial backup of selected files or folders, use backup devices such as diskettes. To do a complete hard drive backup, use the notebook for e-mail or to diskettes or other high-capacity backup devices. 1-2 Maintenance, Shipping and Travel You can protect the... notebook from infection by installing antivirus software. Several products available on your notebook and retrieve lost or damaged files, you should back up your files regularly to access the World ...
HP Notebook Series - Maintenance, Shipping and Travel Guide
Page 12
... a hard drive to seat the drive. ■ Handle a drive carefully. Products with magnetic fields include airport walk-through devices and security wands. Maintaining Your Hardware Caring for Drives Drives are fragile notebook components that protects it from static electricity before handling a drive by ... To prevent loss of magnetism, which will not damage a hard drive. ■ Do not spray a drive with magnetic fields. Maintenance, Shipping and Travel 2-7 To prevent electrostatic damage to the notebook or a drive, follow these two precautions: 1) Discharge yourself from shock, ...
... a hard drive to seat the drive. ■ Handle a drive carefully. Products with magnetic fields include airport walk-through devices and security wands. Maintaining Your Hardware Caring for Drives Drives are fragile notebook components that protects it from static electricity before handling a drive by ... To prevent loss of magnetism, which will not damage a hard drive. ■ Do not spray a drive with magnetic fields. Maintenance, Shipping and Travel 2-7 To prevent electrostatic damage to the notebook or a drive, follow these two precautions: 1) Discharge yourself from shock, ...
Reference Guide
Page 4
...NOT AGREE WITH THE TERMS OF THE LICENSE AGREEMENT, YOU MUST NOW EITHER REMOVE THE SOFTWARE FROM YOUR HARD DRIVE AND DESTROY THE MASTER DISKETTES, OR RETURN THE COMPLETE HP PRODUCT AND SOFTWARE FOR A FULL REFUND. If the COA label does not correspond to your Microsoft ...may not network the software or otherwise use the software on your PC. HP Software Product License Agreement Your HP product contains software programs. CAREFULLY READ THIS LICENSE AGREEMENT BEFORE PROCEEDING TO OPERATE THIS EQUIPMENT. For a PC supplied with your screen when Microsoft Software Products are valid only if...
...NOT AGREE WITH THE TERMS OF THE LICENSE AGREEMENT, YOU MUST NOW EITHER REMOVE THE SOFTWARE FROM YOUR HARD DRIVE AND DESTROY THE MASTER DISKETTES, OR RETURN THE COMPLETE HP PRODUCT AND SOFTWARE FOR A FULL REFUND. If the COA label does not correspond to your Microsoft ...may not network the software or otherwise use the software on your PC. HP Software Product License Agreement Your HP product contains software programs. CAREFULLY READ THIS LICENSE AGREEMENT BEFORE PROCEEDING TO OPERATE THIS EQUIPMENT. For a PC supplied with your screen when Microsoft Software Products are valid only if...

Reference Guide
Page 7
... 10 Step 2: Connect AC power 11 Step 3: Connect a phone line 12 Step 4: Turn on the notebook 13 Step 5: Set up Windows 13 Basic Operation ...15 Operating Your Notebook 16 Default power settings 16 To reset the notebook 17 To change the boot device 17 To use the TouchPad 18 To use the function... 22 To insert or remove a CD or DVD 22 To play DVD movies 23 To create or copy CDs 23 Securing Your Notebook 24 To set up password protection 24 To lock your notebook 24 To attach a security cable 25 To protect against viruses 25 To lock the hard drive 26 Reference Guide vii
... 10 Step 2: Connect AC power 11 Step 3: Connect a phone line 12 Step 4: Turn on the notebook 13 Step 5: Set up Windows 13 Basic Operation ...15 Operating Your Notebook 16 Default power settings 16 To reset the notebook 17 To change the boot device 17 To use the TouchPad 18 To use the function... 22 To insert or remove a CD or DVD 22 To play DVD movies 23 To create or copy CDs 23 Securing Your Notebook 24 To set up password protection 24 To lock your notebook 24 To attach a security cable 25 To protect against viruses 25 To lock the hard drive 26 Reference Guide vii

Reference Guide
Page 8
Taking Care of Your Notebook 27 To protect your hard drive 27 To maintain your notebook 27 To safeguard your data 28 To extend the life of the display 28 To clean your notebook 28 Batteries and Power Management 29 Managing Power Consumption 30 How the notebook manages power automatically 30 Using Battery Power ... 44 To prepare for Bluetooth connections 45 To send or receive files using Bluetooth 46 Add-On Devices ...47 Connecting PC Cards 48 To insert or remove a PC Card 48 Connecting External Devices 50 To connect an audio device 50 To use an external monitor 52 To connect an...
Taking Care of Your Notebook 27 To protect your hard drive 27 To maintain your notebook 27 To safeguard your data 28 To extend the life of the display 28 To clean your notebook 28 Batteries and Power Management 29 Managing Power Consumption 30 How the notebook manages power automatically 30 Using Battery Power ... 44 To prepare for Bluetooth connections 45 To send or receive files using Bluetooth 46 Add-On Devices ...47 Connecting PC Cards 48 To insert or remove a PC Card 48 Connecting External Devices 50 To connect an audio device 50 To use an external monitor 52 To connect an...
Reference Guide
Page 9
... prepare a new hard drive 64 Troubleshooting and Maintenance 65 Troubleshooting Your Notebook 66 Audio problems 66 CD-ROM and DVD problems 67 Display problems 68 Hard drive problems 69 Heat problems 70 Infrared problems 70 Keyboard and pointing device problems 71 Local area network (LAN) problems 72 Memory problems 73 Modem problems 73 PC Card problems...
... prepare a new hard drive 64 Troubleshooting and Maintenance 65 Troubleshooting Your Notebook 66 Audio problems 66 CD-ROM and DVD problems 67 Display problems 68 Hard drive problems 69 Heat problems 70 Infrared problems 70 Keyboard and pointing device problems 71 Local area network (LAN) problems 72 Memory problems 73 Modem problems 73 PC Card problems...
Reference Guide
Page 12
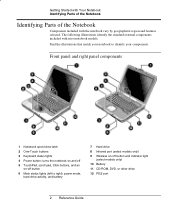
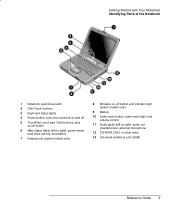
The following illustrations identify the standard external components included with the notebook vary by geographical region and features selected. Find the illustrations that match your notebook to right): power mode, hard drive activity, and battery 7 Hard drive 8 Infrared port (select models only) 9 Wireless on-off button 6 Main status lights (left to identify your components. Front panel and...
The following illustrations identify the standard external components included with the notebook vary by geographical region and features selected. Find the illustrations that match your notebook to right): power mode, hard drive activity, and battery 7 Hard drive 8 Infrared port (select models only) 9 Wireless on-off button 6 Main status lights (left to identify your components. Front panel and...
Reference Guide
Page 13
.../close latch 2 One-Touch buttons 3 Keyboard status lights 4 Power button: turns the notebook on and off 5 TouchPad, scroll pad, Click buttons, plus on-off button 6 Main status lights (left to right): power mode, hard drive activity, and battery 7 Infrared port (select models only) 8 Wireless on-off button and indicator light (select models only...
.../close latch 2 One-Touch buttons 3 Keyboard status lights 4 Power button: turns the notebook on and off 5 TouchPad, scroll pad, Click buttons, plus on-off button 6 Main status lights (left to right): power mode, hard drive activity, and battery 7 Infrared port (select models only) 8 Wireless on-off button and indicator light (select models only...
Reference Guide
Page 16
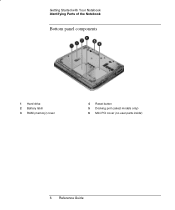
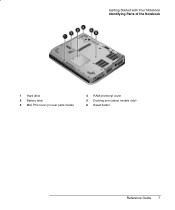
Getting Started with Your Notebook Identifying Parts of the Notebook Bottom panel components 1 Hard drive 2 Battery latch 3 RAM (memory) cover 4 Reset button 5 Docking port (select models only) 6 Mini PCI cover (no user parts inside) 6 Reference Guide
Getting Started with Your Notebook Identifying Parts of the Notebook Bottom panel components 1 Hard drive 2 Battery latch 3 RAM (memory) cover 4 Reset button 5 Docking port (select models only) 6 Mini PCI cover (no user parts inside) 6 Reference Guide
Reference Guide
Page 17
Getting Started with Your Notebook Identifying Parts of the Notebook 1 Hard drive 2 Battery latch 3 Mini PCI cover (no user parts inside) 4 RAM (memory) cover 5 Docking port (select models only) 6 Reset button Reference Guide 7
Getting Started with Your Notebook Identifying Parts of the Notebook 1 Hard drive 2 Battery latch 3 Mini PCI cover (no user parts inside) 4 RAM (memory) cover 5 Docking port (select models only) 6 Reset button Reference Guide 7
Reference Guide
Page 18
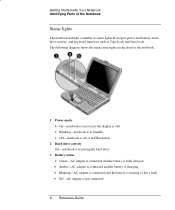
Getting Started with Your Notebook Identifying Parts of the Notebook Status lights The notebook includes a number of the notebook. 1 Power mode • On-notebook is on the front of status lights that report power and battery status, drive activity, and keyboard functions such as Caps Lock and Num ...shows the main status lights on (even if the display is off) • Blinking-notebook is in Standby • Off-notebook is off or in Hibernation 2 Hard drive activity On-notebook is accessing the hard drive 3 Battery status • Green-AC adapter is connected and the battery is fully charged...
Getting Started with Your Notebook Identifying Parts of the Notebook Status lights The notebook includes a number of the notebook. 1 Power mode • On-notebook is on the front of status lights that report power and battery status, drive activity, and keyboard functions such as Caps Lock and Num ...shows the main status lights on (even if the display is off) • Blinking-notebook is in Standby • Off-notebook is off or in Hibernation 2 Hard drive activity On-notebook is accessing the hard drive 3 Battery status • Green-AC adapter is connected and the battery is fully charged...
Reference Guide
Page 23
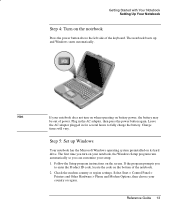
...you turn on when operating on battery power, the battery may be out of the keyboard. Getting Started with Your Notebook Setting Up Your Notebook Step 4: Turn on the notebook Press the power button above the left side of power. Charge times will vary. If the program prompts you ... 5: Set up and Windows starts automatically. Leave the AC adapter plugged in the AC adapter, then press the power button again. The notebook boots up Windows Your notebook has the Microsoft Windows operating system preinstalled on its hard drive. Hint If your notebook does not turn on the screen.
...you turn on when operating on battery power, the battery may be out of the keyboard. Getting Started with Your Notebook Setting Up Your Notebook Step 4: Turn on the notebook Press the power button above the left side of power. Charge times will vary. If the program prompts you ... 5: Set up and Windows starts automatically. Leave the AC adapter plugged in the AC adapter, then press the power button again. The notebook boots up Windows Your notebook has the Microsoft Windows operating system preinstalled on its hard drive. Hint If your notebook does not turn on the screen.
Reference Guide
Page 26
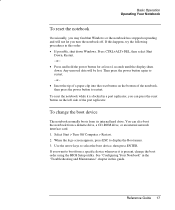
... -or- • Insert the tip of a paper clip into the reset button on the left side of the notebook, then press the power button to boot from its internal hard drive. Select Start > Turn Off Computer > Restart. 2. Use the arrow keys to display the Boot menu. 3. To... reset the notebook while it is docked in a port replicator, you can also boot the notebook from a diskette drive, a CD-ROM drive, or an internal network interface ...
... -or- • Insert the tip of a paper clip into the reset button on the left side of the notebook, then press the power button to boot from its internal hard drive. Select Start > Turn Off Computer > Restart. 2. Use the arrow keys to display the Boot menu. 3. To... reset the notebook while it is docked in a port replicator, you can also boot the notebook from a diskette drive, a CD-ROM drive, or an internal network interface ...

Reference Guide
Page 35
Select Start > Turn Off Computer > Restart. 2. From the Security menu, enable Internal hard drive lock. 5. CAUTION Basic Operation Securing Your Notebook To lock the hard drive The notebook enables you enable hard drive lock, the current BIOS user password (or administrator password if that is the only password set the user (or administrator) password to help keep your ...
Select Start > Turn Off Computer > Restart. 2. From the Security menu, enable Internal hard drive lock. 5. CAUTION Basic Operation Securing Your Notebook To lock the hard drive The notebook enables you enable hard drive lock, the current BIOS user password (or administrator password if that is the only password set the user (or administrator) password to help keep your ...
Reference Guide
Page 36
... ventilation around and underneath it. • Always shut down the notebook or put it in Hibernation before transporting it. If the notebook is operating could destroy data or damage the drive. • Carry the notebook in a padded case to avoid condensation. • Maintain your hard drive Hard drives, as well as other enclosed space. • Do not pick...
... ventilation around and underneath it. • Always shut down the notebook or put it in Hibernation before transporting it. If the notebook is operating could destroy data or damage the drive. • Carry the notebook in a padded case to avoid condensation. • Maintain your hard drive Hard drives, as well as other enclosed space. • Do not pick...

Reference Guide
Page 39
... is Display turns off the display and other input activity occurs for the specified interval The hard drive is not accessed for a specified interval No pointing devices are running your notebook on the display. To resume Briefly press any information that was not saved will be lost.... 30 Reference Guide Begin using the notebook, and the hard drive turns on values set to help you reduce power consumption and extend battery life. Hibernation is turned off . During idle periods, the notebook automatically enters power-saving modes after the display is initiated...
... is Display turns off the display and other input activity occurs for the specified interval The hard drive is not accessed for a specified interval No pointing devices are running your notebook on the display. To resume Briefly press any information that was not saved will be lost.... 30 Reference Guide Begin using the notebook, and the hard drive turns on values set to help you reduce power consumption and extend battery life. Hibernation is turned off . During idle periods, the notebook automatically enters power-saving modes after the display is initiated...
Reference Guide
Page 71
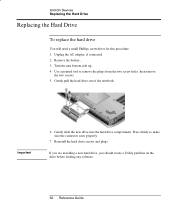
... plugs. Unplug the AC adapter, if connected. 2. Gently pull the hard drive out of the notebook. Important 6. Turn the unit bottom side up. 4. Use a pointed tool to make sure the connector seats properly. 7. Add-On Devices Replacing the Hard Drive Replacing the Hard Drive To replace the hard drive You will need a small Phillips screwdriver for this procedure. 1. If...
... plugs. Unplug the AC adapter, if connected. 2. Gently pull the hard drive out of the notebook. Important 6. Turn the unit bottom side up. 4. Use a pointed tool to make sure the connector seats properly. 7. Add-On Devices Replacing the Hard Drive Replacing the Hard Drive To replace the hard drive You will need a small Phillips screwdriver for this procedure. 1. If...
Reference Guide
Page 72
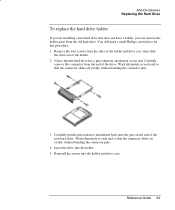
... this connector from the sides of the holder and drive case, then slide the drive out of the new hard drive. Insert the drive into the holder and drive case. Reference Guide 63 Add-On Devices Replacing the Hard Drive To replace the hard drive holder If you can remove the holder parts from... the old hard drive. Carefully put the pin connector attachment ...
... this connector from the sides of the holder and drive case, then slide the drive out of the new hard drive. Insert the drive into the holder and drive case. Reference Guide 63 Add-On Devices Replacing the Hard Drive To replace the hard drive holder If you can remove the holder parts from... the old hard drive. Carefully put the pin connector attachment ...
Reference Guide
Page 73
Add-On Devices Replacing the Hard Drive To prepare a new hard drive When you install a new hard drive, you want to work with your notebook. If you also need to prepare it to be able to restore the Windows software and operating system that were originally installed on your notebook, use the QuickRestore System Recovery CD included with your notebook. 64 Reference Guide
Add-On Devices Replacing the Hard Drive To prepare a new hard drive When you install a new hard drive, you want to work with your notebook. If you also need to prepare it to be able to restore the Windows software and operating system that were originally installed on your notebook, use the QuickRestore System Recovery CD included with your notebook. 64 Reference Guide

Reference Guide
Page 78
.... In the BIOS Setup utility, try setting Video Display Device to scan, then select File > Properties. Hard drive problems If the notebook hard drive doesn't spin • Make sure the notebook has power. If necessary, connect the AC adapter, then make sure it is coming from elsewhere, such... as from the fan or a PC Card drive. If the hard drive makes a buzzing or whining noise • Back up the drive immediately. &#...
.... In the BIOS Setup utility, try setting Video Display Device to scan, then select File > Properties. Hard drive problems If the notebook hard drive doesn't spin • Make sure the notebook has power. If necessary, connect the AC adapter, then make sure it is coming from elsewhere, such... as from the fan or a PC Card drive. If the hard drive makes a buzzing or whining noise • Back up the drive immediately. &#...


