Getting Started
Page 44
...up and is not responding. Computer seems to the red Shut Down button, and then click Restart. Error message: Hard disk drive error. Incompatible memory (RAM) may not be on; Or 1 Press and hold the On button for your computer to contact Support. Refer to the Limited Warranty ... more seconds to turn on or start. For instructions, refer to contact Support. Reinstall the old memory to return your country/region, or refer to the Limited Warranty and Support Guide to the Upgrading and Servicing Guide. if it on. Possible solution Ensure that is blank, the monitor may have ...
...up and is not responding. Computer seems to the red Shut Down button, and then click Restart. Error message: Hard disk drive error. Incompatible memory (RAM) may not be on; Or 1 Press and hold the On button for your computer to contact Support. Refer to the Limited Warranty ... more seconds to turn on or start. For instructions, refer to contact Support. Reinstall the old memory to return your country/region, or refer to the Limited Warranty and Support Guide to the Upgrading and Servicing Guide. if it on. Possible solution Ensure that is blank, the monitor may have ...
Upgrading and Servicing Guide
Page 5
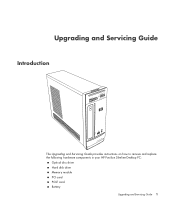
Upgrading and Servicing Guide Introduction The Upgrading and Servicing Guide provides instructions on how to remove and replace the following hardware components in your HP Pavilion Slimline Desktop PC: Optical disc drive Hard disk drive Memory module PCI card PCI-E card Battery Upgrading and Servicing Guide 1
Upgrading and Servicing Guide Introduction The Upgrading and Servicing Guide provides instructions on how to remove and replace the following hardware components in your HP Pavilion Slimline Desktop PC: Optical disc drive Hard disk drive Memory module PCI card PCI-E card Battery Upgrading and Servicing Guide 1
Upgrading and Servicing Guide
Page 7
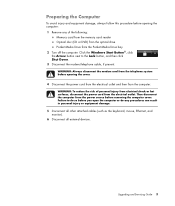
Failure to the Lock button, and then click Shut Down. 3 Disconnect the modem/telephone cable, if present. Upgrading and Servicing Guide 3 Preparing the Computer To avoid injury and equipment damage, always follow this procedure before opening the cover. 4 Disconnect the power cord from ... devices. Then disconnect the computer from the Pocket Media Drive bay 2 Turn off the computer. WARNING: To reduce the risk of the following: Memory card from the memory card reader Optical disc (CD or DVD) from the optical drive Pocket Media Drive from the power source before you open the computer or...
Failure to the Lock button, and then click Shut Down. 3 Disconnect the modem/telephone cable, if present. Upgrading and Servicing Guide 3 Preparing the Computer To avoid injury and equipment damage, always follow this procedure before opening the cover. 4 Disconnect the power cord from ... devices. Then disconnect the computer from the Pocket Media Drive bay 2 Turn off the computer. WARNING: To reduce the risk of the following: Memory card from the memory card reader Optical disc (CD or DVD) from the optical drive Pocket Media Drive from the power source before you open the computer or...
Upgrading and Servicing Guide
Page 9
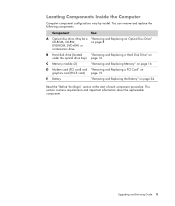
... and Replacing Memory" on page 24. You can remove and replace the following components: Component See: A Optical disc drive. E Battery "Removing and Replacing the Battery" on page 16. ... (located "Removing and Replacing a Hard Disk Drive" on graphics card (PCI-E card) page 19. This section contains requirements and important information about the replaceable component. Upgrading and Servicing Guide 5 D Modem card (PCI card) and "Removing and Replacing a PCI Card" on under the optical drive bay) page 12. Locating Components Inside the...
... and Replacing Memory" on page 24. You can remove and replace the following components: Component See: A Optical disc drive. E Battery "Removing and Replacing the Battery" on page 16. ... (located "Removing and Replacing a Hard Disk Drive" on graphics card (PCI-E card) page 19. This section contains requirements and important information about the replaceable component. Upgrading and Servicing Guide 5 D Modem card (PCI card) and "Removing and Replacing a PCI Card" on under the optical drive bay) page 12. Locating Components Inside the...

Upgrading and Servicing Guide
Page 20
... and Drivers page, click See support and troubleshooting information, enter the model number of memory module could damage the system. Avoid touching the memory chips. 16 Upgrading and Servicing Guide Be careful to http://www.hp.com/support in -line memory modules). Memory module WARNING: Using the wrong type of your computer, and then click Search...
... and Drivers page, click See support and troubleshooting information, enter the model number of memory module could damage the system. Avoid touching the memory chips. 16 Upgrading and Servicing Guide Be careful to http://www.hp.com/support in -line memory modules). Memory module WARNING: Using the wrong type of your computer, and then click Search...
Upgrading and Servicing Guide
Page 21
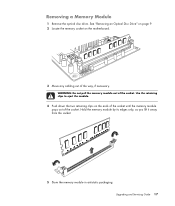
Upgrading and Servicing Guide 17 See "Removing an Optical Disc Drive" on page 9. 2 Locate the memory socket on the ends of the socket until the memory module pops out of the socket. Hold the memory module by its edges only, as you lift it away from the socket. 5 Store the memory module in antistatic packaging. WARNING: Do not pull the memory module out of the way, if necessary. Removing a Memory Module 1 Remove the optical disc drive. Use the retaining clips to eject the module. 4 Push down the two retaining clips on the motherboard. 3 Move any cabling out of the socket.
Upgrading and Servicing Guide 17 See "Removing an Optical Disc Drive" on page 9. 2 Locate the memory socket on the ends of the socket until the memory module pops out of the socket. Hold the memory module by its edges only, as you lift it away from the socket. 5 Store the memory module in antistatic packaging. WARNING: Do not pull the memory module out of the way, if necessary. Removing a Memory Module 1 Remove the optical disc drive. Use the retaining clips to eject the module. 4 Push down the two retaining clips on the motherboard. 3 Move any cabling out of the socket.
Upgrading and Servicing Guide
Page 22
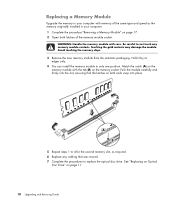
... optical disc drive. Match the notch (A) on both latches of the memory module socket. See "Replacing an Optical Disc Drive" on the memory socket. Replacing a Memory Module Upgrade the memory in your computer with memory of the same type and speed as required. 6 Replace any memory module contacts. A B 5 Repeat steps 1 to not touch any cabling that the...
... optical disc drive. Match the notch (A) on both latches of the memory module socket. See "Replacing an Optical Disc Drive" on the memory socket. Replacing a Memory Module Upgrade the memory in your computer with memory of the same type and speed as required. 6 Replace any memory module contacts. A B 5 Repeat steps 1 to not touch any cabling that the...
Getting Started Guide
Page 165
...from a camera 142 making a movie 149 previewing a movie 149 rotating images clockwise 146 selecting style 147 setting the duration of video 147 upgrading 153 using the magicMoments feature 145 N Network Interface Card (NIC) 9 Norton Internet Security configuring 88 registering 88 O Off button, See ...discs, erasing 130 S Safety & Comfort Guide 43 safety warnings 43 scanner, connecting 6 scrolling with the mouse 62 Secure Digital (SD) memory card 111 setting up computer 1 shortcuts keyboard 58 shutting down computer 38 sleep mode button 55 software programs CyberLink LabelPrint 92, 136 CyberLink ...
...from a camera 142 making a movie 149 previewing a movie 149 rotating images clockwise 146 selecting style 147 setting the duration of video 147 upgrading 153 using the magicMoments feature 145 N Network Interface Card (NIC) 9 Norton Internet Security configuring 88 registering 88 O Off button, See ...discs, erasing 130 S Safety & Comfort Guide 43 safety warnings 43 scanner, connecting 6 scrolling with the mouse 62 Secure Digital (SD) memory card 111 setting up computer 1 shortcuts keyboard 58 shutting down computer 38 sleep mode button 55 software programs CyberLink LabelPrint 92, 136 CyberLink ...
Warranty and Support Guide
Page 7
...than one computer, you in any product identification, copyright notices or proprietary restrictions from the Software Product. 6. c. e. UPGRADES. In case of the HP Product with /for use on those computers. The transfer may not be governed entirely by third parties ("Freeware"), is used.... You may install and use on a single computer ("Your Computer"). You may copy the Software Product into Your Computer's temporary memory (RAM) for commercial timesharing or bureau use the Software Product for purposes of a hard disk drive-based solution, an external media...
...than one computer, you in any product identification, copyright notices or proprietary restrictions from the Software Product. 6. c. e. UPGRADES. In case of the HP Product with /for use on those computers. The transfer may not be governed entirely by third parties ("Freeware"), is used.... You may install and use on a single computer ("Your Computer"). You may copy the Software Product into Your Computer's temporary memory (RAM) for commercial timesharing or bureau use the Software Product for purposes of a hard disk drive-based solution, an external media...


