
End User License Agreement
Page 2
...a one-time transfer of the Software Product, your license is automatically terminated. All intellectual property rights in the form of the HP Product with the update or supplement. entirely by the terms and conditions of a conflict between such terms, the other terms will... to all component parts, media, printed materials, this EULA. 5. Recovery Solution. Restrictions. This EULA is expressly provided for the upgrade. The initial user of the Software Product may not be licensed for which the recovery solution was originally purchased. This EULA will ...
...a one-time transfer of the Software Product, your license is automatically terminated. All intellectual property rights in the form of the HP Product with the update or supplement. entirely by the terms and conditions of a conflict between such terms, the other terms will... to all component parts, media, printed materials, this EULA. 5. Recovery Solution. Restrictions. This EULA is expressly provided for the upgrade. The initial user of the Software Product may not be licensed for which the recovery solution was originally purchased. This EULA will ...
Warranty
Page 8
... that the problem can be fixed using one of these service upgrades, refer to the HP Web site at : http://www.hp.com/support Service Upgrades HP has a range of service upgrades and the cost for your HP Limited Warranty may not be required to the provided instructions and ...documentation. Once the part arrives, replace the defective part pursuant to ship your HP Hardware Product warranty service...
... that the problem can be fixed using one of these service upgrades, refer to the HP Web site at : http://www.hp.com/support Service Upgrades HP has a range of service upgrades and the cost for your HP Limited Warranty may not be required to the provided instructions and ...documentation. Once the part arrives, replace the defective part pursuant to ship your HP Hardware Product warranty service...
Warranty
Page 12
...this EULA, and if applicable, the Certificate of the Software Product, your upgrade eligibility. 3. You may collect and use technical information you fail to another end user. You agree that HP and its affiliates may not reverse engineer, decompile, or disassemble the Software ... property rights in this limitation or it is effective unless terminated or rejected. TERM. This EULA is expressly provided for the upgrade. HP agrees not to use a Software Product identified as a consignment. DISCLAIMER OF WARRANTIES. Some states/jurisdictions do so is mandated under...
...this EULA, and if applicable, the Certificate of the Software Product, your upgrade eligibility. 3. You may collect and use technical information you fail to another end user. You agree that HP and its affiliates may not reverse engineer, decompile, or disassemble the Software ... property rights in this limitation or it is effective unless terminated or rejected. TERM. This EULA is expressly provided for the upgrade. HP agrees not to use a Software Product identified as a consignment. DISCLAIMER OF WARRANTIES. Some states/jurisdictions do so is mandated under...

Warranty
Page 20
... used batteries according to grounding electrodes, and requirements for Health and Safety Act of controls, adjustments, or performance procedures other than those specified in the Upgrading and Servicing Guide may result in hazardous radiation exposure. TV Antenna Connectors Protection External Television Antenna Grounding If an outside antenna or cable system is...
... used batteries according to grounding electrodes, and requirements for Health and Safety Act of controls, adjustments, or performance procedures other than those specified in the Upgrading and Servicing Guide may result in hazardous radiation exposure. TV Antenna Connectors Protection External Television Antenna Grounding If an outside antenna or cable system is...

Warranty
Page 23
...Our Valued Customer Congratulations on your computer, from your retailer. We know that expanding and upgrading are confirming that the computer was working correctly before attempting to upgrade your computer, HP is our promise to do with since it leaves our factory. Easy to reach. Whether...- If that you may wish to upgrade your computer to meet your decision to meet the rigorous standards that have any problems setting up your system. This must pass extensive quality tests to purchase a desktop computer! Award-winning HP Customer Support is ready to come. ...
...Our Valued Customer Congratulations on your computer, from your retailer. We know that expanding and upgrading are confirming that the computer was working correctly before attempting to upgrade your computer, HP is our promise to do with since it leaves our factory. Easy to reach. Whether...- If that you may wish to upgrade your computer to meet your decision to meet the rigorous standards that have any problems setting up your system. This must pass extensive quality tests to purchase a desktop computer! Award-winning HP Customer Support is ready to come. ...
Getting Started
Page 44
... state. Or 1 Press and hold the On button for your computer to the red Shut Down button, and then click Restart. Computer seems to the Upgrading and Servicing Guide. Computer does not start Symptom Computer will not turn it on.
... state. Or 1 Press and hold the On button for your computer to the red Shut Down button, and then click Restart. Computer seems to the Upgrading and Servicing Guide. Computer does not start Symptom Computer will not turn it on.
Upgrading and Servicing Guide
Page 5
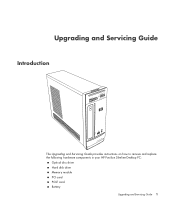
Upgrading and Servicing Guide Introduction The Upgrading and Servicing Guide provides instructions on how to remove and replace the following hardware components in your HP Pavilion Slimline Desktop PC: Optical disc drive Hard disk drive Memory module PCI card PCI-E card Battery Upgrading and Servicing Guide 1
Upgrading and Servicing Guide Introduction The Upgrading and Servicing Guide provides instructions on how to remove and replace the following hardware components in your HP Pavilion Slimline Desktop PC: Optical disc drive Hard disk drive Memory module PCI card PCI-E card Battery Upgrading and Servicing Guide 1
Upgrading and Servicing Guide
Page 6
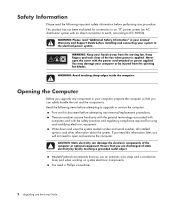
...moving fan. WARNING: Avoid touching sharp edges inside the computer. Opening the Computer Before you upgrade any procedure. WARNING: Please read the following items before attempting to upgrade or service the computer: Print out this information later, you are discharged of the fan ... (an AC distribution system with the power cord attached or power applied. Ensure that you will not need a Phillips screwdriver. 2 Upgrading and Servicing Guide Never open and examine the computer. Safety Information Please read "Additional Safety Information" in your system to the electrical ...
...moving fan. WARNING: Avoid touching sharp edges inside the computer. Opening the Computer Before you upgrade any procedure. WARNING: Please read the following items before attempting to upgrade or service the computer: Print out this information later, you are discharged of the fan ... (an AC distribution system with the power cord attached or power applied. Ensure that you will not need a Phillips screwdriver. 2 Upgrading and Servicing Guide Never open and examine the computer. Safety Information Please read "Additional Safety Information" in your system to the electrical ...
Upgrading and Servicing Guide
Page 7
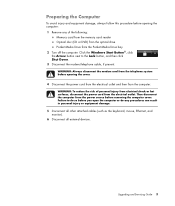
... card reader Optical disc (CD or DVD) from the optical drive Pocket Media Drive from the computer. Then disconnect the computer from the electrical outlet. Upgrading and Servicing Guide 3 Preparing the Computer To avoid injury and equipment damage, always follow this procedure before opening the cover. 4 Disconnect the power cord from...
... card reader Optical disc (CD or DVD) from the optical drive Pocket Media Drive from the computer. Then disconnect the computer from the electrical outlet. Upgrading and Servicing Guide 3 Preparing the Computer To avoid injury and equipment damage, always follow this procedure before opening the cover. 4 Disconnect the power cord from...
Upgrading and Servicing Guide
Page 8
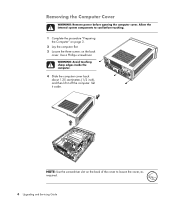
... NOTE: Use the screwdriver slot on the back cover. Set it off the computer. Allow the internal system components to loosen the cover, as required. 4 Upgrading and Servicing Guide Use a Phillips screwdriver. Removing the Computer Cover WARNING: Remove power before touching. 1 Complete the procedure "Preparing the Computer" on page 3. 2 Lay the...
... NOTE: Use the screwdriver slot on the back cover. Set it off the computer. Allow the internal system components to loosen the cover, as required. 4 Upgrading and Servicing Guide Use a Phillips screwdriver. Removing the Computer Cover WARNING: Remove power before touching. 1 Complete the procedure "Preparing the Computer" on page 3. 2 Lay the...
Upgrading and Servicing Guide
Page 9
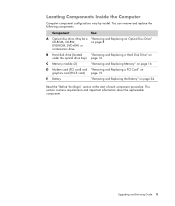
C Memory module (2) "Removing and Replacing Memory" on under the optical drive bay) page 12. This section contains requirements and important information about the replaceable component. Upgrading and Servicing Guide 5 You can remove and replace the following components: Component See: A Optical disc drive. DVD-ROM, DVD+RW, or combination drive B Hard disk ...
C Memory module (2) "Removing and Replacing Memory" on under the optical drive bay) page 12. This section contains requirements and important information about the replaceable component. Upgrading and Servicing Guide 5 You can remove and replace the following components: Component See: A Optical disc drive. DVD-ROM, DVD+RW, or combination drive B Hard disk ...
Upgrading and Servicing Guide
Page 10
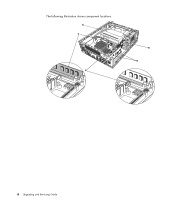
The following illustration shows component locations: A C digitOaUl aT udiowriaenletesnsnLaAN S-VIDEO E B D 6 Upgrading and Servicing Guide
The following illustration shows component locations: A C digitOaUl aT udiowriaenletesnsnLaAN S-VIDEO E B D 6 Upgrading and Servicing Guide

Upgrading and Servicing Guide
Page 11
... the computer: WARNING: To reduce the risk of electrical shock, fire, or damage to the equipment, do not plug telecommunications or telephone connectors into place. Upgrading and Servicing Guide 7 T 4 Align the screws on the computer and all peripherals, such as a printer. 3 Reconnect the power cord. 4 Turn on the computer cover with...
... the computer: WARNING: To reduce the risk of electrical shock, fire, or damage to the equipment, do not plug telecommunications or telephone connectors into place. Upgrading and Servicing Guide 7 T 4 Align the screws on the computer and all peripherals, such as a printer. 3 Reconnect the power cord. 4 Turn on the computer cover with...
Upgrading and Servicing Guide
Page 12
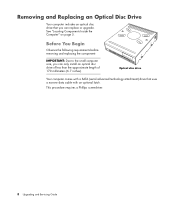
... computer size, you can only install an optical disc drive of less than the approximate length of 170 millimeters (6.7 inches). This procedure requires a Phillips screwdriver. 8 Upgrading and Servicing Guide Optical disc drive Your computer comes with a SATA (serial advanced technology attachment) drive that you can replace or...
... computer size, you can only install an optical disc drive of less than the approximate length of 170 millimeters (6.7 inches). This procedure requires a Phillips screwdriver. 8 Upgrading and Servicing Guide Optical disc drive Your computer comes with a SATA (serial advanced technology attachment) drive that you can replace or...

Upgrading and Servicing Guide
Page 13
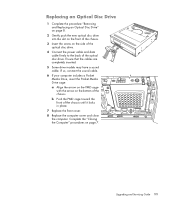
Upgrading and Servicing Guide 9 Complete the "Opening the Computer" procedures on the Pocket Media Drive cage. Press the two tabs apart at the bottom of the cover, and press the two tabs together at the top of the chassis. then push the cover out. digitaOlUauTdio wiraenletsesnLnAaN S-VIDEO 3 If your computer includes a Pocket Media Drive, lift the tab on page 2. 2 Remove the front cover from the computer. Then pull the cage back and out of the cover; Removing an Optical Disc Drive 1 Prepare the computer and remove the computer cover.
Upgrading and Servicing Guide 9 Complete the "Opening the Computer" procedures on the Pocket Media Drive cage. Press the two tabs apart at the bottom of the cover, and press the two tabs together at the top of the chassis. then push the cover out. digitaOlUauTdio wiraenletsesnLnAaN S-VIDEO 3 If your computer includes a Pocket Media Drive, lift the tab on page 2. 2 Remove the front cover from the computer. Then pull the cage back and out of the cover; Removing an Optical Disc Drive 1 Prepare the computer and remove the computer cover.
Upgrading and Servicing Guide
Page 14
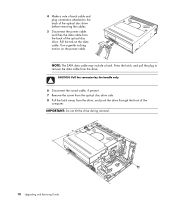
NOTE: The SATA data cable may include a latch. Pull the tab on the power cable. IMPORTANT: Do not tilt the drive during removal. 10 Upgrading and Servicing Guide Use a gentle rocking motion on the data cable. Press the latch, and pull the plug to the back of the optical disc ...
NOTE: The SATA data cable may include a latch. Pull the tab on the power cable. IMPORTANT: Do not tilt the drive during removal. 10 Upgrading and Servicing Guide Use a gentle rocking motion on the data cable. Press the latch, and pull the plug to the back of the optical disc ...
Upgrading and Servicing Guide
Page 15
..." procedures on the side of the optical disc drive. 4 Connect the power cable and data cable firmly to the back of the optical disc drive. Upgrading and Servicing Guide 11 If so, connect the sound cable. 6 If your computer includes a Pocket Media Drive, insert the Pocket Media Drive cage: a Align the...
..." procedures on the side of the optical disc drive. 4 Connect the power cable and data cable firmly to the back of the optical disc drive. Upgrading and Servicing Guide 11 If so, connect the sound cable. 6 If your computer includes a Pocket Media Drive, insert the Pocket Media Drive cage: a Align the...
Upgrading and Servicing Guide
Page 16
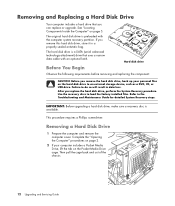
.... Hard disk drive Before You Begin Observe the following requirements before removing and replacing the component: CAUTION: Before you can replace or upgrade. After you remove this hard disk drive, store it in data loss. Removing a Hard Disk Drive 1 Prepare the computer and ...remove the computer cover. The original hard disk drive is preloaded with an optional latch. IMPORTANT: Before upgrading a hard disk drive, make sure a recovery disc is a SATA (serial advanced technology attachment) drive that you remove the hard disk drive,...
.... Hard disk drive Before You Begin Observe the following requirements before removing and replacing the component: CAUTION: Before you can replace or upgrade. After you remove this hard disk drive, store it in data loss. Removing a Hard Disk Drive 1 Prepare the computer and ...remove the computer cover. The original hard disk drive is preloaded with an optional latch. IMPORTANT: Before upgrading a hard disk drive, make sure a recovery disc is a SATA (serial advanced technology attachment) drive that you remove the hard disk drive,...
Upgrading and Servicing Guide
Page 17
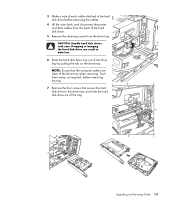
... wire latch, and disconnect the power and data cables from the back of the hard disk drive. 5 Remove the retaining screw from the drive tray. Upgrading and Servicing Guide 13 CAUTION: Handle hard disk drives with care. NOTE: Ensure that secure the hard disk drive to the hard disk drive before...
... wire latch, and disconnect the power and data cables from the back of the hard disk drive. 5 Remove the retaining screw from the drive tray. Upgrading and Servicing Guide 13 CAUTION: Handle hard disk drives with care. NOTE: Ensure that secure the hard disk drive to the hard disk drive before...
Upgrading and Servicing Guide
Page 18
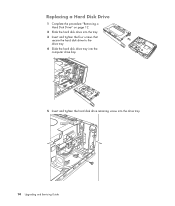
Replacing a Hard Disk Drive 1 Complete the procedure "Removing a Hard Disk Drive" on page 12. 2 Slide the hard disk drive into the tray. 3 Insert and tighten the four screws that secure the hard disk drive to the drive tray. 4 Slide the hard disk drive tray into the computer drive bay. 5 Insert and tighten the hard disk drive retaining screw into the drive tray. 14 Upgrading and Servicing Guide
Replacing a Hard Disk Drive 1 Complete the procedure "Removing a Hard Disk Drive" on page 12. 2 Slide the hard disk drive into the tray. 3 Insert and tighten the four screws that secure the hard disk drive to the drive tray. 4 Slide the hard disk drive tray into the computer drive bay. 5 Insert and tighten the hard disk drive retaining screw into the drive tray. 14 Upgrading and Servicing Guide


