
Hardware and Software Guide
Page 7
... Software 6-13 Optional Security Cable 6-14 7 Hardware Upgrades and Replacements Device Connections 7-1 Connecting a Powered Device 7-1 Connecting a USB Device 7-2 Connecting a 1394 Device 7-3 Connecting a Communication Device 7-4 Digital Memory Cards 7-4 Using the Digital Media Slot Light 7-5 Inserting a Digital Memory Card 7-6 Removing a Digital Memory Card 7-7 PC Cards 7-8 Inserting a PC Card 7-9 Stopping and Removing a PC Card 7-10 Hardware and Software Guide vii
... Software 6-13 Optional Security Cable 6-14 7 Hardware Upgrades and Replacements Device Connections 7-1 Connecting a Powered Device 7-1 Connecting a USB Device 7-2 Connecting a 1394 Device 7-3 Connecting a Communication Device 7-4 Digital Memory Cards 7-4 Using the Digital Media Slot Light 7-5 Inserting a Digital Memory Card 7-6 Removing a Digital Memory Card 7-7 PC Cards 7-8 Inserting a PC Card 7-9 Stopping and Removing a PC Card 7-10 Hardware and Software Guide vii
Hardware and Software Guide
Page 127
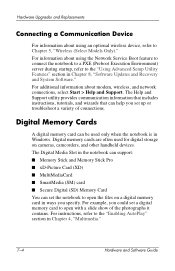
... 7-4 Hardware and Software Guide Digital memory cards are often used only when the notebook is in ways you specify. For additional information about modem, wireless, and network connections, select Start > Help and Support. Hardware Upgrades and Replacements Connecting a Communication Device... For information about using the Network Service Boot feature to connect the notebook to a PXE (Preboot Execution Environment) server during startup, refer ...
... 7-4 Hardware and Software Guide Digital memory cards are often used only when the notebook is in ways you specify. For additional information about modem, wireless, and network connections, select Start > Help and Support. Hardware Upgrades and Replacements Connecting a Communication Device... For information about using the Network Service Boot feature to connect the notebook to a PXE (Preboot Execution Environment) server during startup, refer ...
Hardware and Software Guide
Page 128
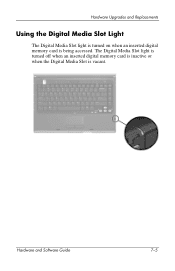
Hardware Upgrades and Replacements Using the Digital Media Slot Light The Digital Media Slot light is turned on when an inserted digital memory card is vacant. The Digital Media Slot light is turned off when an inserted digital memory card is inactive or when the Digital Media Slot is being accessed. Hardware and Software Guide 7-5
Hardware Upgrades and Replacements Using the Digital Media Slot Light The Digital Media Slot light is turned on when an inserted digital memory card is vacant. The Digital Media Slot light is turned off when an inserted digital memory card is inactive or when the Digital Media Slot is being accessed. Hardware and Software Guide 7-5
Hardware and Software Guide
Page 129
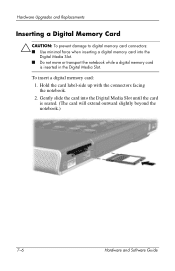
... and Software Guide Hold the card label-side up with the connectors facing the notebook. 2. Hardware Upgrades and Replacements Inserting a Digital Memory Card Ä CAUTION: To prevent damage to digital memory card connectors: ■ Use minimal force when inserting a digital memory card into the Digital Media Slot until the card is inserted in the Digital...
... and Software Guide Hold the card label-side up with the connectors facing the notebook. 2. Hardware Upgrades and Replacements Inserting a Digital Memory Card Ä CAUTION: To prevent damage to digital memory card connectors: ■ Use minimal force when inserting a digital memory card into the Digital Media Slot until the card is inserted in the Digital...
Hardware and Software Guide
Page 130
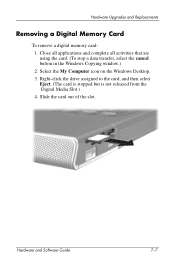
Close all applications and complete all activities that are using the card. (To stop a data transfer, select the cancel button in the Windows Copying window.) 2. Right-click the drive assigned to the card, and then select Eject. (The card is stopped but is not released from the Digital Media Slot.) 4. Hardware and Software Guide 7-7 Hardware Upgrades and Replacements Removing a Digital Memory Card To remove a digital memory card: 1. Slide the card out of the slot. Select the My Computer icon on the Windows Desktop. 3.
Close all applications and complete all activities that are using the card. (To stop a data transfer, select the cancel button in the Windows Copying window.) 2. Right-click the drive assigned to the card, and then select Eject. (The card is stopped but is not released from the Digital Media Slot.) 4. Hardware and Software Guide 7-7 Hardware Upgrades and Replacements Removing a Digital Memory Card To remove a digital memory card: 1. Slide the card out of the slot. Select the My Computer icon on the Windows Desktop. 3.
Hardware and Software Guide
Page 131
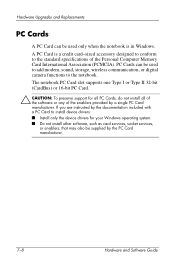
...PC Card to the notebook. Hardware Upgrades and Replacements PC Cards A PC Card can be used only when the notebook is a credit card-sized accessory designed to conform to the standard specifications of the enablers provided by a single PC Card manufacturer. PC Cards can be supplied by the PC Card manufacturer. 7-8 Hardware and Software Guide The notebook PC... Card slot supports one Type I or Type II 32-bit (CardBus) or 16-bit PC Card. Ä ...
...PC Card to the notebook. Hardware Upgrades and Replacements PC Cards A PC Card can be used only when the notebook is a credit card-sized accessory designed to conform to the standard specifications of the enablers provided by a single PC Card manufacturer. PC Cards can be supplied by the PC Card manufacturer. 7-8 Hardware and Software Guide The notebook PC... Card slot supports one Type I or Type II 32-bit (CardBus) or 16-bit PC Card. Ä ...
Hardware and Software Guide
Page 134
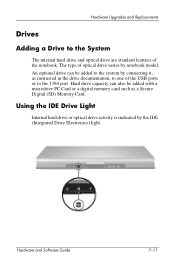
... light. Using the IDE Drive Light Internal hard drive or optical drive activity is indicated by notebook model. Hard drive capacity can be added with a microdrive PC Card or a digital memory card such as instructed in the drive documentation, to the 1394 port. An optional drive can... also be added to the system by connecting it, as a Secure Digital (SD) Memory Card. Hardware and Software Guide 7-11 Hardware Upgrades and Replacements Drives...
... light. Using the IDE Drive Light Internal hard drive or optical drive activity is indicated by notebook model. Hard drive capacity can be added with a microdrive PC Card or a digital memory card such as instructed in the drive documentation, to the 1394 port. An optional drive can... also be added to the system by connecting it, as a Secure Digital (SD) Memory Card. Hardware and Software Guide 7-11 Hardware Upgrades and Replacements Drives...

Hardware and Software Guide
Page 140
... one or both the amount of free space on your hard drive and the amount of space required by the amount of RAM (random access memory) in the system: In Windows, select Start > Help and Support. ■ To display both memory slots may contain a replaceable memory module. Hardware Upgrades and Replacements Memory The notebook has 2 memory slots.
... one or both the amount of free space on your hard drive and the amount of space required by the amount of RAM (random access memory) in the system: In Windows, select Start > Help and Support. ■ To display both memory slots may contain a replaceable memory module. Hardware Upgrades and Replacements Memory The notebook has 2 memory slots.
Hardware and Software Guide
Page 141
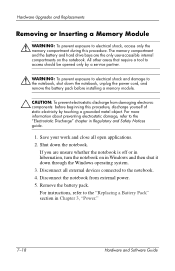
...Upgrades and Replacements Removing or Inserting a Memory Module Å WARNING: To prevent exposure to the notebook. 4. Disconnect all open applications. 2. For instructions, refer to the "Electrostatic Discharge" chapter in Regulatory and Safety Notices guide. 1. The memory compartment and the battery and hard drive bays are unsure whether the notebook... is off or in hibernation, turn the notebook on the notebook. For more information about preventing electrostatic...
...Upgrades and Replacements Removing or Inserting a Memory Module Å WARNING: To prevent exposure to the notebook. 4. Disconnect all open applications. 2. For instructions, refer to the "Electrostatic Discharge" chapter in Regulatory and Safety Notices guide. 1. The memory compartment and the battery and hard drive bays are unsure whether the notebook... is off or in hibernation, turn the notebook on the notebook. For more information about preventing electrostatic...

Hardware and Software Guide
Page 142
Hardware and Software Guide 7-19 Turn the notebook upside down. 7. Loosen the 2 memory compartment screws 1, and then lift up and remove the memory compartment cover 2. Hardware Upgrades and Replacements 6.
Hardware and Software Guide 7-19 Turn the notebook upside down. 7. Loosen the 2 memory compartment screws 1, and then lift up and remove the memory compartment cover 2. Hardware Upgrades and Replacements 6.

Hardware and Software Guide
Page 143
To remove a memory module: a. Grasp the edges of the module and gently pull the module out of the module 1. (The module tilts upward.) b. c. Pull away the retention clips on each side of the memory slot 2. To protect a memory module after removal, place it in an electrostatic-safe container. 7-20 Hardware and Software Guide Remove or insert the memory module. Hardware Upgrades and Replacements 8.
To remove a memory module: a. Grasp the edges of the module and gently pull the module out of the module 1. (The module tilts upward.) b. c. Pull away the retention clips on each side of the memory slot 2. To protect a memory module after removal, place it in an electrostatic-safe container. 7-20 Hardware and Software Guide Remove or insert the memory module. Hardware Upgrades and Replacements 8.

Hardware and Software Guide
Page 144
... retention clips snap into the memory slot until it is seated 2. Hardware Upgrades and Replacements To insert a memory module: a. With the module at a 45-degree angle from the surface of a memory compartment that already contains a memory module.) b. Hardware and Software Guide 7-21 If you are inserting a single memory module into a vacant memory compartment, insert the module into...
... retention clips snap into the memory slot until it is seated 2. Hardware Upgrades and Replacements To insert a memory module: a. With the module at a 45-degree angle from the surface of a memory compartment that already contains a memory module.) b. Hardware and Software Guide 7-21 If you are inserting a single memory module into a vacant memory compartment, insert the module into...

Hardware and Software Guide
Page 145
To close the memory compartment, align the tabs on the memory compartment cover with the cover slots on the notebook, and then slide the cover over the memory compartment until it is seated 1. 10. Tighten the 2 memory compartment screws 2. 11. Replace the battery pack, reconnect the notebook to external power, and then restart the notebook. 7-22 Hardware and Software Guide Hardware Upgrades and Replacements 9.
To close the memory compartment, align the tabs on the memory compartment cover with the cover slots on the notebook, and then slide the cover over the memory compartment until it is seated 1. 10. Tighten the 2 memory compartment screws 2. 11. Replace the battery pack, reconnect the notebook to external power, and then restart the notebook. 7-22 Hardware and Software Guide Hardware Upgrades and Replacements 9.


