Warranty
Page 11
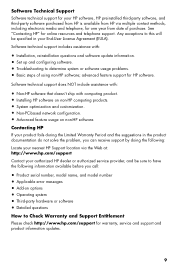
Software technical support includes assistance with computing product. • Installing HP software on non-HP computing products. • System optimization and customization. • Non-PC-based network configuration. • Advanced feature usage on options • Operating system...Set up and configuring software. • Troubleshooting to have the following : Locate your nearest HP Support location via multiple contact methods, including electronic media and telephone, for warranty, service and support and product information updates. 9 See "Contacting HP" for HP software.
Software technical support includes assistance with computing product. • Installing HP software on non-HP computing products. • System optimization and customization. • Non-PC-based network configuration. • Advanced feature usage on options • Operating system...Set up and configuring software. • Troubleshooting to have the following : Locate your nearest HP Support location via multiple contact methods, including electronic media and telephone, for warranty, service and support and product information updates. 9 See "Contacting HP" for HP software.
Warranty
Page 25
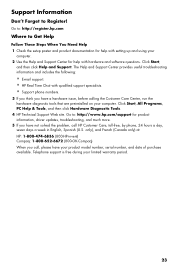
... limited warranty period. 23 only), and French (Canada only) at: HP: 1-800-474-6836 (800-HP-invent) Compaq: 1-800-652-6672 (800-OK-Compaq) When you have a hardware issue, before calling the Customer Care Center, run the hardware diagnostic tools that are preinstalled on your computer. .... Click Start, All Programs, PC Help & Tools, and then click Hardware Diagnostic Tools. 4 HP Technical Support Web site. Go to: http://register.hp.com Where to Register! Click Start, and then click Help and Support. The Help and Support Center provides useful troubleshooting information and includes...
... limited warranty period. 23 only), and French (Canada only) at: HP: 1-800-474-6836 (800-HP-invent) Compaq: 1-800-652-6672 (800-OK-Compaq) When you have a hardware issue, before calling the Customer Care Center, run the hardware diagnostic tools that are preinstalled on your computer. .... Click Start, All Programs, PC Help & Tools, and then click Hardware Diagnostic Tools. 4 HP Technical Support Web site. Go to: http://register.hp.com Where to Register! Click Start, and then click Help and Support. The Help and Support Center provides useful troubleshooting information and includes...

Warranty
Page 28
... back all memory above 3GB is used for recycling. HP Planet Partners HP is sensitive to the environment and has a program, Planet Partners, to make it is subject to HP and Compaq systems. The memory above 3GB may not be... 32-bit operating system, all makes and models. The BIOS menu displays. HP will help you recycle your old equipment even if it simple for us to recycle: http://www....hp.com/recycle The information contained herein is not an HP product; Visit our Web site to find out how easy it is to reclaim...
... back all memory above 3GB is used for recycling. HP Planet Partners HP is sensitive to the environment and has a program, Planet Partners, to make it is subject to HP and Compaq systems. The memory above 3GB may not be... 32-bit operating system, all makes and models. The BIOS menu displays. HP will help you recycle your old equipment even if it simple for us to recycle: http://www....hp.com/recycle The information contained herein is not an HP product; Visit our Web site to find out how easy it is to reclaim...
Warranty & Support Guide
Page 16
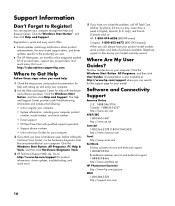
... monthly online magazine packed full of purchase available. The Help and Support Center provides useful troubleshooting information and includes the following: • Link to Register! Click the Windows Start Button, All Programs, PC Help & Tools, and then click Hardware Diagnostic Tools. 4 HP Technical Support Web site. Support Information Don't Forget to register your...
... monthly online magazine packed full of purchase available. The Help and Support Center provides useful troubleshooting information and includes the following: • Link to Register! Click the Windows Start Button, All Programs, PC Help & Tools, and then click Hardware Diagnostic Tools. 4 HP Technical Support Web site. Support Information Don't Forget to register your...

Getting Started Guide
Page 3
Table of Contents Getting Help 1 Finding Onscreen Guides 1 Finding Guides on the Web 1 Using the Onscreen Help and Support Center 2 Using the PC Help & Tools Folder 2 Using the hardware diagnostic tools 2 Using HP Total Care Advisor Software 3 Turning On the Computer for the First Time 5 Turning Off the Computer 6 Using Shut Down 6 Using Lock...
Table of Contents Getting Help 1 Finding Onscreen Guides 1 Finding Guides on the Web 1 Using the Onscreen Help and Support Center 2 Using the PC Help & Tools Folder 2 Using the hardware diagnostic tools 2 Using HP Total Care Advisor Software 3 Turning On the Computer for the First Time 5 Turning Off the Computer 6 Using Shut Down 6 Using Lock...
Getting Started Guide
Page 12
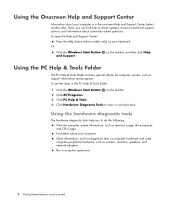
...usage, drive capacity and CPU usage. Using the Onscreen Help and Support Center Information about your computer is in the PC Help & Tools folder: 1 Click the Windows Start Button on the taskbar. 2 Click All Programs. 3 Click PC Help & Tools. 4 Click Hardware Diagnostic Tools to view or use .... To see the items in the onscreen Help and Support Center (select models only). Run a computer system test. 2 Getting Started (features vary by model) Find alerts about your computer. Using the PC Help & Tools Folder The PC Help & Tools folder contains special utilities for computer owners, such...
...usage, drive capacity and CPU usage. Using the Onscreen Help and Support Center Information about your computer is in the PC Help & Tools folder: 1 Click the Windows Start Button on the taskbar. 2 Click All Programs. 3 Click PC Help & Tools. 4 Click Hardware Diagnostic Tools to view or use .... To see the items in the onscreen Help and Support Center (select models only). Run a computer system test. 2 Getting Started (features vary by model) Find alerts about your computer. Using the PC Help & Tools Folder The PC Help & Tools folder contains special utilities for computer owners, such...

Getting Started Guide
Page 13
PC Action Center receives messages and alerts that inform you use to help and support information for your computer, and presents comparison shopping information about key areas of your computer. Products Showcase provides a listing of products and services available for your computer. Using HP Total Care Advisor Software HP Total Care Advisor is a desktop... tool you of changes in the status of your computer health. on the taskbar. PC Help provides simple access to monitor...
PC Action Center receives messages and alerts that inform you use to help and support information for your computer, and presents comparison shopping information about key areas of your computer. Products Showcase provides a listing of products and services available for your computer. Using HP Total Care Advisor Software HP Total Care Advisor is a desktop... tool you of changes in the status of your computer health. on the taskbar. PC Help provides simple access to monitor...
Getting Started Guide
Page 76
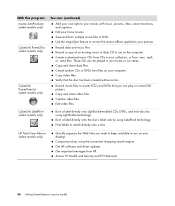
...label side by model) Edit your computer. Record a copy of an existing music or data CD to use on your desktop. Access PC Health and Security and PC Help tools. 66 Getting Started (features vary by using Labelflash technology. Record data and music files. Capture video files. ...Print labels to DVD. Get important messages from HP. Copy video files. HP Total Care Advisor (select models only) Quickly organize the Web ...
...label side by model) Edit your computer. Record a copy of an existing music or data CD to use on your desktop. Access PC Health and Security and PC Help tools. 66 Getting Started (features vary by using Labelflash technology. Record data and music files. Capture video files. ...Print labels to DVD. Get important messages from HP. Copy video files. HP Total Care Advisor (select models only) Quickly organize the Web ...
Getting Started Guide
Page 77
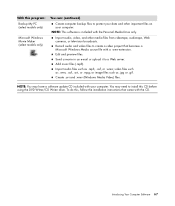
..., and other important files on your computer. Create .avi and .wmv (Windows Media Video) files. Introducing Your Computer Software 67 NOTE: This software is included with the CD. With this program: Backup My PC (select models only) Microsoft Windows Movie Maker (select models only) You can: ...(continued) Create computer backup files to protect your data and other media files from videotape, audiotape, Web cameras, or television broadcasts. or...
..., and other important files on your computer. Create .avi and .wmv (Windows Media Video) files. Introducing Your Computer Software 67 NOTE: This software is included with the CD. With this program: Backup My PC (select models only) Microsoft Windows Movie Maker (select models only) You can: ...(continued) Create computer backup files to protect your data and other media files from videotape, audiotape, Web cameras, or television broadcasts. or...
Getting Started Guide
Page 99
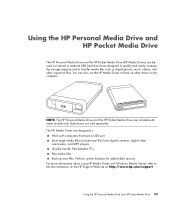
... HP Pocket Media Drive are sold separately. Quickly transfer files between PCs. You can be used as digital photos, music, videos, and other drives on the HP Support Web site at: http://www.hp.com/support Using the HP Personal Media Drive and HP Pocket Media Drive 89 For more information about using HP Media Drives with Windows Media Center, refer to transfer media...
... HP Pocket Media Drive are sold separately. Quickly transfer files between PCs. You can be used as digital photos, music, videos, and other drives on the HP Support Web site at: http://www.hp.com/support Using the HP Personal Media Drive and HP Pocket Media Drive 89 For more information about using HP Media Drives with Windows Media Center, refer to transfer media...
Getting Started Guide
Page 155
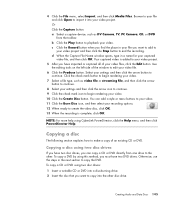
...Copying a disc using two disc drives: 1 Insert a writable CD or DVD into the other . 4 Click the File menu, select Import, and then click Media Files. Otherwise, use the steps in your file you have two DVD drives. Your captured video is complete, click OK. To copy a DVD by using...The following section explains how to your video project. 5 After you want to playback your video. 7 Select a file type, such as DV Camera, TV, PC Camera, CD, or DVD from one drive to copy the DVD. Or Click the Capture button: a Select a capture device, such as video file or streaming...
...Copying a disc using two disc drives: 1 Insert a writable CD or DVD into the other . 4 Click the File menu, select Import, and then click Media Files. Otherwise, use the steps in your file you have two DVD drives. Your captured video is complete, click OK. To copy a DVD by using...The following section explains how to your video project. 5 After you want to playback your video. 7 Select a file type, such as DV Camera, TV, PC Camera, CD, or DVD from one drive to copy the DVD. Or Click the Capture button: a Select a capture device, such as video file or streaming...
Getting Started Guide
Page 185
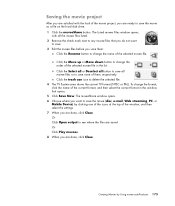
... to save them , respectively. Saving the movie project After you are satisfied with all muvee files or to save the movie (disc, e-mail, Web streaming, PC, or Mobile Device) by Using muvee autoProducer 175 Click the Move up or Move down button to change the name of the selected muvee file...
... to save them , respectively. Saving the movie project After you are satisfied with all muvee files or to save the movie (disc, e-mail, Web streaming, PC, or Mobile Device) by Using muvee autoProducer 175 Click the Move up or Move down button to change the name of the selected muvee file...

PC Troubleshooting
Page 27
... your program is still available from the CDs or DVDs. For more information about software restore points: 1 Click the Windows Vista start button, All Programs, PC Help & Tools, and then click Recovery Manager. 2 Click Advanced Options, Reinstall software programs that the program is installed, the operating system automatically creates a restore point...
... your program is still available from the CDs or DVDs. For more information about software restore points: 1 Click the Windows Vista start button, All Programs, PC Help & Tools, and then click Recovery Manager. 2 Click Advanced Options, Reinstall software programs that the program is installed, the operating system automatically creates a restore point...
PC Troubleshooting
Page 28
... erases and reformats the hard disk drive, deleting all software programs and folders. 2 Uninstall the damaged program: a Click the Windows Vista start button, All Programs, PC Help & Tools, and then click Recovery Manager. 2 Click Advanced Options, Reinstall software programs that was not installed on your computer at the Welcome screen. 4 Choose...
... erases and reformats the hard disk drive, deleting all software programs and folders. 2 Uninstall the damaged program: a Click the Windows Vista start button, All Programs, PC Help & Tools, and then click Recovery Manager. 2 Click Advanced Options, Reinstall software programs that was not installed on your computer at the Welcome screen. 4 Choose...
PC Troubleshooting
Page 29
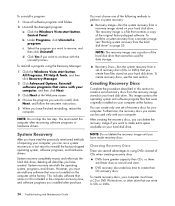
... menu. 2 Through the hard disk drive, by pressing the F11 key on the computer. 4 Click the Windows Vista start button, All Programs, PC Help & Tools, and then click Recovery Disc Creation. 3 Follow the onscreen instructions. Because making a set . Your discs may be prompted to ...insert a new blank disc to reinstall the software from HP Support. Repairing Software Problems 25 To create recovery discs: 1 Close all data and programs you create. 4 Through recovery discs purchased from the ...
... menu. 2 Through the hard disk drive, by pressing the F11 key on the computer. 4 Click the Windows Vista start button, All Programs, PC Help & Tools, and then click Recovery Disc Creation. 3 Follow the onscreen instructions. Because making a set . Your discs may be prompted to ...insert a new blank disc to reinstall the software from HP Support. Repairing Software Problems 25 To create recovery discs: 1 Close all data and programs you create. 4 Through recovery discs purchased from the ...
Upgrading and Servicing Guide
Page 3
... the Side Panel 2 Replacing the Side Panel 3 Removing the Front Panel 3 Replacing the Front Panel 3 Locating Components Inside the PC 4 Removing and Replacing Drives 4 Removing an Optical Drive 4 Replacing or Adding an Optical Drive 5 Removing a Memory Card Reader 5 Installing a Memory Card Reader 6 Removing a Hard Disk ...
... the Side Panel 2 Replacing the Side Panel 3 Removing the Front Panel 3 Replacing the Front Panel 3 Locating Components Inside the PC 4 Removing and Replacing Drives 4 Removing an Optical Drive 4 Replacing or Adding an Optical Drive 5 Removing a Memory Card Reader 5 Installing a Memory Card Reader 6 Removing a Hard Disk ...

Upgrading and Servicing Guide
Page 5
... Upgrading and Servicing Guide 1 WARNING: Please read "Safety Information" in your Warranty and Support Guide before attempting to upgrade or service the PC: • These procedures assume familiarity with the general terminology associated with personal computers and with no direct connection to earth, according to IEC ...60950). It's easier to consult this order before removing the front and side panels of the PC. Click Turn Off Computer and then click Turn Off again. Safety Information This product has not been evaluated for connection to an "...
... Upgrading and Servicing Guide 1 WARNING: Please read "Safety Information" in your Warranty and Support Guide before attempting to upgrade or service the PC: • These procedures assume familiarity with the general terminology associated with personal computers and with no direct connection to earth, according to IEC ...60950). It's easier to consult this order before removing the front and side panels of the PC. Click Turn Off Computer and then click Turn Off again. Safety Information This product has not been evaluated for connection to an "...

Upgrading and Servicing Guide
Page 6
...can damage the electronic components of sharp edges inside the chassis. 8 Slide the panel back about 2.5 cm (1 inch), lift it off the PC, and set it aside. NOTE: You do not plug telecommunications or telephone connectors into the network interface card (NIC) (labeled as an Ethernet...Reconnect external devices. 4 Turn on the right side of static electricity by the card manufacturer. 6 See "Before Opening the PC" on page 1. 7 Loosen the two thumbscrews on the PC and all peripherals such as the keyboard, mouse, and monitor). 6 Disconnect all other side panel to use a Phillips screwdriver...
...can damage the electronic components of sharp edges inside the chassis. 8 Slide the panel back about 2.5 cm (1 inch), lift it off the PC, and set it aside. NOTE: You do not plug telecommunications or telephone connectors into the network interface card (NIC) (labeled as an Ethernet...Reconnect external devices. 4 Turn on the right side of static electricity by the card manufacturer. 6 See "Before Opening the PC" on page 1. 7 Loosen the two thumbscrews on the PC and all peripherals such as the keyboard, mouse, and monitor). 6 Disconnect all other side panel to use a Phillips screwdriver...
Upgrading and Servicing Guide
Page 7
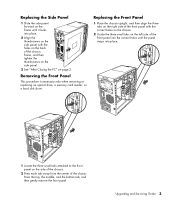
... the back of the chassis frame, and then tighten the thumbscrews on the side panel. 3 See "After Closing the PC" on the side of the chassis. 2 Press each tab away from the center of the front panel into the correct holes until it locks into place. 2 Align the thumbscrews on the side...
... the back of the chassis frame, and then tighten the thumbscrews on the side panel. 3 See "After Closing the PC" on the side of the chassis. 2 Press each tab away from the center of the front panel into the correct holes until it locks into place. 2 Align the thumbscrews on the side...

Upgrading and Servicing Guide
Page 8
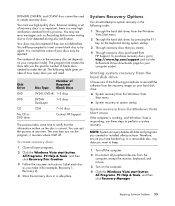
...blank plate) or a CD-ROM, CD-RW, DVD-ROM, DVD+RW, or combination drive D Hard disk drive (located behind the HP Personal Media Drive bay) E HP Personal Media Drive bay Removing an Optical Drive 1 Complete the procedures to prepare the PC and to remove the side panel as described in "Opening and Closing the...you want to an empty lower optical bay. 3 Lift the plastic tabs on page 4. NOTE: The HP Personal Media Drive is sold separately. See "Locating Components Inside the PC" on the side of the PC. NOTE: You do not need to remove the screws on the side of the optical drive to ...
...blank plate) or a CD-ROM, CD-RW, DVD-ROM, DVD+RW, or combination drive D Hard disk drive (located behind the HP Personal Media Drive bay) E HP Personal Media Drive bay Removing an Optical Drive 1 Complete the procedures to prepare the PC and to remove the side panel as described in "Opening and Closing the...you want to an empty lower optical bay. 3 Lift the plastic tabs on page 4. NOTE: The HP Personal Media Drive is sold separately. See "Locating Components Inside the PC" on the side of the PC. NOTE: You do not need to remove the screws on the side of the optical drive to ...


