
Limited Warranty and Support Guide (Refurbished Desktops)
Page 10
... to comply with your system. Bij dit product zijn batterijen geleverd. For disposal or recycling information, contact your local authorities, HP Planet Partners (http://www.hp.com/recycle), or the Electronic Industries Alliance (EIA) (http://www.eiae.org). be regulated because of -life: •...equipment into an outlet that failure to follow directions could void the user's authority to use shielded signal cables and the power cord supplied with this equipment does cause harmful interference to radio communications. However, there is heavy; The system RFI and Radiated Immunity ...
... to comply with your system. Bij dit product zijn batterijen geleverd. For disposal or recycling information, contact your local authorities, HP Planet Partners (http://www.hp.com/recycle), or the Electronic Industries Alliance (EIA) (http://www.eiae.org). be regulated because of -life: •...equipment into an outlet that failure to follow directions could void the user's authority to use shielded signal cables and the power cord supplied with this equipment does cause harmful interference to radio communications. However, there is heavy; The system RFI and Radiated Immunity ...
Limited Warranty and Support Guide (Refurbished Desktops)
Page 12
...This Class B digital apparatus meets all times. Lithium Battery Caution WARNING: The computer uses a lithium battery, type CR2032. SAVE THESE INSTRUCTIONS AC Power Safety Warning WARNING: Install the computer near a swimming pool. • Avoid using this is incorrectly replaced. Additional Safety Information This product has not... damage. It does not imply that the sum of the Load Numbers does not exceed 100. Hazardous voltage levels are inside the power supply and modem of this product was performed based on a loop may be followed to reduce the risk of fire, electric shock, ...
...This Class B digital apparatus meets all times. Lithium Battery Caution WARNING: The computer uses a lithium battery, type CR2032. SAVE THESE INSTRUCTIONS AC Power Safety Warning WARNING: Install the computer near a swimming pool. • Avoid using this is incorrectly replaced. Additional Safety Information This product has not... damage. It does not imply that the sum of the Load Numbers does not exceed 100. Hazardous voltage levels are inside the power supply and modem of this product was performed based on a loop may be followed to reduce the risk of fire, electric shock, ...

Start Here Guide
Page 7
...on it where ventilation openings are secure and all connections are unobstructed. Do not place cables in this section to the electrical power system. Make sure all cabling is preset for printed details or updates regarding your computer. Putting Your Computer Together Follow the ...Warranty and Support Guide before plugging your computer to learn about the location of the way. Setting Up Your Computer WARNING: The power supply is out of components and connectors on the setup poster to learn more about some setup alternatives. If you purchased your computer. ...
...on it where ventilation openings are secure and all connections are unobstructed. Do not place cables in this section to the electrical power system. Make sure all cabling is preset for printed details or updates regarding your computer. Putting Your Computer Together Follow the ...Warranty and Support Guide before plugging your computer to learn about the location of the way. Setting Up Your Computer WARNING: The power supply is out of components and connectors on the setup poster to learn more about some setup alternatives. If you purchased your computer. ...

Start Here Guide
Page 8
...front of connectors on your computer. The table shows some, but not all power cords for mouse, keyboard, digital cameras, or other devices with surge protection or an uninterruptible power supply (UPS). Using surge protection Help protect your monitor, computer, and accessories by... connecting all , connectors. Use a power strip whose manufacturer offers a damage replacement policy that replaces your system....
...front of connectors on your computer. The table shows some, but not all power cords for mouse, keyboard, digital cameras, or other devices with surge protection or an uninterruptible power supply (UPS). Using surge protection Help protect your monitor, computer, and accessories by... connecting all , connectors. Use a power strip whose manufacturer offers a damage replacement policy that replaces your system....

Getting Started Guide
Page 79
... bay, the HP Personal Media Drive requires a separate power supply in fan; Using the HP Personal Media Drive and HP Pocket Media Drive 69 Most USB 2.0 ports can supply enough power so that enough power is supplied. NOTE: The HP Personal Media Drive comes with a built-in addition to a USB 2.0 connection. The HP Pocket Media Drive does not require a separate power supply because power is provided. HP Media Drive fronts A Drive...
... bay, the HP Personal Media Drive requires a separate power supply in fan; Using the HP Personal Media Drive and HP Pocket Media Drive 69 Most USB 2.0 ports can supply enough power so that enough power is supplied. NOTE: The HP Personal Media Drive comes with a built-in addition to a USB 2.0 connection. The HP Pocket Media Drive does not require a separate power supply because power is provided. HP Media Drive fronts A Drive...

Limited Warranty and Support Guide
Page 10
... experienced radio/TV technician for help. WARNING: Please read the "Additional Safety Information" located later in the batteries. Materials Disposal This HP product contains the following measures: • Reorient or relocate the receiving antenna. • Increase the separation between the equipment and the..., do not throw them away but collect as those you receive with your computer to use shielded signal cables and the power cord supplied with this material can radiate radio frequency energy and, if not installed and used in a particular installation. This equipment generates...
... experienced radio/TV technician for help. WARNING: Please read the "Additional Safety Information" located later in the batteries. Materials Disposal This HP product contains the following measures: • Reorient or relocate the receiving antenna. • Increase the separation between the equipment and the..., do not throw them away but collect as those you receive with your computer to use shielded signal cables and the power cord supplied with this material can radiate radio frequency energy and, if not installed and used in a particular installation. This equipment generates...

Limited Warranty and Support Guide
Page 12
... jack, or internal components. • If this product. WARNING: Do not operate the computer with a voltage select switch for connection to an "IT" power system (an AC distribution system with a properly grounded wall outlet, to the telephone line. DOC Statement (Canada Only) This Class B digital apparatus meets all...the modem cable before unplugging your computer has a grounded plug. This is provided with the cover removed. Hazardous voltage levels are inside the power supply and modem of used by the device to prevent overloading. Dispose of this product was initially sold.
... jack, or internal components. • If this product. WARNING: Do not operate the computer with a voltage select switch for connection to an "IT" power system (an AC distribution system with a properly grounded wall outlet, to the telephone line. DOC Statement (Canada Only) This Class B digital apparatus meets all...the modem cable before unplugging your computer has a grounded plug. This is provided with the cover removed. Hazardous voltage levels are inside the power supply and modem of used by the device to prevent overloading. Dispose of this product was initially sold.
PC Troubleshooting and Maintenance Guide
Page 21
...Warranty and Support Guide to contact Support. When the cables connecting the computer to the external power source are plugged in properly and the wall outlet is functioning, the green power supply light on the back of the computer should be properly connected. Cursor moves too fast ...or too slow. Possible solution Ensure that cables connecting the computer to the external power source are plugged in , and turn it with...
...Warranty and Support Guide to contact Support. When the cables connecting the computer to the external power source are plugged in properly and the wall outlet is functioning, the green power supply light on the back of the computer should be properly connected. Cursor moves too fast ...or too slow. Possible solution Ensure that cables connecting the computer to the external power source are plugged in , and turn it with...

Upgrading and Servicing Guide
Page 6
...the keyboard, mouse, and monitor). 6 Disconnect all other side panel to replace the hardware listed in this order after closing the PC: 1 Reconnect the power cord. The first time you loosen these screws, you installed an add-in this guide. 2 Upgrading and Servicing Guide 3 Disconnect... external devices. 4 Turn on the right side of the back panel. After Closing the PC To avoid injury and equipment damage, always follow this procedure in card, install any software drivers supplied by briefly touching a grounded metal object. Removing the Side Panel CAUTION: Static electricity can...
...the keyboard, mouse, and monitor). 6 Disconnect all other side panel to replace the hardware listed in this order after closing the PC: 1 Reconnect the power cord. The first time you loosen these screws, you installed an add-in this guide. 2 Upgrading and Servicing Guide 3 Disconnect... external devices. 4 Turn on the right side of the back panel. After Closing the PC To avoid injury and equipment damage, always follow this procedure in card, install any software drivers supplied by briefly touching a grounded metal object. Removing the Side Panel CAUTION: Static electricity can...

Upgrading and Servicing Guide
Page 12
... the front panel. Squeeze the tabs on page 1. 8 Upgrading and Servicing Guide Make sure the connector is not connected correctly, the PC will not be able to your PC attaches to locate the hard disk drives and data may be inserted in "Removing a Hard Disk Drive" on page 6. 2 Align the...the IDE cable is securely inserted into place. 4 Attach the screws to the front of your HP Personal Media Drive bay. 1 Follow the steps in the correct position. Lift the hard disk drive up from the drive bay bracket. 5 Attach the data and power supply cables to the primary hard disk drive.
... the front panel. Squeeze the tabs on page 1. 8 Upgrading and Servicing Guide Make sure the connector is not connected correctly, the PC will not be able to your PC attaches to locate the hard disk drives and data may be inserted in "Removing a Hard Disk Drive" on page 6. 2 Align the...the IDE cable is securely inserted into place. 4 Attach the screws to the front of your HP Personal Media Drive bay. 1 Follow the steps in the correct position. Lift the hard disk drive up from the drive bay bracket. 5 Attach the data and power supply cables to the primary hard disk drive.

Upgrading and Servicing Guide
Page 14
... hard disk drive with the holes on the bottom of the PC. You must have straight connectors. Right angle connectors will bend against the chassis bottom, and may break. Insert and tighten the four screws. 5 Attach the data and power supply cables to the secondary hard disk drive. WARNING: For Parallel ... Guide Parallel ATA hard disk drive WARNING: For Serial ATA hard disk drives, do not use right angle data and power cable connectors. Serial ATA data and power cables must purchase a separate Parallel ATA hard disk drive connection cable. The cable connectors must face the back of the...
... hard disk drive with the holes on the bottom of the PC. You must have straight connectors. Right angle connectors will bend against the chassis bottom, and may break. Insert and tighten the four screws. 5 Attach the data and power supply cables to the secondary hard disk drive. WARNING: For Parallel ... Guide Parallel ATA hard disk drive WARNING: For Serial ATA hard disk drives, do not use right angle data and power cable connectors. Serial ATA data and power cables must purchase a separate Parallel ATA hard disk drive connection cable. The cable connectors must face the back of the...
Upgrading and Servicing Guide
Page 17
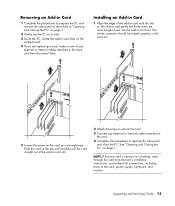
... the side panel and close the PC. The whole connector should be seated properly in card slot. NOTE: If the new card or device isn't working, read through the card manufacturer's installation instructions, and recheck all connections, including those to the card, power supply, keyboard, and monitor. Hold the... page 1. Removing an Add-in Card 1 Complete the procedures to prepare the PC and remove the side panel as described in "Opening and Closing the PC" on page 1. 2 Gently lay the PC on its side. 3 Inside the PC, locate the add-in card slot. 2 Attach the screw to secure the card....
... the side panel and close the PC. The whole connector should be seated properly in card slot. NOTE: If the new card or device isn't working, read through the card manufacturer's installation instructions, and recheck all connections, including those to the card, power supply, keyboard, and monitor. Hold the... page 1. Removing an Add-in Card 1 Complete the procedures to prepare the PC and remove the side panel as described in "Opening and Closing the PC" on page 1. 2 Gently lay the PC on its side. 3 Inside the PC, locate the add-in card slot. 2 Attach the screw to secure the card....


