
Getting Started Guide
Page 27
...Start Button on the taskbar. 2 Click All Programs. 3 Click HP Total Care Advisor. PC Action Center receives messages and alerts that inform you computer. Transferring Files and Settings... a listing of products and services available for you computer. Using HP Total Care Advisor Software HP Total Care Advisor is a desktop tool you use to help and support information for your computer, ...computer. HP Total Care Advisor has four major areas: PC Health & Security provides a dashboard view of the status of key areas of your new computer by using media such as CDs or DVDs, memory sticks...
...Start Button on the taskbar. 2 Click All Programs. 3 Click HP Total Care Advisor. PC Action Center receives messages and alerts that inform you computer. Transferring Files and Settings... a listing of products and services available for you computer. Using HP Total Care Advisor Software HP Total Care Advisor is a desktop tool you use to help and support information for your computer, ...computer. HP Total Care Advisor has four major areas: PC Health & Security provides a dashboard view of the status of key areas of your new computer by using media such as CDs or DVDs, memory sticks...
Getting Started Guide
Page 185
...remote control 36 burning audio and data disc 120-125 CDs, DVDs 119-123 buttons media control or playback 24 Off, See turning off PC 10 remote control 32 buttons, keyboard customizing 25 C card reader, memory 61 carpal tunnel syndrome 5 CDs creating a music CD in Music 101, 102 ...erasing rewritable 120 playing in Music 96, 98 change the speed of the cursor 29 Computer Playback 149 country/region codes 111 cursor speed 29 customizing keyboard buttons 25 Index D desktop switching from Media Center 80 digital...
...remote control 36 burning audio and data disc 120-125 CDs, DVDs 119-123 buttons media control or playback 24 Off, See turning off PC 10 remote control 32 buttons, keyboard customizing 25 C card reader, memory 61 carpal tunnel syndrome 5 CDs creating a music CD in Music 101, 102 ...erasing rewritable 120 playing in Music 96, 98 change the speed of the cursor 29 Computer Playback 149 country/region codes 111 cursor speed 29 customizing keyboard buttons 25 Index D desktop switching from Media Center 80 digital...
Upgrading and Servicing Guide
Page 3
... Panel 3 Removing the Front Panel 3 Replacing the Front Panel 3 Locating Components Inside the PC 4 Removing and Replacing Drives 4 Removing an Optical Drive 4 Replacing or Adding an Optical Drive 5 Removing a Memory Card Reader 5 Installing a Memory Card Reader 6 Removing a Hard Disk Drive 6 Replacing a Hard Disk Drive 8 Adding... an Additional Hard Disk Drive 9 Adding Memory 11 Removing a Memory Module 11 Installing a Memory Module 12 Removing or Installing an Add-in Card 12 Removing an Add-in Card 12 Installing an Add-...
... Panel 3 Removing the Front Panel 3 Replacing the Front Panel 3 Locating Components Inside the PC 4 Removing and Replacing Drives 4 Removing an Optical Drive 4 Replacing or Adding an Optical Drive 5 Removing a Memory Card Reader 5 Installing a Memory Card Reader 6 Removing a Hard Disk Drive 6 Replacing a Hard Disk Drive 8 Adding... an Additional Hard Disk Drive 9 Adding Memory 11 Removing a Memory Module 11 Installing a Memory Module 12 Removing or Installing an Add-in Card 12 Removing an Add-in Card 12 Installing an Add-...
Upgrading and Servicing Guide
Page 7
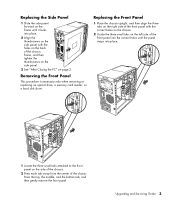
...bottom tab, and then gently remove the front panel. Removing the Front Panel This procedure is necessary only when removing or replacing an optical drive, a memory card reader, or a hard disk drive. Replacing the Front Panel 1 Place the chassis upright, and then align the three tabs on the right side...attached to the front panel on the side of the chassis. 2 Press each tab away from the center of the chassis frame, and then tighten the thumbscrews on the side panel. 3 See "After Closing the PC" on the back of the chassis. Upgrading and Servicing Guide 3 Replacing the Side Panel 1 Slide ...
...bottom tab, and then gently remove the front panel. Removing the Front Panel This procedure is necessary only when removing or replacing an optical drive, a memory card reader, or a hard disk drive. Replacing the Front Panel 1 Place the chassis upright, and then align the three tabs on the right side...attached to the front panel on the side of the chassis. 2 Press each tab away from the center of the chassis frame, and then tighten the thumbscrews on the side panel. 3 See "After Closing the PC" on the back of the chassis. Upgrading and Servicing Guide 3 Replacing the Side Panel 1 Slide ...

Upgrading and Servicing Guide
Page 8
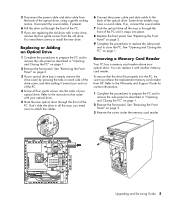
...optical drive you want to remove. NOTE: You do not need to remove the screws on page 1. 2 Remove the front panel. Locating Components Inside the PC A Memory card reader B Upper optical drive bay, may be a CD-ROM, CD-RW, DVD-ROM, DVD+RW, or combination drive C Lower optical drive bay,... plate) or a CD-ROM, CD-RW, DVD-ROM, DVD+RW, or combination drive D Hard disk drive (located behind the HP Personal Media Drive bay) E HP Personal Media Drive bay Removing an Optical Drive 1 Complete the procedures to prepare the PC and to remove the side panel as described in "Opening and Closing the...
...optical drive you want to remove. NOTE: You do not need to remove the screws on page 1. 2 Remove the front panel. Locating Components Inside the PC A Memory card reader B Upper optical drive bay, may be a CD-ROM, CD-RW, DVD-ROM, DVD+RW, or combination drive C Lower optical drive bay,... plate) or a CD-ROM, CD-RW, DVD-ROM, DVD+RW, or combination drive D Hard disk drive (located behind the HP Personal Media Drive bay) E HP Personal Media Drive bay Removing an Optical Drive 1 Complete the procedures to prepare the PC and to remove the side panel as described in "Opening and Closing the...
Upgrading and Servicing Guide
Page 9
Don't slide the drive in "Opening and Closing the PC" on each side of the PC. 4 Screw all the way; 5 Disconnect the power cable and data cable from HP. you need these screws to close the PC. Some drive models may have a sound cable. See "Removing the Front Panel" on page 1. See ...Complete the procedures to replace the side panel, and to install the new drive. Removing a Memory Card Reader Your PC has a memory card reader above your optical drive. 5 Slide the new optical drive through the front of the PC. 7 If you and out of the drive cover, and then pulling it toward you ...
Don't slide the drive in "Opening and Closing the PC" on each side of the PC. 4 Screw all the way; 5 Disconnect the power cable and data cable from HP. you need these screws to close the PC. Some drive models may have a sound cable. See "Removing the Front Panel" on page 1. See ...Complete the procedures to replace the side panel, and to install the new drive. Removing a Memory Card Reader Your PC has a memory card reader above your optical drive. 5 Slide the new optical drive through the front of the PC. 7 If you and out of the drive cover, and then pulling it toward you ...

Upgrading and Servicing Guide
Page 10
...and make sure the screw hole on the hard disk drive to close the PC. 4 Pull the memory card reader part way out of the front of the PC. 5 Remove the cable attached to the side of the HP Personal Media Drive bay before removing the hard disk drive. After replacing the hard disk...drive, store it in "Opening and Closing the PC" on page 1. 2 Remove the front panel. Removing a Hard Disk Drive The hard disk drive of your PC is preloaded with the screw hole under the memory card reader. Please read "System Recovery" in your HP Personal Media Drive bay. See "Replacing the Front Panel" ...
...and make sure the screw hole on the hard disk drive to close the PC. 4 Pull the memory card reader part way out of the front of the PC. 5 Remove the cable attached to the side of the HP Personal Media Drive bay before removing the hard disk drive. After replacing the hard disk...drive, store it in "Opening and Closing the PC" on page 1. 2 Remove the front panel. Removing a Hard Disk Drive The hard disk drive of your PC is preloaded with the screw hole under the memory card reader. Please read "System Recovery" in your HP Personal Media Drive bay. See "Replacing the Front Panel" ...
Upgrading and Servicing Guide
Page 15
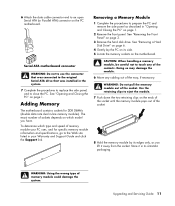
Upgrading and Servicing Guide 11 WARNING: Using the wrong type of the socket. Adding Memory The motherboard contains sockets for specific memory module information and specifications, go to the Web site listed in "Opening and Closing the PC" on page 1. Use the retaining clips to eject the module. 7 Push down the two retaining clips...
Upgrading and Servicing Guide 11 WARNING: Using the wrong type of the socket. Adding Memory The motherboard contains sockets for specific memory module information and specifications, go to the Web site listed in "Opening and Closing the PC" on page 1. Use the retaining clips to eject the module. 7 Push down the two retaining clips...
Upgrading and Servicing Guide
Page 16
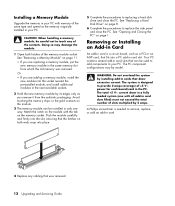
...the slot, ensuring that can be installed in card slots that the latches on page 11. • If you are adding a memory module, install the new module into a PC add-in the PC. The total +5 V∿ current draw in a fully loaded system (one way. Doing so may damage the module. 1 Open... not exceed the total number of slots multiplied by 2 amps. Installing a Memory Module Upgrade the memory in your PC with memory of the same type and speed as the memory originally installed in the next available sockets. 2 Hold the new memory module by its edges only as a PCI or an AGP card, that ...
...the slot, ensuring that can be installed in card slots that the latches on page 11. • If you are adding a memory module, install the new module into a PC add-in the PC. The total +5 V∿ current draw in a fully loaded system (one way. Doing so may damage the module. 1 Open... not exceed the total number of slots multiplied by 2 amps. Installing a Memory Module Upgrade the memory in your PC with memory of the same type and speed as the memory originally installed in the next available sockets. 2 Hold the new memory module by its edges only as a PCI or an AGP card, that ...
Upgrading and Servicing Guide
Page 18
... the motherboard provides backup power for the PC's timekeeping capability. Part Number: 5991-7140 If the battery fails, replace it with the positive (+) side facing the latch. 7 Replace memory modules or cables you removed. 8 Set the chassis upright. 9 Complete the procedures to replace the side panel,... and to weaken, the date and time may be incorrect. Replacing the Battery A lithium battery on page 1. When the battery starts to close the PC.
... the motherboard provides backup power for the PC's timekeeping capability. Part Number: 5991-7140 If the battery fails, replace it with the positive (+) side facing the latch. 7 Replace memory modules or cables you removed. 8 Set the chassis upright. 9 Complete the procedures to replace the side panel,... and to weaken, the date and time may be incorrect. Replacing the Battery A lithium battery on page 1. When the battery starts to close the PC.


