ProtectTools (Select Models Only) - Windows Vista
Page 46
... the computer, you must be able to manage various password settings. Select Start > All Programs > HP ProtectTools Security Manager. 2. NOTE To disable automatic DriveLock protection for HP ProtectTools." ● No DriveLock passwords have set in Computer Setup, and also to undo a password... enabled, the DriveLock passwords will not be automatically generated and set in the HP ProtectTools window. Click Apply, and then click OK in the HP ProtectTools window to save your notebook from unauthorized use BIOS Configuration to "Enabling the embedded security chip" and "...
... the computer, you must be able to manage various password settings. Select Start > All Programs > HP ProtectTools Security Manager. 2. NOTE To disable automatic DriveLock protection for HP ProtectTools." ● No DriveLock passwords have set in Computer Setup, and also to undo a password... enabled, the DriveLock passwords will not be automatically generated and set in the HP ProtectTools window. Click Apply, and then click OK in the HP ProtectTools window to save your notebook from unauthorized use BIOS Configuration to "Enabling the embedded security chip" and "...
Software Update, Backup and Recovery - Windows Vista
Page 6
...2. Accessing computer information Before you are provided on the screen. 2 Chapter 1 Software updates ENWW Use the arrow keys to enter Setup" message is Notebook. ● The product family name, series number, and serial number (S/N) are already in the lower-left corner of the disc, visit the... HP Web site at http://www.hp.com. Some BIOS updates may be displayed by pressing fn+esc (if you access the updates for displaying BIOS information: 1. BIOS ...
...2. Accessing computer information Before you are provided on the screen. 2 Chapter 1 Software updates ENWW Use the arrow keys to enter Setup" message is Notebook. ● The product family name, series number, and serial number (S/N) are already in the lower-left corner of the disc, visit the... HP Web site at http://www.hp.com. Some BIOS updates may be displayed by pressing fn+esc (if you access the updates for displaying BIOS information: 1. BIOS ...

Drives - Windows Vista
Page 9
... is on, in the Sleep state, or in Hibernation. ■ If you are not sure whether the computer is off or in Hibernation, turn the notebook on a flat surface. 6. Disconnect all external devices connected to the computer. 4. Unplug the power cord from the computer. 5.
... is on, in the Sleep state, or in Hibernation. ■ If you are not sure whether the computer is off or in Hibernation, turn the notebook on a flat surface. 6. Disconnect all external devices connected to the computer. 4. Unplug the power cord from the computer. 5.

Notebook Tour
Page 2
Contents 1 Components Top components 1-2 Lights 1-2 Pointing devices 1-4 Buttons, switches and readers 1-6 Keys 1-8 Front components 1-9 Rear components 1-9 Right-side components 1-10 Left-side components 1-11 Bottom components 1-13 Wireless antennae 1-15 Additional hardware components 1-16 Labels 1-17 2 Specifications Operating environment 2-1 Rated input power 2-2 Index Notebook Tour ii
Contents 1 Components Top components 1-2 Lights 1-2 Pointing devices 1-4 Buttons, switches and readers 1-6 Keys 1-8 Front components 1-9 Rear components 1-9 Right-side components 1-10 Left-side components 1-11 Bottom components 1-13 Wireless antennae 1-15 Additional hardware components 1-16 Labels 1-17 2 Specifications Operating environment 2-1 Rated input power 2-2 Index Notebook Tour ii

Notebook Tour
Page 3
Select Hardware tab > Device Manager. The illustrations in this guide identify the standard external features included in most computer models. Select Start > My Computer. 2. Notebook Tour 1-1 To see a list of the computer. You can also add hardware or modify your device configurations using Device Manager. ✎ Components included with the computer vary by region and by model. 1 Components This chapter explains the hardware features of hardware installed on the computer: 1. In the left pane of the System Tasks window, select View system information. 3.
Select Hardware tab > Device Manager. The illustrations in this guide identify the standard external features included in most computer models. Select Start > My Computer. 2. Notebook Tour 1-1 To see a list of the computer. You can also add hardware or modify your device configurations using Device Manager. ✎ Components included with the computer vary by region and by model. 1 Components This chapter explains the hardware features of hardware installed on the computer: 1. In the left pane of the System Tasks window, select View system information. 3.

Notebook Tour
Page 4
Components Top components Lights Component 1 Power lights* (2) Description On: The computer is off or in standby. Blinking: The computer is in hibernation. (Continued) 1-2 Notebook Tour Off: The computer is on. Blinking rapidly: An HP Smart AC Adapter with a higher power rating should be connected.
Components Top components Lights Component 1 Power lights* (2) Description On: The computer is off or in standby. Blinking: The computer is in hibernation. (Continued) 1-2 Notebook Tour Off: The computer is on. Blinking rapidly: An HP Smart AC Adapter with a higher power rating should be connected.

Notebook Tour
Page 5
... drive or optical drive is being accessed. The power light on the front of the computer is visible whether the computer is open or closed . Notebook Tour 1-3 On: Computer sound is turned off. 6 Battery light Amber: A battery pack is close to full charge capacity. Green: A battery pack is charging. Amber: The...
... drive or optical drive is being accessed. The power light on the front of the computer is visible whether the computer is open or closed . Notebook Tour 1-3 On: Computer sound is turned off. 6 Battery light Amber: A battery pack is close to full charge capacity. Green: A battery pack is charging. Amber: The...

Notebook Tour
Page 6
... screen. Scrolls up or down. *This table describes default settings.To view and change TouchPad preferences, select Start > Control Panel > Printers and Other Hardware > Mouse. 1-4 Notebook Tour
... screen. Scrolls up or down. *This table describes default settings.To view and change TouchPad preferences, select Start > Control Panel > Printers and Other Hardware > Mouse. 1-4 Notebook Tour

Notebook Tour
Page 7
Pointing stick (select models only) Components Component 1 Left pointing stick button 2 Center pointing stick button 3 Pointing stick 4 Right pointing stick button Description Functions like the left button on the screen. Moves the pointer and selects or activates items on an external mouse. Functions like the center button on an external mouse. Notebook Tour 1-5 Functions like the right button on an external mouse.
Pointing stick (select models only) Components Component 1 Left pointing stick button 2 Center pointing stick button 3 Pointing stick 4 Right pointing stick button Description Functions like the left button on the screen. Moves the pointer and selects or activates items on an external mouse. Functions like the center button on an external mouse. Notebook Tour 1-5 Functions like the right button on an external mouse.

Notebook Tour
Page 8
Components Buttons, switches and readers Component 1 Power button* 2 Display switch 1-6 Description When the computer is on the computer. ■ In standby, briefly press to exit standby. ■ In hibernation, briefly press to turn on . (Continued) Notebook Tour If the computer has stopped responding and Windows shutdown procedures cannot be used, press and hold the power button for at least 5 seconds to exit hibernation. Turns off the display if the display is closed while the computer is ■ Off, press to turn off the computer.
Components Buttons, switches and readers Component 1 Power button* 2 Display switch 1-6 Description When the computer is on the computer. ■ In standby, briefly press to exit standby. ■ In hibernation, briefly press to turn on . (Continued) Notebook Tour If the computer has stopped responding and Windows shutdown procedures cannot be used, press and hold the power button for at least 5 seconds to exit hibernation. Turns off the display if the display is closed while the computer is ■ Off, press to turn off the computer.
Notebook Tour
Page 9
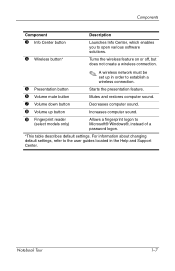
For information about changing default settings, refer to the user guides located in order to establish a wireless connection. Mutes and restores computer sound. Notebook Tour 1-7 Starts the presentation feature. Turns the wireless feature on or off, but does not create a wireless connection. 5 Presentation button 6 Volume mute button 7 Volume down ...
For information about changing default settings, refer to the user guides located in order to establish a wireless connection. Mutes and restores computer sound. Notebook Tour 1-7 Starts the presentation feature. Turns the wireless feature on or off, but does not create a wireless connection. 5 Presentation button 6 Volume mute button 7 Volume down ...

Notebook Tour
Page 10
Can be used system functions when pressed in combination with the fn key. 1-8 Notebook Tour Execute frequently used system functions when pressed in combination with the fn key. Executes frequently used like the keys on an external numeric keypad. Displays the Windows Start menu. Displays a shortcut menu for items beneath the pointer. Components Keys Component 1 esc key 2 fn key 3 Windows logo key 4 Windows applications key 5 Embedded numeric keypad 6 Function keys Description Displays system information when pressed in combination with a function key or the esc key.
Can be used system functions when pressed in combination with the fn key. 1-8 Notebook Tour Execute frequently used system functions when pressed in combination with the fn key. Executes frequently used like the keys on an external numeric keypad. Displays the Windows Start menu. Displays a shortcut menu for items beneath the pointer. Components Keys Component 1 esc key 2 fn key 3 Windows logo key 4 Windows applications key 5 Embedded numeric keypad 6 Function keys Description Displays system information when pressed in combination with a function key or the esc key.

Notebook Tour
Page 11
Notebook Tour 1-9 Rear components Component 1 Power connector 2 External monitor port Description Connects an AC adapter or an optional power adapter. Front components Components Component 1 Display release latch Description Opens the computer. Connects an external monitor.
Notebook Tour 1-9 Rear components Component 1 Power connector 2 External monitor port Description Connects an AC adapter or an optional power adapter. Front components Components Component 1 Display release latch Description Opens the computer. Connects an external monitor.

Notebook Tour
Page 12
Connect optional USB devices. Connects an optional serial device. 1-10 Notebook Tour Records sound. Connects an optional computer headset microphone, stereo array microphone, or a monaural microphone. Components Right-side components Component 1 Audio-out (headphone) jack 2 Internal microphone 3 Audio-in (microphone) jack 4 USB ports (2) 5 Optical drive 6 Serial port (select models only) Description Produces computer sound when connected to optional powered stereo speakers, headphones, ear buds, a headset, or television audio. Reads an optical disc.
Connect optional USB devices. Connects an optional serial device. 1-10 Notebook Tour Records sound. Connects an optional computer headset microphone, stereo array microphone, or a monaural microphone. Components Right-side components Component 1 Audio-out (headphone) jack 2 Internal microphone 3 Audio-in (microphone) jack 4 USB ports (2) 5 Optical drive 6 Serial port (select models only) Description Produces computer sound when connected to optional powered stereo speakers, headphones, ear buds, a headset, or television audio. Reads an optical disc.

Notebook Tour
Page 13
Connects an optional S-Video device such as a deterrent, but may not prevent the computer from being mishandled or stolen. Connects a network cable. Left-side components Components Component 1 Security cable slot 2 RJ-45 (network) jack 3 RJ-11 (modem) jack 4 S-Video-out jack Description Attaches an optional security cable to the computer. Ä The security cable is designed to act as a television, VCR, camcorder, overhead projector, or video capture card. (Continued) Notebook Tour 1-11 Connects a modem cable.
Connects an optional S-Video device such as a deterrent, but may not prevent the computer from being mishandled or stolen. Connects a network cable. Left-side components Components Component 1 Security cable slot 2 RJ-45 (network) jack 3 RJ-11 (modem) jack 4 S-Video-out jack Description Attaches an optional security cable to the computer. Ä The security cable is designed to act as a television, VCR, camcorder, overhead projector, or video capture card. (Continued) Notebook Tour 1-11 Connects a modem cable.

Notebook Tour
Page 14
... an adjoining optional printer, or a soft surface, such as a camcorder. Supports optional Type I and Type II 32-bit (CardBus) or 16-bit PC Cards. 1-12 Notebook Tour Connects an optional USB device. PC Card slot Description Enables airflow to cool internal components and prevent overheating. Supports Secure Digital (SD) Memory Cards...
... an adjoining optional printer, or a soft surface, such as a camcorder. Supports optional Type I and Type II 32-bit (CardBus) or 16-bit PC Cards. 1-12 Notebook Tour Connects an optional USB device. PC Card slot Description Enables airflow to cool internal components and prevent overheating. Supports Secure Digital (SD) Memory Cards...

Notebook Tour
Page 15
Holds the hard drive. Connects an optional docking device. Holds a standard size business card. Bottom components Components Component 1 Primary battery bay 2 Primary battery pack release latches (2) 3 Business card holder 4 Hard drive bay 5 Docking connector 6 Expansion memory module compartment Description Holds the primary battery pack. Release the primary battery pack from the battery bay. Contains the expansion memory module slot. (Continued) Notebook Tour 1-13
Holds the hard drive. Connects an optional docking device. Holds a standard size business card. Bottom components Components Component 1 Primary battery bay 2 Primary battery pack release latches (2) 3 Business card holder 4 Hard drive bay 5 Docking connector 6 Expansion memory module compartment Description Holds the primary battery pack. Release the primary battery pack from the battery bay. Contains the expansion memory module slot. (Continued) Notebook Tour 1-13

Notebook Tour
Page 16
... cycle on a hard, flat surface. Use the computer only on and off during routine operation. 8 Accessory battery connector Connects an optional accessory battery pack. 1-14 Notebook Tour
... cycle on a hard, flat surface. Use the computer only on and off during routine operation. 8 Accessory battery connector Connects an optional accessory battery pack. 1-14 Notebook Tour

Notebook Tour
Page 17
These antennae are not visible from obstructions. Notebook Tour 1-15 Components Wireless antennae Two wireless antennae send and receive wireless device signals. For wireless regulatory notices pertaining to your region, refer to the Regulatory, Safety and Environmental Notices located in the Help and Support Center. ✎ For optimal transmission, keep the areas immediately around the antennae free from the outside of the computer.
These antennae are not visible from obstructions. Notebook Tour 1-15 Components Wireless antennae Two wireless antennae send and receive wireless device signals. For wireless regulatory notices pertaining to your region, refer to the Regulatory, Safety and Environmental Notices located in the Help and Support Center. ✎ For optimal transmission, keep the areas immediately around the antennae free from the outside of the computer.

Notebook Tour
Page 18
...-11 telephone jack or to a non-RJ-11 telephone jack. *Modem cables, battery packs, and power cords vary in appearance by region and country. 1-16 Notebook Tour Components Additional hardware components Component Description 1 Power cord* Connects an AC adapter to an AC outlet...
...-11 telephone jack or to a non-RJ-11 telephone jack. *Modem cables, battery packs, and power cords vary in appearance by region and country. 1-16 Notebook Tour Components Additional hardware components Component Description 1 Power cord* Connects an AC adapter to an AC outlet...


