Resolving Start Up and No Boot Problems Checklist
Page 1
HP Notebook PCs - Symptom: LED lights do not glow, display is no battery or AC power at the notebook, contact HP for at -a-time If possible, boot to BIOS mode (f10) and run Memory Test and Hard Drive Test If all USB devices and media cards. 2. Connect an external monitor to ... devices, peripherals and do not glow when power button is pressed, there is black, computer does not start If LEDs do hard reset If memory or hard drive components were replaced, reinstall original components Remove memory modules and replace one-at least 15 seconds. 3. If computer does not start...
HP Notebook PCs - Symptom: LED lights do not glow, display is no battery or AC power at the notebook, contact HP for at -a-time If possible, boot to BIOS mode (f10) and run Memory Test and Hard Drive Test If all USB devices and media cards. 2. Connect an external monitor to ... devices, peripherals and do not glow when power button is pressed, there is black, computer does not start If LEDs do hard reset If memory or hard drive components were replaced, reinstall original components Remove memory modules and replace one-at least 15 seconds. 3. If computer does not start...
Resolving Start Up and No Boot Problems Checklist
Page 2
... displays a blue screen or continually restarts Trying to restart the PC after an error message can usually bypass the error and the PC can run in Safe mode to http://www.hp.com/go/helpandsupport Run HP Support Assistant www.hp.com/go/helpandsupport for latest updates Run Windows Update www.update.... updates Run the anti-virus program Search www.microsoft.com for terms in error message Search www.hp.com for terms in error message Boot to BIOS Diagnostics (f10) and run memory and hard drive diagnostic tests Boot to Windows Advanced boot options (f8) and: o Select Disable automatic restart on...
... displays a blue screen or continually restarts Trying to restart the PC after an error message can usually bypass the error and the PC can run in Safe mode to http://www.hp.com/go/helpandsupport Run HP Support Assistant www.hp.com/go/helpandsupport for latest updates Run Windows Update www.update.... updates Run the anti-virus program Search www.microsoft.com for terms in error message Search www.hp.com for terms in error message Boot to BIOS Diagnostics (f10) and run memory and hard drive diagnostic tests Boot to Windows Advanced boot options (f8) and: o Select Disable automatic restart on...

Limited warranty and technical support - (1 Year)
Page 8
...state. Before returning the HP Product for your HP Product. Types of these parts, a replaceable part can be fixed using HP software, see the manufacturer's Web site, if available. During service, the hard drive may be available. Customer Replaceable Parts Where available, HP ships approved replacement parts ... related to the operating system or preinstalled software. You should make periodic backup copies of the data and programs stored on your hard drive or other storage devices as a precaution against possible failures, alteration, or loss of the data. The following services: „...
...state. Before returning the HP Product for your HP Product. Types of these parts, a replaceable part can be fixed using HP software, see the manufacturer's Web site, if available. During service, the hard drive may be available. Customer Replaceable Parts Where available, HP ships approved replacement parts ... related to the operating system or preinstalled software. You should make periodic backup copies of the data and programs stored on your hard drive or other storage devices as a precaution against possible failures, alteration, or loss of the data. The following services: „...
Getting Started - Windows 7
Page 6
... Removing the battery ...39 Removing or replacing the vanity cover 40 Removing the vanity cover 40 Replacing the vanity cover 40 Replacing the hard drive ...42 Removing the hard drive ...42 Installing a hard drive ...42 Replacing the memory module ...44 Updating programs and drivers ...46 Routine care ...46 Cleaning the display ...46 Cleaning the TouchPad and...
... Removing the battery ...39 Removing or replacing the vanity cover 40 Removing the vanity cover 40 Replacing the vanity cover 40 Replacing the hard drive ...42 Removing the hard drive ...42 Installing a hard drive ...42 Replacing the memory module ...44 Updating programs and drivers ...46 Routine care ...46 Cleaning the display ...46 Cleaning the TouchPad and...
Getting Started - Windows 7
Page 19
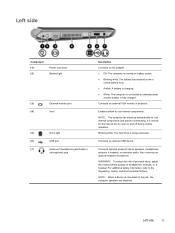
... television audio. Also connects an optional headset microphone. Left side Component (1) (2) Power connector Battery light (3) External monitor port (4) Vent (5) Drive light (6) USB port (7) Audio-out (headphone) jack/Audio-in (microphone) jack Description Connects an AC adapter. ● Off: The ...on and off during routine operation. NOTE: The computer fan starts up automatically to cool internal components. Blinking white: The hard drive is fully charged. Enables airflow to cool internal components and prevent overheating. WARNING! NOTE: When a device is connected ...
... television audio. Also connects an optional headset microphone. Left side Component (1) (2) Power connector Battery light (3) External monitor port (4) Vent (5) Drive light (6) USB port (7) Audio-out (headphone) jack/Audio-in (microphone) jack Description Connects an AC adapter. ● Off: The ...on and off during routine operation. NOTE: The computer fan starts up automatically to cool internal components. Blinking white: The hard drive is fully charged. Enables airflow to cool internal components and prevent overheating. WARNING! NOTE: When a device is connected ...
Getting Started - Windows 7
Page 26
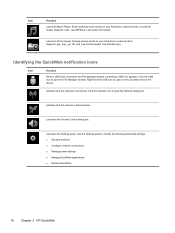
Click the network icon to open a menu to open the Network dialog box. Launches the Settings panel. Browse photos stored on your hard drive or external drive. Right-click the USB icon to safely remove the device. Icon Function Launches Music Player. Supports .mp3, .aac (MPEG-4), and ... Set date and time ● Configure network connections ● Manage power settings ● Manage QuickWeb applications ● Restore QuickWeb 18 Chapter 3 HP QuickWeb Select and play music stored on your hard drive, external drives, or external media. Launches Photo Viewer.
Click the network icon to open a menu to open the Network dialog box. Launches the Settings panel. Browse photos stored on your hard drive or external drive. Right-click the USB icon to safely remove the device. Icon Function Launches Music Player. Supports .mp3, .aac (MPEG-4), and ... Set date and time ● Configure network connections ● Manage power settings ● Manage QuickWeb applications ● Restore QuickWeb 18 Chapter 3 HP QuickWeb Select and play music stored on your hard drive, external drives, or external media. Launches Photo Viewer.
Getting Started - Windows 7
Page 45
6 Maintenance ● Replacing the battery ● Removing or replacing the vanity cover ● Replacing the hard drive ● Replacing the memory module ● Updating programs and drivers ● Routine care 37
6 Maintenance ● Replacing the battery ● Removing or replacing the vanity cover ● Replacing the hard drive ● Replacing the memory module ● Updating programs and drivers ● Routine care 37

Getting Started - Windows 7
Page 48
To remove the vanity cover: 1. Replacing the vanity cover Replace the vanity cover after accessing the memory module slot, hard drive, SIM card insertion slot, regulatory label, and other components. Removing the vanity cover Remove the vanity cover to release the vanity ...cover. 3. Slide the release button (2) inward to access the memory module slot, hard drive, SIM card insertion slot, regulatory label, and other components. Rotate the back edge (2) of the vanity cover into place. 40 Chapter 6 Maintenance...
To remove the vanity cover: 1. Replacing the vanity cover Replace the vanity cover after accessing the memory module slot, hard drive, SIM card insertion slot, regulatory label, and other components. Removing the vanity cover Remove the vanity cover to release the vanity ...cover. 3. Slide the release button (2) inward to access the memory module slot, hard drive, SIM card insertion slot, regulatory label, and other components. Rotate the back edge (2) of the vanity cover into place. 40 Chapter 6 Maintenance...
Getting Started - Windows 7
Page 50
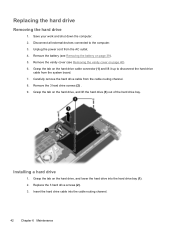
... the 3 hard drive screws (2) . 9. Replace the 3 hard drive screws (2). 3. Insert the hard drive cable into the hard drive bay (1). 2. Grasp the tab on the hard drive, and lower the hard drive into the cable routing channel. 42 Chapter 6 Maintenance Remove the battery (see Removing the vanity cover on page 40). 6. Grasp the tab on the hard drive, and lift the hard drive (3) out of the hard drive bay...
... the 3 hard drive screws (2) . 9. Replace the 3 hard drive screws (2). 3. Insert the hard drive cable into the hard drive bay (1). 2. Grasp the tab on the hard drive, and lower the hard drive into the cable routing channel. 42 Chapter 6 Maintenance Remove the battery (see Removing the vanity cover on page 40). 6. Grasp the tab on the hard drive, and lift the hard drive (3) out of the hard drive bay...

Getting Started - Windows 7
Page 51
Reconnect external power and external devices. 8. Replace the vanity cover (see Inserting the battery on page 40). 6. Replacing the hard drive 43 Replace the battery (see Replacing the vanity cover on page 38). 7. 4. Turn on the hard drive cable connector (3), and then carefully press the hard drive cable connector onto the system board until it snaps into place. 5. Grasp the tab on the computer.
Reconnect external power and external devices. 8. Replace the vanity cover (see Inserting the battery on page 40). 6. Replacing the hard drive 43 Replace the battery (see Replacing the vanity cover on page 38). 7. 4. Turn on the hard drive cable connector (3), and then carefully press the hard drive cable connector onto the system board until it snaps into place. 5. Grasp the tab on the computer.
Getting Started - Windows 7
Page 56
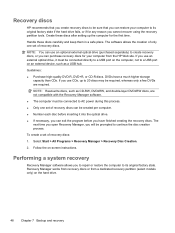
...Start > All Programs > Recovery Manager > Recovery Disc Creation. 2. Handle these discs after setting up to its original factory state if the hard drive fails, or if for the first time. NOTE: You can exit the program before inserting it must be connected to continue the disc creation...of recovery discs: 1. NOTE: Read-write discs, such as a USB hub. Follow the on the hard drive. 48 Chapter 7 Backup and recovery Recovery Manager works from recovery discs or from the HP Web site. If you have a much higher storage capacity than CDs. Performing a system recovery Recovery ...
...Start > All Programs > Recovery Manager > Recovery Disc Creation. 2. Handle these discs after setting up to its original factory state if the hard drive fails, or if for the first time. NOTE: You can exit the program before inserting it must be connected to continue the disc creation...of recovery discs: 1. NOTE: Read-write discs, such as a USB hub. Follow the on the hard drive. 48 Chapter 7 Backup and recovery Recovery Manager works from recovery discs or from the HP Web site. If you have a much higher storage capacity than CDs. Performing a system recovery Recovery ...
Getting Started - Windows 7
Page 57
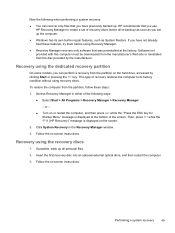
...computer, and then press esc while the "Press the ESC key for Startup Menu" message is displayed on the hard drive, accessed by the manufacturer. Then, press f11 while the "F11 (HP Recovery)" message is displayed at the factory. Recovery using recovery discs. Insert the first recovery disc into an ... computer from the disc provided by clicking Start or pressing the f11 key. If you set of the screen. HP recommends that was preinstalled at the bottom of recovery discs (entire drive backup) as soon as you have previously backed up. If possible, back up the computer. ● Windows...
...computer, and then press esc while the "Press the ESC key for Startup Menu" message is displayed on the hard drive, accessed by the manufacturer. Then, press f11 while the "F11 (HP Recovery)" message is displayed at the factory. Recovery using recovery discs. Insert the first recovery disc into an ... computer from the disc provided by clicking Start or pressing the f11 key. If you set of the screen. HP recommends that was preinstalled at the bottom of recovery discs (entire drive backup) as soon as you have previously backed up. If possible, back up the computer. ● Windows...
Getting Started - Windows 7
Page 58
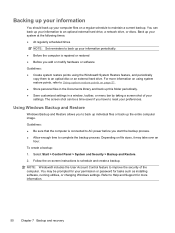
... up this folder periodically. ● Save customized settings in the Documents library and back up your information to an optional external hard drive, a network drive, or discs. Follow the on using the Windows® System Restore feature, and periodically copy them to an optical disc or an ...external hard drive. You can be prompted for your permission or password for more information on -screen instructions to improve the security of your settings....
... up this folder periodically. ● Save customized settings in the Documents library and back up your information to an optional external hard drive, a network drive, or discs. Follow the on using the Windows® System Restore feature, and periodically copy them to an optical disc or an ...external hard drive. You can be prompted for your permission or password for more information on -screen instructions to improve the security of your settings....

Getting Started - Windows 7
Page 59
... or extensively modify software or hardware ● Periodically, whenever the computer is functioning optimally NOTE: If you revert to a restore point and then change your hard drive at a previous date and time), when the computer was functioning optimally, follow these steps: 1. In the left pane, click System protection. 3. Click the System Protection...
... or extensively modify software or hardware ● Periodically, whenever the computer is functioning optimally NOTE: If you revert to a restore point and then change your hard drive at a previous date and time), when the computer was functioning optimally, follow these steps: 1. In the left pane, click System protection. 3. Click the System Protection...
Getting Started - Windows 7
Page 66
...and programs, updating 46 E esc key, identifying 7 F f11 49 fn key, identifying 7, 29 full system recovery 47 H hard drive installing 42 removing 42 hard drive, replacing 42 headphone (audio-out) jack 11 Help and Support action key 30 hotkey description 29 I input power 56 integrated webcam...10 K keyboard hotkey, identifying 29 keyboard, using 29 keys action 7 esc 7 fn 7 Windows applications 7 Windows logo 7 L labels Bluetooth 54 HP Mobile Broadband Module 54 Microsoft Certificate of Authenticity 54 regulatory 54 serial number 54 SIM 54 wireless certification 54 WLAN 54 latch, battery locking 13...
...and programs, updating 46 E esc key, identifying 7 F f11 49 fn key, identifying 7, 29 full system recovery 47 H hard drive installing 42 removing 42 hard drive, replacing 42 headphone (audio-out) jack 11 Help and Support action key 30 hotkey description 29 I input power 56 integrated webcam...10 K keyboard hotkey, identifying 29 keyboard, using 29 keys action 7 esc 7 fn 7 Windows applications 7 Windows logo 7 L labels Bluetooth 54 HP Mobile Broadband Module 54 Microsoft Certificate of Authenticity 54 regulatory 54 serial number 54 SIM 54 wireless certification 54 WLAN 54 latch, battery locking 13...

HP Mini 210 - Maintenance and Service Guide
Page 6
Component replacement procedures 30 Computer feet ...30 Battery ...31 SIM ...33 Service access cover ...34 Hard drive ...37 WWAN and GPS modules (select models only 40 WLAN module ...42 Memory module ...44 RTC battery ...45 Keyboard ...46 Top cover ...49 Speakers ...53 ... 75 6 Specifications ...76 Device specifications ...76 25.7-cm (10.1-in) high-definition AntiGlare display specifications 77 25.7-cm (10.1-in) WSVGA AntiGlare display specifications 78 Hard drive specifications ...79 vi
Component replacement procedures 30 Computer feet ...30 Battery ...31 SIM ...33 Service access cover ...34 Hard drive ...37 WWAN and GPS modules (select models only 40 WLAN module ...42 Memory module ...44 RTC battery ...45 Keyboard ...46 Top cover ...49 Speakers ...53 ... 75 6 Specifications ...76 Device specifications ...76 25.7-cm (10.1-in) high-definition AntiGlare display specifications 77 25.7-cm (10.1-in) WSVGA AntiGlare display specifications 78 Hard drive specifications ...79 vi

HP Mini 210 - Maintenance and Service Guide
Page 7
... to a previous date and time 81 Backing up and recovering using HP Recovery Manager 82 Backing up your information 82 Creating a set of recovery discs 83 Performing a recovery ...84 Recovering using the recovery discs 84 Recovering using the partition on the hard drive (select models only 85 8 Power cord set requirements ...86 Requirements...
... to a previous date and time 81 Backing up and recovering using HP Recovery Manager 82 Backing up your information 82 Creating a set of recovery discs 83 Performing a recovery ...84 Recovering using the recovery discs 84 Recovering using the partition on the hard drive (select models only 85 8 Power cord set requirements ...86 Requirements...
HP Mini 210 - Maintenance and Service Guide
Page 10
... Ethernet Wireless Description Supports the following 9.5-mm (0.37-in) × 6.35-cm (2.5-inch), parallel SATA, 7200-rpm or 5400-rpm hard drives: ● 320-GB NOTE: Supported only on computers with Windows 7 Starter with Notebook COA Emerging Markets, Windows 7 Basic with Notebook COA...WLAN antennas built into display assembly WWAN by way of: ● Ericcson F3307 HSPA Mini Card (select models only) ● Qualcomm Gobi 2000 3G module (select models only) GPS by way of Broadcom GPS Mini Card (select models only) Subscriber identity module (SIM) security 2 Chapter 1 Product description
... Ethernet Wireless Description Supports the following 9.5-mm (0.37-in) × 6.35-cm (2.5-inch), parallel SATA, 7200-rpm or 5400-rpm hard drives: ● 320-GB NOTE: Supported only on computers with Windows 7 Starter with Notebook COA Emerging Markets, Windows 7 Basic with Notebook COA...WLAN antennas built into display assembly WWAN by way of: ● Ericcson F3307 HSPA Mini Card (select models only) ● Qualcomm Gobi 2000 3G module (select models only) GPS by way of Broadcom GPS Mini Card (select models only) Subscriber identity module (SIM) security 2 Chapter 1 Product description
HP Mini 210 - Maintenance and Service Guide
Page 12
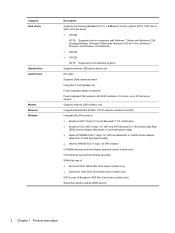
Category Operating system Serviceability Description Windows 7 Home Basic Windows 7 Home Premium (select countries) Windows 7 Starter Windows 7 Professional (select countries) Support for HP QuickWeb USB Key Recovery support (for Service, refurbish centers, and repair centers) End-user replaceable parts: AC adapter Battery (system) Hard drive Memory module WLAN module or WLAN+Bluetooth module WWAN module (select models only) GPS module (select models only) 4 Chapter 1 Product description
Category Operating system Serviceability Description Windows 7 Home Basic Windows 7 Home Premium (select countries) Windows 7 Starter Windows 7 Professional (select countries) Support for HP QuickWeb USB Key Recovery support (for Service, refurbish centers, and repair centers) End-user replaceable parts: AC adapter Battery (system) Hard drive Memory module WLAN module or WLAN+Bluetooth module WWAN module (select models only) GPS module (select models only) 4 Chapter 1 Product description

HP Mini 210 - Maintenance and Service Guide
Page 18
...internal components. NOTE: The security cable is being mishandled or stolen. Connects a network cable. Component (1) (2) Power connector Battery light (3) External monitor port (4) Vent (5) Drive light Description Connects an AC adapter. ● Off: The computer is fully charged. Enables airflow to cool internal components and prevent overheating. Component (5) Security cable... is charging. ● White: The computer is connected to external power and the battery is running on and off during routine operation. Blinking: The hard drive is designed to the computer.
...internal components. NOTE: The security cable is being mishandled or stolen. Connects a network cable. Component (1) (2) Power connector Battery light (3) External monitor port (4) Vent (5) Drive light Description Connects an AC adapter. ● Off: The computer is fully charged. Enables airflow to cool internal components and prevent overheating. Component (5) Security cable... is charging. ● White: The computer is connected to external power and the battery is running on and off during routine operation. Blinking: The hard drive is designed to the computer.

