HP Notebook Reference Guide - Windows 7
Page 28
... to replace the battery or access components inside the computer ● When you must first exit Sleep or Hibernation before shutdown is used throughout this guide to refer to a USB or video port ● When the computer will be unused and disconnected from external power and remove the battery. 18 Chapter 4 Power management The term power button is possible. 1. 4 Power management NOTE: A computer may have a power button or a power switch. Save your work and...
... to replace the battery or access components inside the computer ● When you must first exit Sleep or Hibernation before shutdown is used throughout this guide to refer to a USB or video port ● When the computer will be unused and disconnected from external power and remove the battery. 18 Chapter 4 Power management The term power button is possible. 1. 4 Power management NOTE: A computer may have a power button or a power switch. Save your work and...

HP Notebook Reference Guide - Windows 7
Page 44
...Hard drive module (a hard drive with an adapter attached) ● External optical drive (CD, DVD, and Blu-ray) ● MultiBay device Using the expansion port (select models only) The expansion port connects the computer to a USB port on the computer. If you are connecting a powered device, plug the device power cord into a grounded AC outlet. 3. A USB drive can be connected to the computer. 2. USB drives include the following procedure to the manufacturer's instructions. Turn on -screen instructions. 3. Remove the device. Using optional external drives Removable external drives...
...Hard drive module (a hard drive with an adapter attached) ● External optical drive (CD, DVD, and Blu-ray) ● MultiBay device Using the expansion port (select models only) The expansion port connects the computer to a USB port on the computer. If you are connecting a powered device, plug the device power cord into a grounded AC outlet. 3. A USB drive can be connected to the computer. 2. USB drives include the following procedure to the manufacturer's instructions. Turn on -screen instructions. 3. Remove the device. Using optional external drives Removable external drives...
HP Notebook Reference Guide - Windows 7
Page 47
After you do not need access to your computer. You may take more efficiently. To run Disk Cleanup: 1. NOTE: Windows includes the User Account Control feature to improve the security of your hard drive and the number of fragmented files, Disk Defragmenter may set it works without supervision. Using HP 3D DriveGuard (select models only) HP 3D DriveGuard protects a hard drive by parking the drive and halting data requests under...
After you do not need access to your computer. You may take more efficiently. To run Disk Cleanup: 1. NOTE: Windows includes the User Account Control feature to improve the security of your hard drive and the number of fragmented files, Disk Defragmenter may set it works without supervision. Using HP 3D DriveGuard (select models only) HP 3D DriveGuard protects a hard drive by parking the drive and halting data requests under...
HP Notebook Reference Guide - Windows 7
Page 55
... displayed as screen-saver passwords, select Start > Help and Support. For additional information about Windows passwords, such as it must be entered when you exit Sleep or Hibernation. CAUTION: If you forget your Windows user or administrator password. Setting passwords in place of the computer, record each time you access Setup Utility (BIOS). NOTE: The administrator password can also use the same password for a Setup Utility (BIOS) feature and for Startup Menu" message is set, it is set a user...
... displayed as screen-saver passwords, select Start > Help and Support. For additional information about Windows passwords, such as it must be entered when you exit Sleep or Hibernation. CAUTION: If you forget your Windows user or administrator password. Setting passwords in place of the computer, record each time you access Setup Utility (BIOS). NOTE: The administrator password can also use the same password for a Setup Utility (BIOS) feature and for Startup Menu" message is set, it is set a user...
HP Notebook Reference Guide - Windows 7
Page 63
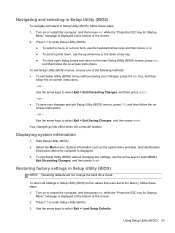
... displayed at the factory, follow these steps: 1. Use the arrow keys to select Exit > Exit Saving Changes, and then press enter. Use the arrow keys to select Exit > Exit Discarding Changes, and then press enter. - Your changes go into effect when the computer restarts. Select the Main menu. To return all settings in Setup Utility (BIOS) NOTE: Restoring defaults will not change the hard drive mode. Press f10 to select Exit > Load Setup Defaults. Start Setup Utility (BIOS). 2. Restoring factory settings...
... displayed at the factory, follow these steps: 1. Use the arrow keys to select Exit > Exit Saving Changes, and then press enter. Use the arrow keys to select Exit > Exit Discarding Changes, and then press enter. - Your changes go into effect when the computer restarts. Select the Main menu. To return all settings in Setup Utility (BIOS) NOTE: Restoring defaults will not change the hard drive mode. Press f10 to select Exit > Load Setup Defaults. Start Setup Utility (BIOS). 2. Restoring factory settings...
HP Notebook Reference Guide - Windows 7
Page 65
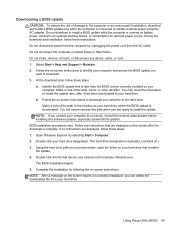
.... 1. Using Setup Utility (BIOS) 55 Do not shut down the computer or initiate Sleep or Hibernation. Downloading a BIOS update CAUTION: To reduce the risk of damage to the computer or an unsuccessful installation, download and install a BIOS update only when the computer is running on battery power, docked in an optional docking device, or connected to an optional power source. Do not download or install a BIOS update while the computer is connected to the hard drive. Select Start...
.... 1. Using Setup Utility (BIOS) 55 Do not shut down the computer or initiate Sleep or Hibernation. Downloading a BIOS update CAUTION: To reduce the risk of damage to the computer or an unsuccessful installation, download and install a BIOS update only when the computer is running on battery power, docked in an optional docking device, or connected to an optional power source. Do not download or install a BIOS update while the computer is connected to the hard drive. Select Start...
HP Notebook Reference Guide - Windows 7
Page 71
...displaying remaining charge 23 disposing 25 low battery levels 23 replacing 25 storing 24 Battery Check 22 battery information, finding 22 battery power 22 battery temperature 24 BIOS determining version 54 downloading an update 55 updating 54 Bluetooth device 2, 8 buttons media 13 power 18 volume 14 C cables 1394 32 eSATA 33 USB 31 checking audio functions 14 computer, traveling 24, 57 configuring audio for HDMI 17 configuring ExpressCards 28 connecting to a wired network 8 connecting to an existing wireless network 4 Connection Manager 3 conservation, power 24 creating a wireless connection...
...displaying remaining charge 23 disposing 25 low battery levels 23 replacing 25 storing 24 Battery Check 22 battery information, finding 22 battery power 22 battery temperature 24 BIOS determining version 54 downloading an update 55 updating 54 Bluetooth device 2, 8 buttons media 13 power 18 volume 14 C cables 1394 32 eSATA 33 USB 31 checking audio functions 14 computer, traveling 24, 57 configuring audio for HDMI 17 configuring ExpressCards 28 connecting to a wired network 8 connecting to an existing wireless network 4 Connection Manager 3 conservation, power 24 creating a wireless connection...
HP Notebook Reference Guide - Windows 7
Page 72
...9 connecting a modem cable adapter 9 selecting a location setting 10 N network cable, connecting 11 network icon 2 O operating system controls 4 optical disc inserting 39 removing 40 optical drive 34 optional external devices, using 34 P passwords set in Setup Utility (BIOS) 45 set in Windows 45 ports DisplayPort 15 expansion 34 external monitor 15 HDMI 16 Intel Wireless Display 17 VGA 15 power battery 22 conserving 24 options 19 power button 18 power meter 20 power plans customizing 21 selecting 20 viewing current 20 power switch 18 power-on password creating 47 entering 47 managing 47 power...
...9 connecting a modem cable adapter 9 selecting a location setting 10 N network cable, connecting 11 network icon 2 O operating system controls 4 optical disc inserting 39 removing 40 optical drive 34 optional external devices, using 34 P passwords set in Setup Utility (BIOS) 45 set in Windows 45 ports DisplayPort 15 expansion 34 external monitor 15 HDMI 16 Intel Wireless Display 17 VGA 15 power battery 22 conserving 24 options 19 power button 18 power meter 20 power plans customizing 21 selecting 20 viewing current 20 power switch 18 power-on password creating 47 entering 47 managing 47 power...
HP Mini 210, HP Mini 110, Compaq Mini CQ10 - Maintenance and Service Guide
Page 31
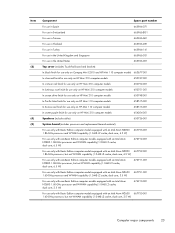
... drive finish for use only on HP Mini 210 computer models 650748-001 In Pacific blue finish for use only on HP Mini 110 computer models 658515-001 In Sonora red finish for use only on HP Mini 110 computer models 658513-001 In sweet purple finish for use only on HP Mini 210 computer models 654204-001 Speakers (include cables) 650736-001 System board (includes processor and replacement thermal material): For use...
... drive finish for use only on HP Mini 210 computer models 650748-001 In Pacific blue finish for use only on HP Mini 110 computer models 658515-001 In Sonora red finish for use only on HP Mini 110 computer models 658513-001 In sweet purple finish for use only on HP Mini 210 computer models 654204-001 Speakers (include cables) 650736-001 System board (includes processor and replacement thermal material): For use...
HP Mini 210, HP Mini 110, Compaq Mini CQ10 - Maintenance and Service Guide
Page 75
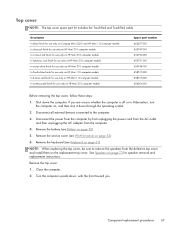
... toward you. Remove the service cover (see WLAN module on the replacement top cover. Turn the computer upside down through the operating system. 2. Remove the battery (see Keyboard on page 50). 5. Remove the keyboard (see Battery on page 61). Remove the top cover: 1. Close the computer. 2. Shut down the computer. Disconnect all external devices connected to remove the speakers from the computer. 4. See Speakers on HP Mini 210 computer models Spare part number 663677-001...
... toward you. Remove the service cover (see WLAN module on the replacement top cover. Turn the computer upside down through the operating system. 2. Remove the battery (see Keyboard on page 50). 5. Remove the keyboard (see Battery on page 61). Remove the top cover: 1. Close the computer. 2. Shut down the computer. Disconnect all external devices connected to remove the speakers from the computer. 4. See Speakers on HP Mini 210 computer models Spare part number 663677-001...
HP Mini 210, HP Mini 110, Compaq Mini CQ10 - Maintenance and Service Guide
Page 98
... download your hard drive where the BIOS update is later than those currently installed on the computer, you are already in an optional docking device, or connected to reliable external power using Setup Utility. 1. During the download and installation, follow these instructions: Do not disconnect power from the AC outlet. Start Setup Utility (BIOS). 2. b. You will need to select Main. 3. Make a note of the system BIOS currently installed. Do not shut down the computer or initiate Sleep...
... download your hard drive where the BIOS update is later than those currently installed on the computer, you are already in an optional docking device, or connected to reliable external power using Setup Utility. 1. During the download and installation, follow these instructions: Do not disconnect power from the AC outlet. Start Setup Utility (BIOS). 2. b. You will need to select Main. 3. Make a note of the system BIOS currently installed. Do not shut down the computer or initiate Sleep...

HP Mini 210, HP Mini 110, Compaq Mini CQ10 - Maintenance and Service Guide
Page 105
...Windows partition and the HP Recovery partition are permanently removed. You can use Windows Backup and Restore to the "Using a Windows 7 operating system DVD (purchased separately)" section. For additional information, refer to recover your information using the Windows 7 operating system DVD and the Driver Recovery disc (both purchased separately). When reformatting is complete, the recovery process restores the operating system, as well as the drivers, software, and utilities from starting correctly. ● f11 recovery tools: You can also use Windows Startup Repair to fix...
...Windows partition and the HP Recovery partition are permanently removed. You can use Windows Backup and Restore to the "Using a Windows 7 operating system DVD (purchased separately)" section. For additional information, refer to recover your information using the Windows 7 operating system DVD and the Driver Recovery disc (both purchased separately). When reformatting is complete, the recovery process restores the operating system, as well as the drivers, software, and utilities from starting correctly. ● f11 recovery tools: You can also use Windows Startup Repair to fix...
HP Mini 210, HP Mini 110, Compaq Mini CQ10 - Maintenance and Service Guide
Page 112
... button components 8 buttons power 8 TouchPad 10 TouchPad on/off 10 Web browser 8 C cables, service considerations 43 caps lock light 9 chipset, product description 1 components bottom 13 buttons 8 display 7 keys 6 left-side 11 lights 9 right-side 12 TouchPad 10 computer feet, locations 49 computer major components 16 computer part number 48 computer specifications 92 connectors, service considerations 43 corner cover spare part number 32 corner covers spare part number 25 D Digital Media Slot 12 display components 7 specifications 93 display assembly removal 81 spare part numbers...
... button components 8 buttons power 8 TouchPad 10 TouchPad on/off 10 Web browser 8 C cables, service considerations 43 caps lock light 9 chipset, product description 1 components bottom 13 buttons 8 display 7 keys 6 left-side 11 lights 9 right-side 12 TouchPad 10 computer feet, locations 49 computer major components 16 computer part number 48 computer specifications 92 connectors, service considerations 43 corner cover spare part number 32 corner covers spare part number 25 D Digital Media Slot 12 display components 7 specifications 93 display assembly removal 81 spare part numbers...
HP Mini 210, HP Mini 110, Compaq Mini CQ10 - Maintenance and Service Guide
Page 113
... monitor 11 monitor port 11 product description 4 USB 11, 12 power button 8 power connector 11 power connector cable removal 76 spare part number 24, 32, 76 power cord set requirements 100 spare part numbers 29, 30 power light 9 power requirements, product description 4 processor, product description 1 product description audio 2 chipset 1 display panel 1 Ethernet 2 external media cards 3 graphics 1 hard drives 2 keyboard 4 memory module 2 microphone 2 operating system 4 pointing device 4 ports 4 power requirements 4 processors 1 product name 1 security 4 serviceability 5 video 2 wireless...
... monitor 11 monitor port 11 product description 4 USB 11, 12 power button 8 power connector 11 power connector cable removal 76 spare part number 24, 32, 76 power cord set requirements 100 spare part numbers 29, 30 power light 9 power requirements, product description 4 processor, product description 1 product description audio 2 chipset 1 display panel 1 Ethernet 2 external media cards 3 graphics 1 hard drives 2 keyboard 4 memory module 2 microphone 2 operating system 4 pointing device 4 ports 4 power requirements 4 processors 1 product name 1 security 4 serviceability 5 video 2 wireless...

HP Mini 210, HP Mini 110, Compaq Mini CQ10 - Maintenance and Service Guide
Page 114
... serviceability, product description 5 SIM, removal 51 sleeve, spare part numbers 29, 30 speakers removal 73 spare part number 23, 31, 73 specifications computer 92 display 93 hard drive 94 system board removal 74 spare part numbers 23, 41, 42, 74 W warranty period 49 Web browser button 8 webcam 7 webcam light 7 webcamera/microphone module removal 83 spare part number 26, 32, 83 Windows applications key 6 Windows logo key 6 wireless antenna locations 7 removal 85 spare part number 26, 32, 86 wireless light 9 wireless, product description 3 WLAN module removal 52 spare part numbers 24...
... serviceability, product description 5 SIM, removal 51 sleeve, spare part numbers 29, 30 speakers removal 73 spare part number 23, 31, 73 specifications computer 92 display 93 hard drive 94 system board removal 74 spare part numbers 23, 41, 42, 74 W warranty period 49 Web browser button 8 webcam 7 webcam light 7 webcamera/microphone module removal 83 spare part number 26, 32, 83 Windows applications key 6 Windows logo key 6 wireless antenna locations 7 removal 85 spare part number 26, 32, 86 wireless light 9 wireless, product description 3 WLAN module removal 52 spare part numbers 24...
HP Mini 200 - Maintenance and Service Guide
Page 22
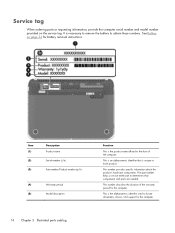
... specific information about the product's hardware components. See Battery on the service tag. Item (1) (2) (3) Description Product name Serial number (s/n) Part number/Product number (p/n) (4) Warranty period (5) Model description Function This is unique to the front of the warranty period for the computer. 14 Chapter 3 Illustrated parts catalog It is the alphanumeric identifier used to determine what components and parts are needed. The part number helps a service technician to locate documents, drivers...
... specific information about the product's hardware components. See Battery on the service tag. Item (1) (2) (3) Description Product name Serial number (s/n) Part number/Product number (p/n) (4) Warranty period (5) Model description Function This is unique to the front of the warranty period for the computer. 14 Chapter 3 Illustrated parts catalog It is the alphanumeric identifier used to determine what components and parts are needed. The part number helps a service technician to locate documents, drivers...
HP Mini 200 - Maintenance and Service Guide
Page 79
... has been downloaded to reliable external power using Setup Utility. 1. Start Setup Utility (BIOS). 2. Do not insert, remove, connect, or disconnect any software updates, especially system BIOS updates. Downloading a BIOS update CAUTION: To reduce the risk of the path to select Exit > Exit Discarding Changes, and then press enter. Follow the on-screen instructions to identify your hard drive. b. Follow the on-screen instructions to download your computer. Using Setup Utility 71 Identify the BIOS update that is running on battery power, docked in Windows) or...
... has been downloaded to reliable external power using Setup Utility. 1. Start Setup Utility (BIOS). 2. Do not insert, remove, connect, or disconnect any software updates, especially system BIOS updates. Downloading a BIOS update CAUTION: To reduce the risk of the path to select Exit > Exit Discarding Changes, and then press enter. Follow the on-screen instructions to identify your hard drive. b. Follow the on-screen instructions to download your computer. Using Setup Utility 71 Identify the BIOS update that is running on battery power, docked in Windows) or...
HP Mini 200 - Maintenance and Service Guide
Page 86
... programs using Startup Repair, follow these steps: CAUTION: Using Startup Repair completely erases hard drive contents and reformats the hard drive. When reformatting is complete, the recovery process restores the operating system, as well as the drivers, software, and utilities from starting correctly. ● f11 recovery tools: You can use the system repair discs you previously created (select models only), you must recover your original hard drive image. NOTE: If the Windows partition and the HP Recovery partition are unable to boot (start...
... programs using Startup Repair, follow these steps: CAUTION: Using Startup Repair completely erases hard drive contents and reformats the hard drive. When reformatting is complete, the recovery process restores the operating system, as well as the drivers, software, and utilities from starting correctly. ● f11 recovery tools: You can use the system repair discs you previously created (select models only), you must recover your original hard drive image. NOTE: If the Windows partition and the HP Recovery partition are unable to boot (start...
HP Mini 200 - Maintenance and Service Guide
Page 93
... audio-out jack 11 B base enclosure, spare part number 17, 25 battery removal 34 spare part numbers 17, 24, 34 battery bay 12 battery/service cover release latch 12 bottom components 12 button components 7 buttons power 7 TouchPad 9 TouchPad on/off 9 Web browser 7 C cables, service considerations 27 caps lock light 8 chipset, product description 1 components bottom 12 buttons 7 display 6 keys 5 left-side 10 lights 8 right-side 11 TouchPad 9 computer feet, locations 33 computer major components 15 computer part number 32 computer specifications...
... audio-out jack 11 B base enclosure, spare part number 17, 25 battery removal 34 spare part numbers 17, 24, 34 battery bay 12 battery/service cover release latch 12 bottom components 12 button components 7 buttons power 7 TouchPad 9 TouchPad on/off 9 Web browser 7 C cables, service considerations 27 caps lock light 8 chipset, product description 1 components bottom 12 buttons 7 display 6 keys 5 left-side 10 lights 8 right-side 11 TouchPad 9 computer feet, locations 33 computer major components 15 computer part number 32 computer specifications...
HP Mini 200 - Maintenance and Service Guide
Page 94
... monitor 10 monitor port 10 product description 3 USB 10, 11 power button 7 power connector 10 power connector cable removal 57 spare part number 17, 24, 57 power cord set requirements 81 spare part numbers 22, 23 power light 8 power requirements, product description 3 processor, product description 1 product description audio 2 chipset 1 display panel 1 Ethernet 2 external media cards 3 graphics 1 hard drives 1 keyboard 3 memory module 1 microphone 2 operating system 4 pointing device 3 ports 3 power requirements 3 processors 1 product name 1 security 3 serviceability 4 video 2 wireless...
... monitor 10 monitor port 10 product description 3 USB 10, 11 power button 7 power connector 10 power connector cable removal 57 spare part number 17, 24, 57 power cord set requirements 81 spare part numbers 22, 23 power light 8 power requirements, product description 3 processor, product description 1 product description audio 2 chipset 1 display panel 1 Ethernet 2 external media cards 3 graphics 1 hard drives 1 keyboard 3 memory module 1 microphone 2 operating system 4 pointing device 3 ports 3 power requirements 3 processors 1 product name 1 security 3 serviceability 4 video 2 wireless...


