HP TouchSmart Desktop PCs - Troubleshooting and Maintenance Guide
Page 13
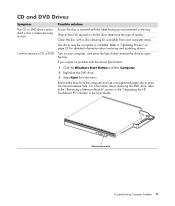
.... CD and DVD Drives Symptom Possible solution The CD or DVD drive cannot read a disc or takes too long to the "Removing a Memory Module" section in the "Upgrading the HP TouchSmart PC" chapter in the tray. The driver may be corrupted or outdated. Clean the disc with the actual Eject button: 1 Click the...
.... CD and DVD Drives Symptom Possible solution The CD or DVD drive cannot read a disc or takes too long to the "Removing a Memory Module" section in the "Upgrading the HP TouchSmart PC" chapter in the tray. The driver may be corrupted or outdated. Clean the disc with the actual Eject button: 1 Click the...
HP TouchSmart Desktop PCs - User Guide
Page 4
... Opening and Closing the HP TouchSmart PC 45 Preparing the HP TouchSmart PC 45 Before opening the HP TouchSmart PC 46 After closing the HP TouchSmart PC 46 Removing the rear cover ...47 Replacing the rear cover ...48 Removing the vertical cover ...48 Replacing the vertical cover ...49 Adding Memory...49 Removing a memory module...49 Installing a memory module ...50 Removing and...
... Opening and Closing the HP TouchSmart PC 45 Preparing the HP TouchSmart PC 45 Before opening the HP TouchSmart PC 46 After closing the HP TouchSmart PC 46 Removing the rear cover ...47 Replacing the rear cover ...48 Removing the vertical cover ...48 Replacing the vertical cover ...49 Adding Memory...49 Removing a memory module...49 Installing a memory module ...50 Removing and...

HP TouchSmart Desktop PCs - User Guide
Page 6
...Audio/Video Connectors On/Standby Built-in -1 two-slot memory card reader where you can cause mechanical problems. Headphone connector - HP SmartCenter button - slot for the photo to show current activity for information on your HP TouchSmart PC, or put it to connect to a wireless ...home network that connects all kinds of the HP TouchSmart PC. 2 HP TouchSmart PC User Guide use it in ...
...Audio/Video Connectors On/Standby Built-in -1 two-slot memory card reader where you can cause mechanical problems. Headphone connector - HP SmartCenter button - slot for the photo to show current activity for information on your HP TouchSmart PC, or put it to connect to a wireless ...home network that connects all kinds of the HP TouchSmart PC. 2 HP TouchSmart PC User Guide use it in ...

HP TouchSmart Desktop PCs - User Guide
Page 38
... transfer cable that is not listed as a digital photo or video camera, directly to the HP TouchSmart PC by using various methods. The easy-to-use the accessible card readers on your PC: 1 Insert a memory card into the DVD drive. 2 Move your pictures to a folder on the front of ... edit, and print them. Most digital picture files you copy or download from the memory cards used by digital cameras and other digital imaging devices by using the memory card reader (select models only). 34 HP TouchSmart PC User Guide You can use touch display lets you view and print photos as...
... transfer cable that is not listed as a digital photo or video camera, directly to the HP TouchSmart PC by using various methods. The easy-to-use the accessible card readers on your PC: 1 Insert a memory card into the DVD drive. 2 Move your pictures to a folder on the front of ... edit, and print them. Most digital picture files you copy or download from the memory cards used by digital cameras and other digital imaging devices by using the memory card reader (select models only). 34 HP TouchSmart PC User Guide You can use touch display lets you view and print photos as...

HP TouchSmart Desktop PCs - User Guide
Page 39
... Touch program, a message appears asking if you select. Using the HP TouchSmart PC 35 HP Photosmart Touch Main Window Button or Toolbar Function Refresh the HP TouchSmart PC for any new photos that were added to your hard disk drive. Insert a memory card, external hard disk drive, CD, DVD, or digital camera. 3 Press the Import photos...
... Touch program, a message appears asking if you select. Using the HP TouchSmart PC 35 HP Photosmart Touch Main Window Button or Toolbar Function Refresh the HP TouchSmart PC for any new photos that were added to your hard disk drive. Insert a memory card, external hard disk drive, CD, DVD, or digital camera. 3 Press the Import photos...
HP TouchSmart Desktop PCs - User Guide
Page 50
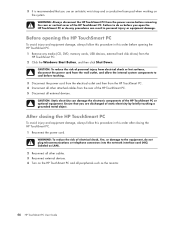
...Shut Down. Before opening the HP TouchSmart PC. 1 Remove any procedures can damage the electronic components of the HP TouchSmart PC or optional equipment. WARNING: To reduce the risk of electrical shock, fire, or damage to the equipment, do any media (CD, DVD, memory cards, USB devices, external hard... disk drives) from the wall outlet, and allow the internal system components to do so before opening the HP TouchSmart PC To avoid injury and equipment damage, always follow this procedure...
...Shut Down. Before opening the HP TouchSmart PC. 1 Remove any procedures can damage the electronic components of the HP TouchSmart PC or optional equipment. WARNING: To reduce the risk of electrical shock, fire, or damage to the equipment, do any media (CD, DVD, memory cards, USB devices, external hard... disk drives) from the wall outlet, and allow the internal system components to do so before opening the HP TouchSmart PC To avoid injury and equipment damage, always follow this procedure...
HP TouchSmart Desktop PCs - User Guide
Page 51
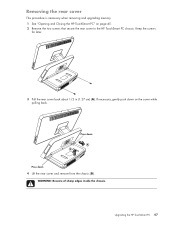
Keep the screws for later. + - 3 Pull the rear cover back about 1/2 in (1.27 cm) (A). Upgrading the HP TouchSmart PC 47 If necessary, gently push down on page 45. 2 Remove the two screws that secure the rear cover to the HP TouchSmart PC chassis. WARNING: Beware of sharp edges inside the chassis. Removing the rear cover This procedure is necessary when removing and upgrading memory. 1 See "Opening and Closing the HP TouchSmart PC" on the cover while pulling back. 4 Lift the rear cover and remove from the chassis (B).
Keep the screws for later. + - 3 Pull the rear cover back about 1/2 in (1.27 cm) (A). Upgrading the HP TouchSmart PC 47 If necessary, gently push down on page 45. 2 Remove the two screws that secure the rear cover to the HP TouchSmart PC chassis. WARNING: Beware of sharp edges inside the chassis. Removing the rear cover This procedure is necessary when removing and upgrading memory. 1 See "Opening and Closing the HP TouchSmart PC" on the cover while pulling back. 4 Lift the rear cover and remove from the chassis (B).
HP TouchSmart Desktop PCs - User Guide
Page 53
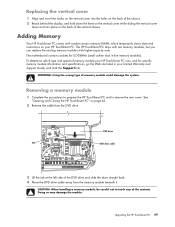
... 45. 2 Remove the cable from the memory module beneath it. Upgrading the HP TouchSmart PC 49 Adding Memory Your HP TouchSmart PC comes with higher-capacity ones. The HP TouchSmart PC ships with two memory modules, but you can replace the existing memory modules with random access memory (RAM), which type and speed of memory module your HP TouchSmart PC. Doing so may damage the...
... 45. 2 Remove the cable from the memory module beneath it. Upgrading the HP TouchSmart PC 49 Adding Memory Your HP TouchSmart PC comes with higher-capacity ones. The HP TouchSmart PC ships with two memory modules, but you can replace the existing memory modules with random access memory (RAM), which type and speed of memory module your HP TouchSmart PC. Doing so may damage the...
HP TouchSmart Desktop PCs - User Guide
Page 54
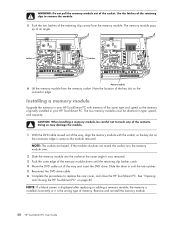
... the module slot does not match the socket, turn the memory module over. 2 Slide the memory module into the socket at an angle. Remove and reinstall the memory module. 50 HP TouchSmart PC User Guide Use the latches of memory. Installing a memory module Upgrade the memory in your HP TouchSmart PC. NOTE: The sockets are keyed. NOTE: If a blank screen...
... the module slot does not match the socket, turn the memory module over. 2 Slide the memory module into the socket at an angle. Remove and reinstall the memory module. 50 HP TouchSmart PC User Guide Use the latches of memory. Installing a memory module Upgrade the memory in your HP TouchSmart PC. NOTE: The sockets are keyed. NOTE: If a blank screen...

HP TouchSmart Desktop PCs - User Guide
Page 58
... GS-32 buttons, keyboard customizing GS-25 C calendar using HP SmartCalendar UG- 29 viewing UG- 30 camera using built-in Web camera UG- 24 Web camera with indicator UG- 1 card reader, memory GS-61 carpal tunnel syndrome GS-5 CD and DVD Drive ...customizing keyboard buttons GS-25 D Declaration of Conformity, WS- 9 desktop switching from Media Center GS-80 digital camera, using HP Photosmart Touch UG- 34 digital images GS-129 working with UG- 34 digital picture GS-61, GS-129 digital video ... GS-116 language GS-113 playing in Media Center GS-112 DVD Play, features GS-46 54 HP TouchSmart PC User Guide
... GS-32 buttons, keyboard customizing GS-25 C calendar using HP SmartCalendar UG- 29 viewing UG- 30 camera using built-in Web camera UG- 24 Web camera with indicator UG- 1 card reader, memory GS-61 carpal tunnel syndrome GS-5 CD and DVD Drive ...customizing keyboard buttons GS-25 D Declaration of Conformity, WS- 9 desktop switching from Media Center GS-80 digital camera, using HP Photosmart Touch UG- 34 digital images GS-129 working with UG- 34 digital picture GS-61, GS-129 digital video ... GS-116 language GS-113 playing in Media Center GS-112 DVD Play, features GS-46 54 HP TouchSmart PC User Guide
HP TouchSmart Desktop PCs - User Guide
Page 60
...do in Music GS-89 in Radio GS-104 media control buttons UG- 2 memory card, formatting GS-65 memory card reader UG- 34, GS- 129 card types UG- 2, GS-61 in...memory, upgrade UG- 49 microphone using UG- 24 microphone array UG- 1 mouse autoscroll GS-28 cursor speed GS-29 panning GS-28 replace batteries UG- 11 setting up UG- 8 storing UG- 1 switching button functions GS-29 using UG- 11 56 HP TouchSmart...- 2 Norton Internet Security configuring GS-44 registering GS-44 note deleting notes in HP SmartCalendar UG- 33 editing in HP SmartCalendar UG- 33 moving notes to calendar UG- 33 O Off button, See ...
...do in Music GS-89 in Radio GS-104 media control buttons UG- 2 memory card, formatting GS-65 memory card reader UG- 34, GS- 129 card types UG- 2, GS-61 in...memory, upgrade UG- 49 microphone using UG- 24 microphone array UG- 1 mouse autoscroll GS-28 cursor speed GS-29 panning GS-28 replace batteries UG- 11 setting up UG- 8 storing UG- 1 switching button functions GS-29 using UG- 11 56 HP TouchSmart...- 2 Norton Internet Security configuring GS-44 registering GS-44 note deleting notes in HP SmartCalendar UG- 33 editing in HP SmartCalendar UG- 33 moving notes to calendar UG- 33 O Off button, See ...


