HP TouchSmart Desktop PCs - User Guide
Page 50
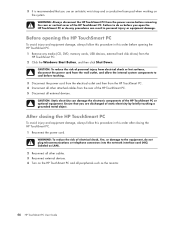
...shock or hot surfaces, disconnect the power cord from the wall outlet, and allow the internal system components to do so before removing the rear or vertical cover of the HP TouchSmart PC. CAUTION: Static electricity can result in this procedure in personal injury or equipment damage....and equipment damage, always follow this procedure in this order before touching. 3 Disconnect the power cord from the electrical outlet and then from the HP TouchSmart PC. 4 Disconnect all other cables. 3 Reconnect external devices. 4 Turn on the system. 3 It is recommended that you are discharged of...
...shock or hot surfaces, disconnect the power cord from the wall outlet, and allow the internal system components to do so before removing the rear or vertical cover of the HP TouchSmart PC. CAUTION: Static electricity can result in this procedure in personal injury or equipment damage....and equipment damage, always follow this procedure in this order before touching. 3 Disconnect the power cord from the electrical outlet and then from the HP TouchSmart PC. 4 Disconnect all other cables. 3 Reconnect external devices. 4 Turn on the system. 3 It is recommended that you are discharged of...
HP TouchSmart Desktop PCs - User Guide
Page 52
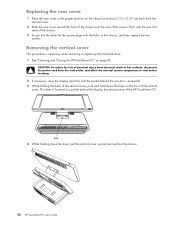
... CAUTION: To reduce the risk of personal injury from electrical shock or hot surfaces, disconnect the power cord from the wall outlet, and allow the internal system components to cool before touching. 2 If necessary, raise the display (monitor) until the rear of the cover is flush with the rear I/O... from the vertical cover. 2 Slide the rear cover toward the front of the chassis until the pocket behind the display (monitor) portion of the HP TouchSmart PC. This lever is located in the chassis, and then replace the two screws. Lever 4 While holding the back of the vertical cover, push...
... CAUTION: To reduce the risk of personal injury from electrical shock or hot surfaces, disconnect the power cord from the wall outlet, and allow the internal system components to cool before touching. 2 If necessary, raise the display (monitor) until the rear of the cover is flush with the rear I/O... from the vertical cover. 2 Slide the rear cover toward the front of the chassis until the pocket behind the display (monitor) portion of the HP TouchSmart PC. This lever is located in the chassis, and then replace the two screws. Lever 4 While holding the back of the vertical cover, push...


